Therapy withVR Documentation
Customizable virtual reality speaking situations for professionals, researchers, and educators - controlled in real time from your laptop.
What Is Therapy withVR?
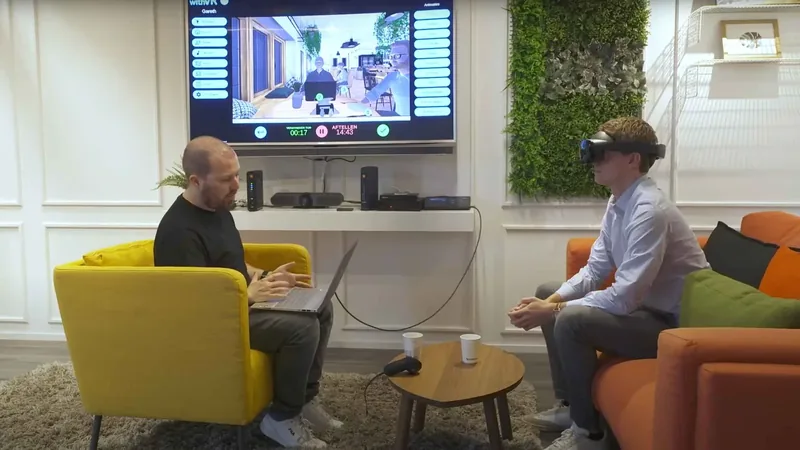
Therapy withVR is a customizable virtual reality tool for speech-language professionals, researchers, and educators. It gives you real-time control over virtual speaking situations - customized to how each individual perceives their own experiences.
Using a standard laptop and a Meta Quest headset, you can create, shape, and control immersive speaking environments while the individual experiences them from the inside.
- Gareth Walkom, Founder of withVR
What It Makes Possible
Role-play inside a clinic does not create the same feelings, speech, and responses as the real world. Going out into the real world is unpredictable - you cannot control how strangers will respond.
Therapy withVR sits in between. It creates a safe, controlled space where individuals can practice what matters - at their own pace, in their own time, taking steps as small or as large as they need. Research shows that VR speaking experiences closely match real-life equivalents.
Therapy withVR is a customizable tool. It does not provide therapy, assessment, diagnosis, or treatment of any kind. There are no built-in right or wrong approaches. How you use it is entirely up to you.
Who It Is For
Professionals
Shape social situations around individual goals with full real-time control over every avatar, sound, and interaction.
Researchers
Prepare controlled scenarios, use different profiles for different protocols, and simulate behaviors comparable to real life.
Educators
Give students practical experience before they graduate and adjust interaction difficulty to match their pace.
Communication Areas
- Speech - supporting individuals who experience stuttering, cluttering, apraxia, dysarthria, selective mutism, and more
- Voice - supporting individuals exploring transgender voice, voice differences, and more
- Hearing - supporting individuals who experience hyperacusis and related listening situations
What You Need
Therapy withVR has two parts: the VR App (installed on a Meta Quest VR headset) and the Web App (accessed in a browser at the withVR web app).
| Component | Requirements |
|---|---|
| VR headset | Meta Quest 2, Meta Quest Pro, Meta Quest 3, or Meta Quest 3S. See Getting Started > Choosing Your VR Headset. |
| Computer | Any laptop or desktop computer with a web browser and internet connection. Any operating system is compatible (Windows, macOS, Linux, ChromeOS). |
| Web browser | Any modern web browser (Chrome, Firefox, Safari, Edge, and others). No plugins or extensions required. |
| Internet | Required for both the VR headset and the computer. A standard WiFi connection is sufficient. |
| Therapy withVR account | One account per VR headset. Contact hello@withvr.app to get started. |
Compliance and Data
GDPR (EU/EEA)
Therapy withVR is GDPR compliant. All data is stored on servers in Frankfurt, Germany (Google Cloud, EU). A Data Processing Agreement (DPA) is available on request. The platform processes user account data (names, email addresses) and session data, all within the European Economic Area. For more detail, see the Privacy Policy.
HIPAA (US)
Therapy withVR is designed so that Protected Health Information (PHI) does not enter the system. No client names, diagnoses, health records, or other identifiable health data is collected or stored by the platform. Users are instructed not to enter personally identifiable information about the individuals they work with. Because PHI does not enter the system, a Business Associate Agreement (BAA) is not required. This is an architectural choice - the platform is built to avoid PHI entirely, rather than to receive and protect it.
FERPA (US)
Therapy withVR does not collect or store student education records. No student names, grades, assessment results, or other education records are held by the platform. Users are instructed not to enter personally identifiable information about the individuals they work with. A FERPA agreement is available for school districts that require one. Because student education records do not enter the system, the platform falls outside the scope of FERPA's data protection requirements by design.
Data Security
- All data is stored on servers in Frankfurt, Germany (Google Cloud, EU)
- No audio or video from sessions is ever recorded or stored
- Profile names are encrypted in the database
- Therapy withVR never has access to user passwords - these are managed entirely by Firebase Authentication
- Only the Therapy withVR team has administrative access to the database - no third parties
Data Retention
Your data is kept for as long as your account is active. If your subscription ends or your account is canceled, different types of data are retained for different periods:
- Account and subscription data - retained for 5 years after your subscription ends
- Session and profile data - retained for 3 years after your subscription ends
- Billing and transaction records - retained for 7 years (required by Belgian accounting law)
These retention periods allow you to reactivate your account and access previous data, and meet legal and compliance obligations. For more detail, see the Privacy Policy.
Exporting Your Data
You can access and review your session data at any time through the web app during an active subscription. To request a full data export, email hello@withvr.app. Exports are provided within 30 days of your request.
Requesting Deletion of Your Data
You have the right to request deletion of your personal data. Contact legal@withvr.app. Deletion requests are handled in accordance with applicable data protection law for your region - for example, within one month under GDPR.
Contact and Support
| Contact | |
|---|---|
| General enquiries and access requests | hello@withvr.app |
| Technical support | support@withvr.app |
| Legal and data protection | legal@withvr.app |
Website: withvr.app
What's New
The latest changes, known issues, and version history. Click any version to expand its changelog.
Known Issues
The following issues are known and being worked on. You do not need to report these.
| Issue | Details |
|---|---|
| Animals not showing for non-English languages | The Animal situation only displays the animal for users whose Avatar Language is set to an English variant. Other languages currently show an empty room. |
| Waiter button in the Café does not always show | The briefcase icon ("Go To Table") for the waiter avatar behind the bar does not always appear during a session. If this happens, refresh the web app in your browser and try again. |
| Object menu in the Room situation is positioned incorrectly | The Objects tab menu in the Room situation appears in the wrong position on screen. The controls still work, but they may overlap with other elements. |
Version History
v4.0.0 Current versionFebruary 1, 2026
The avatar company (Ready Player Me) shut down at the end of January, requiring many foundational elements of the software to be rebuilt quickly. While updating these behind-the-scenes systems, 31 new languages and dialects were added, along with many improvements and bug fixes. All existing avatars remain and are secure, but creating new custom avatars is not available at this time.
New Features
- 31 new languages - the total number of supported languages and dialects has increased from 21 to 52. No matter which language you select as your account language, you can now translate any text to any of these languages, and the avatars will say it in that language
Improvements
- Avatar system rebuilt - the previous avatar service provider shut down, so the underlying avatar system has been rebuilt. You can continue to use your current avatars, but creating new custom avatars is not available at this time
- Faster avatar loading - avatars now load much faster, especially in the VR App. You can see the speed improvement by opening the VR App, waiting for all avatars to load, closing it, and reopening it
- Improved lighting in some situations - several situations that had poor lighting have been corrected
- Interface sizing fixed - the interface buttons and elements no longer appear stretched or misplaced on smaller or differently sized screens
- Sharper icons and text - icons and text that previously appeared blurred are now high quality and crisp throughout
- Other interface improvements - many smaller visual and layout refinements across the Web App and VR App
- Backend updates - core services that the software relies on have been updated to their latest versions. These are behind-the-scenes changes that pave the way for future updates
Bug Fixes
- Supermarket situation now works inside VR - previously the Supermarket would not load correctly in the VR App
- Animal now appears correctly - for some users the animal was not showing in the Animal situation
- Children avatars positioned correctly - children avatars that appeared in strange positions in the newer situations are now placed properly
- Sentences now save reliably - an issue where sentences were not always being saved to the database has been fixed
- Account creation and sign-in errors fixed - several errors during the sign-up and first sign-in process have been resolved
v3.0.1November 9, 2025
Improvements
- Best voices assigned by default - new accounts are now given the highest quality voices available in their language automatically
- Updated Arabic translation - the Arabic interface translation has been corrected and improved
Bug Fixes
- New avatars now load correctly - avatars that were saved but failed to load due to a format change now appear as expected
- Avatars no longer load in wrong positions - switching between situations no longer causes avatars to appear in incorrect locations
- Avatars speak and look correctly - an issue where the software miscalculated avatar positions, preventing them from speaking or making eye contact, has been fixed
- French avatars no longer say random symbols - a text-to-speech encoding issue that caused French avatars to occasionally speak random symbols has been resolved
- AI Prompts no longer overwrite sentence text - clicking an AI Prompt word no longer replaces the text in the input bar
- AI Prompts now track prepared sentences - clicking a pre-prepared sentence now correctly updates the conversation context used by AI Prompts
- Animal situation no longer changes avatar voice - entering the Animal situation no longer resets your avatar's voice settings
- Correct voices assigned at sign-up - new accounts now receive avatar voices matching their selected Avatar Language
- Language variants load correctly - languages with regional variants (such as Portuguese and Serbian) now display the correct interface language on first load
- Last name no longer typed backwards - the sign-up form no longer reverses the last name as it is typed
v3.0.0September 21, 2025
The biggest update to date - the number of situations doubled from 6 to 12. These new situations were co-created with individuals and organizations and include several highly requested environments. Google also updated their Text-to-Speech voices, and the software now loads from the cloud for faster startup.
New Features
- Speaking Circle situation - a circle of 2 to 12 chairs, spaced automatically based on the number you choose
- Animal situation - an interaction space with a kitten or bunny
- Room situation - a fully customizable space where you can change the width, length, height, and color of the walls, floor, and ceiling, plus avatar desk positioning and lighting
- Auditorium situation - stand on a stage in front of 197 seats. Up to six avatars can be placed in the front seats, with more seat positions coming soon
- Reception situation - 1 to 2 avatars behind a reception desk
- Supermarket situation - a store space where you can interact with a supermarket employee
- Upgraded avatar voices - Google recently updated their Text-to-Speech voices. You now have access to the latest voices by selecting the Voice Type "CHIRP3" or "CHIRP3-HD" in the voice settings. These new voices sound significantly more natural. Note that pitch, rate, and emotional speech adjustments are not available for these new voice types
- Cloud-based situation loading - situations and some other elements now load from the cloud, meaning the Web App opens much faster. The trade-off is that loading a specific situation takes a moment longer. This is an ongoing improvement
- Avatar caching - avatars are saved to your browser cache (memory) so they load faster on return visits
- Credit text - if a situation was co-created with an individual or organization, credit text appears in the bottom left of the setup screen
Improvements
- Avatars load from database - avatars now load from the local database rather than the avatar platform, which was sometimes too slow
- Improved speaking animations - avatars now have a selection of animations, and one randomly plays when they speak
- Create avatar with photo - you can create an avatar from a photo again
- Voice names simplified - voice names are shorter and easier to differentiate, with visible language names and voice gender
- Improved dropdown menus - dropdown menus have a cleaner appearance
- More avatar loading info - more detail is shown when avatars are loading, which helps if they get stuck
- Art moved to main menu - the art gallery is now in a more logical place in the main menu
- Setup tabs redesigned - the setup tabs (avatars, objects, sentences) have a cleaner look
- Improved Arabic font - the Arabic font now contains more of the characters used in Arabic
- AI caution text visibility - the AI privacy caution text is no longer hidden by long translations
- AI Prompts gap fixed - a small gap in the AI Prompts panel has been removed
- Automatic sentence creation - if a situation has never been used in the selected language, translations are created automatically
- Green buttons changed to blue - green UI buttons are now blue for a more consistent appearance
- Avatar position fallback - if an avatar position number becomes incorrect, the system automatically chooses the nearest valid position to prevent crashes
- Whisper no longer requires refresh - you can now use Whisper without needing to refresh the Web App
- Profile and situation name overflow - long names now show as ellipses instead of overlapping
- Updated translations - all languages now have updated translations
- Unity Services removed - Unity Services has been removed from the software, so Unity service outages no longer affect the platform
Bug Fixes
- Arabic font generation fixed - a bug preventing the Arabic font from being generated in some locations has been resolved
- Sentence group names can be changed - an issue preventing sentence group names from being edited has been fixed
- Whisper now works correctly - a bug preventing Whisper from functioning has been resolved
- Bartender talk animation restored - the bartender's talking animation was missing and has been restored
- Voice changes apply correctly - changing language or voice type now correctly updates the avatar's voice
- Voices no longer change randomly - voices no longer switch to a different voice unexpectedly
- Test voice works reliably - testing an avatar's voice now works in all instances
- Main menu crash fixed - some users experienced a crash when returning to the main menu, which has been resolved
- Peru connectivity fixed - connectivity issues specific to Peru have been resolved
- Avatars no longer say extra words - a bug in the AI that sometimes added extra words during speech has been fixed
- Waiter crash fixed - a crash that occurred when controlling the waiter in the Café has been resolved
- Create avatar voice testing fixed - you can now test the voice when creating a new avatar
- Back-to-front typing fixed - text is no longer typed in reverse order
- Double avatar removal bug fixed - removing an avatar from the same position twice no longer causes an error
v2.4.0April 30, 2025
This was an emergency fix. The third-party avatar platform (Ready Player Me) experienced an issue that prevented avatars from loading in any web application that used their service, including Therapy withVR. A workaround was built to bring the software back online. If you previously created custom avatars, they may take slightly longer to load the first time after this update while the system downloads and re-uploads them in the background.
Bug Fixes
- Avatar loading fixed - a workaround was implemented to resolve avatars not loading due to the third-party avatar platform outage. All existing avatars remain and are secure. You can also continue to create new avatars
v2.3.0April 5, 2025
The main feature in this update is Speaker Grammar, which solves a problem in gendered languages: previously, users had to prepare separate sentences for masculine and feminine avatars, and AI would only generate one-gendered output, which could break the feeling of presence.
New Features
- Speaker Grammar - in languages where grammar changes based on the speaker's gender (Arabic, Czech, Greek, Spanish, French, Italian, Portuguese, Polish, and Slovak), avatars now automatically adjust sentence grammar to match their own gender. For example, in Spanish a masculine avatar says "Estoy listo" while a feminine avatar automatically changes it to "Estoy lista." In French, a masculine avatar says "Je suis avocat" while a feminine avatar says "Je suis avocate." This means you can prepare a single sentence and it works correctly regardless of which avatar speaks it. For now, this feature only considers the gender of the avatar speaking - it does not yet account for the gender of the person inside VR or other avatars. This feature requires OpenAI to be enabled, and can be found in Settings, OpenAI, then the Extra section
Improvements
- Emotional Speech improved - avatar voice changes based on emotion now sound more natural, with smoother transitions. Previous issues with long breaks between words and abrupt changes in volume, pitch, and speed have been refined
- Purple buttons removed - a few remaining purple buttons from the previous update have been changed
- Spanish translation fixes - some Spanish translations that contained extra numbers have been corrected
- EULA updated - the End User License Agreement has been updated
- Educational Use Policy - a new Educational Use Policy has been added to the website
Bug Fixes
- French symbols fixed - avatars no longer say random symbols like "&MBSP" and " " after finishing speaking in French
- Additional words in other languages fixed - avatars no longer say extra words in other languages
- Bakery sentence groups restored - sentence groups 1-9 were missing in the Bakery and have been restored
- No-avatar crash fixed - starting a situation with no avatars placed no longer causes a crash
- Avatar glasses restored - glasses that were missing for some avatars have been restored
- Speak button fixed - the speak button now works correctly
- Read return key error fixed - pressing the return key to create text to read no longer causes an error
v2.2.0February 28, 2025
This update addressed the biggest challenge users reported: speed when selecting the next action during a session. The session interface has been completely reorganized, and a new AI Quick Responses feature lets you keep conversations flowing with a single click. The old left-side menu has been removed, sentence groups moved to the left, sounds moved to the bottom, and a new set of response prompts sits on the right.
New Features
- Redesigned session interface - the left-side menu (Animations, Emotions, Speak, Read, Sounds, Goal, Icons) has been removed. Sentence groups are now on the left side. Emotions appear on the left when an avatar is selected, arranged with the most positive at the top, neutral in the middle, and most negative at the bottom. Sounds are now at the bottom. The back button has been removed. Pause, stop audio, and finish buttons are on the right. The time bar is shorter, with elapsed and countdown times on either side
- AI Quick Responses - 14 prompt buttons on the right side of the session screen that let you quickly continue a conversation. The prompts are: New Topic, Acknowledge, Clarify, Validate, Encourage, Compliment, Thank, Apologize, Elaborate, Reflect, Hypothesize, Contrast, Transition, and Summarize. Click any prompt and the AI generates a response based on the current conversation topic, which the selected avatar says immediately. Each prompt also has a robot icon - clicking that generates three questions at the top of the screen so you can choose which one the avatar says. This feature requires OpenAI and Generate Text to be enabled in Settings
- Save text to read - next to each saved sentence, there is now a laptop icon. Click it and that sentence immediately appears on the laptop inside VR. The old Read button has been replaced - you now click directly on the laptop in the VR preview to add text. You can also type a topic in the text box at the top and press the book icon to generate text for the laptop using AI
- 20 new sounds in 8 groups - the sound library has expanded from 3 groups to 8 groups with 20 additional sounds. Sounds appear at the bottom of the session screen, and some are only available in situations where they make sense (for example, the dishwasher is available in the Kitchen Table but not the Classroom). The groups are: Ambiance Sounds (Low Ambiance, Medium Ambiance, High Ambiance, Coffee Machine, School Bell, Music), Eat and Drink Sounds (Eating, Eating (smacking), Drinking), Environmental Sounds (Chair Moving, Crying Baby, Cutlery, Pen Click, Glass Break, Dishwasher, Microwave Finished), Technology Sounds (iPhone Notification, iPhone Ringtone, iPhone Receive Message, iPhone Send Message), Disruption Sounds (Cough, Cough (sick), Sneeze (feminine), Sneeze (masculine), Laugh (feminine), Laugh (masculine), Laugh (child), Fart), Heartbeat Sounds (Slow Heartbeat, Fast Heartbeat), Animal and Insect Sounds (Cat Meowing, Dog Barking, Fly Buzzing), and Outdoor Sounds (Ambulance Siren, Traffic)
Improvements
- Profiles replaces Clients - the wording has been changed from "Clients" to "Profiles" to reflect the broader range of uses. "Last Name" is now "Label" and "First Name" is now "Name." You can keep your existing names or edit them
- Nicer profile icons - profile option buttons (Back, Delete, Edit, Select) have been tidied up with a consistent color and icon-based appearance
- Goal relocated - the goal now appears at the top of the session screen with inline rating buttons
- Waiter button simplified - one press sends the waiter to the table, another press sends them back. The previous animation buttons (Yes, No, Write) have been removed
- Formality and translate dropdowns improved - the formality and translate dropdown menus are larger and cleaner
- Profile and situation names in session - the profile name and situation name now appear in small text in the top left of the session screen
- ChatGPT model updated - AI models updated to the latest version for faster responses
- Avatar emphasis change limited - avatar voice emphasis no longer changes more than once during a sentence
- Auto-select nearest avatar - if no avatar is selected when you click a sentence, the nearest one to the person inside VR speaks
- Button hover colors updated - button hover animations are now green or blue instead of purple
- Icon tooltips improved - tooltips are now properly positioned away from the cursor, smaller, and no longer go off-screen near the edges
- Confirmation prompts added - going back from setup or finishing a session now shows a confirmation prompt to prevent accidental presses
- Sign out confirmation added - the sign out button now asks for confirmation
- Version check moved to startup - VR App version status is now checked only at startup, not continuously
- Input box color changed - input boxes are now white rather than gray
- Legal accept button fixed - the legal accept button is no longer covered by the scroll menu on shorter screens
- Text overflow handling - text that was too long for buttons now scales down instead of overflowing, which particularly helps with longer language translations such as German and Greek
v2.1.0January 24, 2025
This update focused on legal compliance. In response to evolving discussions around privacy and security in US healthcare and education laws, withVR updated its Terms of Service, End User License Agreement, and Privacy Policy to ensure alignment with GDPR, HIPAA, and FERPA standards.
Improvements
- Terms of Service updated for HIPAA - the platform is not designed for handling Protected Health Information (PHI)
- Terms of Service updated for FERPA - users handling student records must adhere to FERPA requirements
- Terms of Service updated for Prohibited Content - clear restrictions on uploading PHI or FERPA-protected educational records
- EULA updated for Sensitive Data - reinforced obligations for users to avoid uploading sensitive data
- EULA updated for Third-Party Services - users integrating third-party tools must ensure compliance with GDPR, HIPAA, and FERPA
- Privacy Policy updated for Sensitive Data - PHI is not collected, processed, or stored. Any inadvertently uploaded PHI will be securely deleted
- Privacy Policy updated for Data Breach Notifications - notification procedures for data breaches affecting personal data or FERPA-protected records
v2.0.1November 17, 2024
Improvements
- Children avatars in Break Room - children avatars can now be placed in the Break Room
- Pause improvements - additional buttons are now disabled when the session is paused
- Web app size decreased - the web app is 25% smaller for faster loading times
- Updated Czech and Slovak translations - the Czech and Slovak translations have been corrected
- Update/install text resizing - the update/install text at the main menu now fits on screen for all languages
- Standing animations expanded - standing animations are now available in all situations with standing positions, not just the Bakery
Bug Fixes
- Create avatar fixed - an error when creating avatars has been resolved
- Bakery animations restored - missing bakery animations have been restored
- Art thank you button fixed - clicking the art thank you button no longer causes an error
- Settings Extra button fixed - the Settings Extra button now works regardless of screen dimensions
- Avatar toggle icons fixed - avatar toggle icons now highlight correctly when avatars are already selected
- Sign up buttons fixed - an overlapping text box no longer prevents sign up buttons from being pressed
- OpenAI off by default - OpenAI is now correctly turned off by default for new accounts
- Pause prevents new text - typing a sentence while paused no longer creates delayed audio
- Latest app status fixed - signing up no longer incorrectly reports that you have the latest VR app
- Speaking animation stops correctly - the speaking animation now stops properly after the avatar finishes speaking
- Sign up crashes fixed - crashes after signing up have been resolved
- Terms no longer re-shown after sign up - the terms acceptance screen no longer reappears after signing up
- Welcome text translates correctly - the welcome text now translates correctly after signing up
- Avatar gender fixed - avatar gender is no longer always saved as female during sign up
v2.0.0November 5, 2024
A major update adding a new situation, a redesigned interface, and a new way to select avatars. The Meeting Room was one of the most requested situations. The interface redesign was driven by observing how users interact with the software and identifying what they could not find, did not use, or took too long to reach.
New Features
- Meeting Room situation - a conference-style room with a long table, designed for practicing job interviews, presentations, business meetings, client meetings, and more. This was a highly requested situation
- Click-to-select avatars - click directly on an avatar in the VR preview to select or deselect them. Selected avatars glow white. This replaces the old system of pressing numbered buttons next to avatars, which became messy as more avatar options were added. If you prefer the old numbered buttons, you can switch back by pressing the icon button in the top left corner of the preview window
- Czech and Slovak languages - full translations and avatar voices for Czech and Slovak, developed in collaboration with SLPs from Czechia
Improvements
- Redesigned interface - many text-based buttons have been replaced with smaller icon-based buttons. Hovering over any icon shows the original text as a tooltip. Common controls like making an avatar look at the person inside VR or stopping sounds are now placed inside the VR preview for quicker access
- Goal system redesigned - a pop-up window now appears before starting a session. You can type any goal (replacing the old dropdown menu with preset options like "Confidence" or "Loudness"), rate how confident the person feels about achieving that goal from 1 to 10, and rate it again after the session ends. You can also rate the goal at any time during the session using the Goal icon. Goals now appear in the Profiles list next to the label, name, and last session date
- Auto-select single avatar - if only one avatar is in the situation, it is automatically selected when the session starts, reducing the chance of forgetting
- Most recent avatar speaks - if you select a new avatar without deselecting the previous one, only the most recently selected avatar speaks
- Emotion colors in Setup - the emotion dropdown in Setup now shows the emotion colors next to each name
- Icon tooltips added - any icon without text now shows a tooltip on hover
- Improved children facial expressions - children avatar facial expressions are significantly more detailed depending on the emotion
- Single ambience sound - playing a new ambience sound now replaces the previous one instead of stacking on top of it
- Multi-user Web App support - you can use the Web App (without VR) while a colleague uses it on another computer (with VR) without connectivity issues
- Whisper no longer requires refresh - accepting microphone access for Whisper no longer requires a browser refresh
Bug Fixes
- Child animation glitch fixed - switching to a new child avatar no longer plays an abrupt animation
- Fearful emotion eye fix - switching from the fearful emotion on a child no longer keeps their eyes closed
- Slow-motion speech fixed - sounds and speech inside VR are no longer sometimes in slow motion
- Default sentences load correctly - default sentences now appear inside the session even if none were added during setup
- Default sign-up language fixed - the default language at sign-up is now always English
- Back-to-front text fixed - text is no longer typed in reverse order
- Sign-up text alignment fixed - sign-up info text now aligns correctly
- Art thank you button fixed - the art thank you feature now works correctly
- Translate button visibility fixed - the translate button now hides correctly when not needed
v1.7.0October 3, 2024
Improvements
- Add Profile button relocated - the Add Profile button now appears at the end of the profiles list for easier access
- Profiles sorted by last active - profiles are now sorted with the most recently used at the top
- Individual OpenAI feature toggles - you can now turn individual AI features on or off from the Settings Extra panel
- Profile names shown in session - the profile's first and last names now appear below the logo in the setup and session screens
Bug Fixes
- Create avatar error fixed - an error in the Bakery, Kitchen Table, and Break Room when creating an avatar has been resolved
- White space when creating avatar fixed - a white space that appeared when switching tabs during avatar creation has been removed
- Emotions work in all situations - emotions no longer crash the software in situations other than the Café
- Child avatar in Kitchen Table fixed - placing a child avatar in the standing position of the Kitchen Table no longer slows down the web app
- Kitchen Table standing animations fixed - the avatar in the standing position of the Kitchen Table now performs animations correctly
- Bakery crash fixed - the Bakery no longer crashes when adding an avatar that is not the first adult
- Waiter positioning fixed - the waiter in the Café no longer appears in the middle of the room or walks through walls
v1.6.1September 25, 2024
Bug Fixes
- Children avatar crash fixed - a crash on load caused by children avatars has been resolved
v1.6.0September 22, 2024
This update focused on giving users more control over AI features and improving how the software handles avatar emotions. A new Settings menu replaces the old Language button, and you can now choose whether to use OpenAI features at all.
New Features
- ChatGPT model upgraded - AI features now use the latest GPT-4o-2024-08-06 model
- Settings menu - a new Settings button replaces the old Language button on the main menu. Inside you can find the language setting and AI feature controls
- Toggle OpenAI features - you can now turn all OpenAI features on or off from the Settings menu. This was added because some organizations may not want to use OpenAI features due to concerns over policies such as EU regulations and data management. OpenAI features include ChatGPT (AI-generated sentences, translation, formality, emotional speech, and generated reading text) and Whisper (speech-to-text for adding sentences). By default, OpenAI features are enabled for existing accounts
- Hide laptop and Read menu - you can now hide the additional laptop object from the Setup screen. Hiding the laptop also hides the Read menu during a session
- Smooth emotion transitions - emotions now transition gradually instead of changing abruptly. When avatars speak, the emotion in their mouth area temporarily relaxes to allow for natural mouth movement, then returns to the assigned emotion once they finish speaking
Improvements
- Updated translations - all translations updated, including previously missed text and the welcome screen
- Children avatars speak any language - children avatars were previously only speaking with an American accent regardless of the chosen language. They now speak in the correct language. You may want to adjust their pitch and rate if the voice sounds too low
- Legal documents updated - the Terms of Service, EULA, and Privacy Policy have been updated
Bug Fixes
- Duration editing crash fixed - editing the session duration no longer causes a crash
- Waiter no longer disappears - the waiter in the Café no longer leaves unexpectedly
- Pitch and rate changes apply - voice pitch and rate adjustments now work correctly
- Emotions work inside VR - emotion changes now apply correctly inside the VR App
- Laser beam length increased - the controller laser beam inside VR is now up to 3x longer, making it easier to select Sign Out and Exit buttons
v1.5.0September 13, 2024
Improvements
- Toggle laptop visibility - you can now hide the additional laptop used for reading, which also hides the Read tab
- ChatGPT model updated - AI features now use the latest available ChatGPT model
Bug Fixes
- Back button crash fixed - a bug when pressing the back button or switching between situations has been resolved
- Duration crash fixed - the database no longer updates too early when editing the duration
v1.4.2July 1, 2024
Bug Fixes
- Mirrored text input fixed - a bug that randomly mirrored typed text has been resolved
- Text fields work correctly - text fields that were sometimes unresponsive now work properly
- Backquotes no longer spoken - avatars no longer say 'backquote backquote' from ChatGPT formatting
- Creating avatar crash fixed - a crash when creating an avatar has been resolved
- Emotion changes apply to all matching avatars - changing an avatar's emotion before entering a situation now correctly applies to all instances
- Voice testing works in all languages - testing a voice no longer only reads English text
- Changelog display fixed - section titles in the changelog no longer appear when empty
- Greek translation updated - the Greek translation has been corrected
v1.4.1June 19, 2024
Improvements
- Improved speaking emotion handling - avatars now only pause mouth-area expressions while speaking and return to the full emotion afterward
Bug Fixes
- Emotions work in all languages - emotion changes now apply correctly in non-English languages
- Read text box typing fixed - text in the read text box is no longer typed in reverse order
- Text box input fixed - text boxes that were sometimes unresponsive now work correctly
v1.4.0June 16, 2024
A major update with several long-awaited features. The AI model was upgraded, children avatars can now speak, a new emotion system replaces facial expressions, and avatars now speak with realistic intonation that matches their emotion. Greek was also added as a fully supported language.
New Features
- ChatGPT model upgraded to GPT-4o - the latest model makes AI features up to 2x faster, more concise, more creative, and significantly better at understanding language and linguistic patterns
- Children avatars now speak - child avatars can now be given a voice. Adult avatars use Google Text-to-Speech, but making adult voices sound child-like was not possible. Thanks to the latest AI model from OpenAI, children avatars now have their own voices. This feature is experimental
- Avatar emotions - the previous Facial Expressions feature has been replaced by a new Emotions system. You can assign one of 11 emotions to any avatar: Neutral, Happy, Sad, Angry, Confused, Anxious, Excited, Calm, Bored, Surprised, and Fearful. Each emotion has its own color. When you assign an emotion, the avatar's facial expression changes to match. In the Web App, a colored sphere appears above each avatar's head so you can see which emotion they have at a glance - these spheres are not visible to the person inside VR
- Emotional speech - when avatars speak, the AI now analyzes the text and adapts pitch, rate, volume, emphasis, and break timing based on the avatar's emotion, resulting in more realistic and less robotic-sounding voices. This is powered by Google Text-to-Speech Speech Synthesis Markup Language (SSML). This feature is experimental
- Sentence tooltip on hover - hover over a truncated sentence button to see the full text without selecting it
- Greek language added - full Greek translation and avatar voices, developed in collaboration with SLPs in Greece
Improvements
- Laptop text larger - text displayed on the laptop inside VR is now larger and easier to read
- Paste text to read - you can now paste text into the read text box (experimental)
- Create avatar improvements - improved steps for creating an avatar, with the option to paste a link
- Improved facial expressions - the underlying facial expressions that power emotions are now much more realistic, thanks to AI
- Changelog redesigned - the changelog has a cleaner appearance
- Buttons reordered - buttons above Select Avatar are now in a more logical order
- Welcome text updated - the welcome text now reads "Welcome to Therapy withVR"
- Duration label clarified - "Duration" now reads "Maximum Duration"
- Voice selection labels added - Languages, Voice Types, and Voices are now labeled in the voice selection menu, which has also been redesigned and moved below the avatar selector on the Setup page
Bug Fixes
- Back button crash fixed - pressing the back button after making an avatar speak no longer causes a crash
- Text box selection fixed - text boxes that were sometimes not selectable now work correctly
- Version handler fixed - finishing a session no longer incorrectly reports that the VR App needs updating
- Translation error fixed - translation no longer triggers when no text has been entered
- Changelog display fixed - the first description in the changelog is now in the correct position
v1.3.0May 29, 2024
This update added AI-powered features that were among the most requested: controlling how formal or informal avatars sound, translating text so avatars can speak different languages, and displaying text on a laptop inside VR for the person to read. All three features work together - you can generate text with a specific formality and translate it to any supported language.
New Features
- Sentence formality using AI - choose whether AI-generated text sounds Neutral, Informal, or Formal. This affects both spoken sentences and generated reading text
- Translate text using AI - translate text so avatars can speak in a different language. By default, the translation language matches your software language, but you can change it. Translation also respects the formality setting you have chosen. You do not need to change individual avatar language settings to use this feature
- Laptop text display (Read) - each situation now has a laptop visible to the person inside VR. During a session, select the Read menu and type text into the box on the right side of the screen. Press the blue button to send it to the laptop inside VR. The laptop only updates when you press the button, not while you are typing - so you can prepare text before showing it. This feature is designed to support the individual in using their voice, such as providing reading material or gentle guidance
- Generate text to read using AI - type a topic at the top of the screen, press enter, and the AI creates a longer passage for the laptop inside VR. You can further refine the topic - for example, asking it to use sentence structures that a ten-year-old can read. The generated text also follows the formality setting you have chosen
- Translate generated text - generated reading text can also be translated to any supported language using the same translation controls
Improvements
- Arabic characters connected - Arabic characters are now properly connected instead of appearing as separated letters
Bug Fixes
- Various crashes fixed - several crashes reported by users at different stages of the software have been resolved
v1.2.0May 3, 2024
This update focused on supporting users more effectively rather than adding new situations. Key additions include profile name encryption for better privacy, a changelog so users always know what has changed, and a version handler so you can check your VR app status without putting on the headset.
New Features
- Profile name encryption - profile names are now encrypted in the database. Previously, anyone with administrator access to the database could see the real names stored in profiles. Now, both the label and name fields are encrypted so the database only stores a string of random letters, numbers, and symbols. The software decrypts names automatically when you open the Web App, so you always see the real names - but no one else can
- Changelog - each time the Web App updates, a changelog appears showing new features, improvements, and bug fixes. Press the blue check button at the bottom once you have read it
- Version handler - a message now appears on the welcome screen that automatically checks whether your VR App is up to date. A green message means you have the latest version. A red message means an update is available, with steps to install it. A blue message means the VR App has not been installed yet, with steps to do so
Improvements
- Web App size reduced by half - the Web App is now 2x smaller for faster loading times and reduced risk of crashes on slower computers or internet connections, without reducing any features or quality
Bug Fixes
- Scene switching crash fixed - a crash that occurred during certain sequences of scene changes has been resolved
Choosing Your VR Headset
Therapy withVR runs on Meta Quest VR headsets. You purchase the headset yourself - the software is supplied separately.
Recommended VR Headset

Meta Quest 3S (128 GB) is the recommended model for most users. The 128 GB version provides more than enough storage.
- USD: ~$350 EUR: ~€350 GBP: ~£310
Compatible VR Headsets
- Meta Quest 2
- Meta Quest Pro
- Meta Quest 3
- Meta Quest 3S
Where to Buy
Meta ships directly to many countries including the US, UK, most of Europe, Australia, Canada, Japan, and more. Also available from Amazon, Coolblue, Target, Walmart, and local electronics retailers worldwide.
Optional: Silicone Facial Cover
For settings where hygiene is a priority - hospitals, clinics, or research labs - a silicone facial cover makes it easy to wipe clean between users.
- Silicone cover for Meta Quest 3S on Meta's website
- Make sure you order the cover for your specific VR headset model
- Sometimes out of stock - search Amazon or local retailers as an alternative
- Consider buying two covers so one is always available while the other is being cleaned

Setup & Onboarding
From unboxing your VR headset to logging in for the first time - follow these steps in order.
Step 1: Set Up Your Meta Quest
Take the VR headset out of the box and charge if needed. Hold the power button to turn it on.
Put it on and follow Meta's on-screen setup. Connect to WiFi, download the Meta Horizon app on your phone, and create a Meta account using your email address.
Meta account notes: You do not need to connect Facebook or Instagram. You do not need to enter credit card details. Use a real email address you can access.
Step 2: Send Us Your Email Address
Email hello@withvr.app with the email address you used to create your Meta account. You will be added to the approved access list and will then receive an invitation email from Meta.
Step 3: Accept the Meta Invitation
Open the email from Meta. Find the Accept link - it is embedded in the body text, not a large button. Click it and sign into your Meta account if prompted.
Step 4: Restart Your VR Headset
Hold the power button until the screen goes black, wait a few seconds, then hold it again to turn back on.
Step 5: Install the VR App
- Open the menu: press the Meta button on your right controller (oval button, below A). Using hands? Pinch thumb to index finger in front of you.
- Click something: pull the trigger (back of controller, under your index finger). Using hands? Point, then pinch.
- Get back or go home: press the Meta button once to close a menu. Press and hold it for 2 seconds to go home. This is your panic button.
Put on the headset. Open the menu (Meta button on the controller, or pinch with your hands).
Open Library (Navigator) or Apps (older UI).
Find Therapy withVR in the list. Apps are arranged in staggered rows - scroll up and down, not just side to side. You can also use the search field in the left-hand menu and type "therapy" or "withVR".
Click Install. If the app does not appear at all, change the filter from "Installed" to All.
Pin it to the top. When the app finishes installing, hover over it and select Pin to top. From now on, Therapy withVR sits at the top of your Library - no more scrolling.
Step 6: Create Your Web App Account
While the VR app downloads, go to the withVR web app on your computer and click the blue Sign Up button. Enter your email and password, accept the terms, and complete your profile.
Step 7: Log Into the VR App
Open Therapy withVR from your Library. On the wall in front of you, you will see Email Address and Password fields.
- Controllers: point at a field and pull the trigger to select, then use the floating keyboard.
- Hands: point with your index finger and pinch to select; type with the floating keyboard using pinches.
Sign in with your Therapy withVR web app credentials - the email and password you created at the withVR web app. Not your Meta account.

Step 8: Wait for Avatars to Load
After signing in, a loading message appears on the wall. Adult avatars load first, then children avatars. When complete, a longer line of instruction text replaces the loading message. You are now ready for your onboarding training call.
Setting Up for Children
If the person using the VR headset is a child, there are a few additional things to consider during setup.
Strap and fit
The standard Meta Quest strap may not fit smaller heads securely. The Elite Strap (available from Meta) provides a dial-based fit adjustment that works much better for children. A loose strap causes the headset to shift during sessions, which breaks immersion and can cause discomfort.
Boundary setup
Set the boundary while the child is in the position they will use during the session - usually seated. Because children are shorter, a boundary drawn while an adult is holding the headset will be at the wrong height, and the virtual floor may appear too low or too high. If the boundary feels wrong once the child puts the headset on, you can reset it: start the session, pause it, then have the child put the headset on and redraw the boundary from their seated position.
Session length
Keep first sessions short - 3 to 5 minutes. Children often engage intensely with VR, so shorter sessions at higher frequency work better than longer ones. Set the Maximum Duration in Setup accordingly.
Starting gently
Consider starting with the Animal situation (a kitten or bunny) rather than a human avatar. Some children find it easier to speak to an animal first. The without VR option on the Start screen can also help - show the child what the environment looks like on your laptop before they put the headset on.
Teams & Multi-VR Headset Setups
- Shared VR headset: Use a shared team email address so access is not lost if a team member leaves
- Multiple VR headsets: Create a separate email address for each headset
- One email address per VR headset - this is required
- You only need inbox access once to accept the Meta invitation
Web App Account Setup
Create and configure your account at the withVR web app.
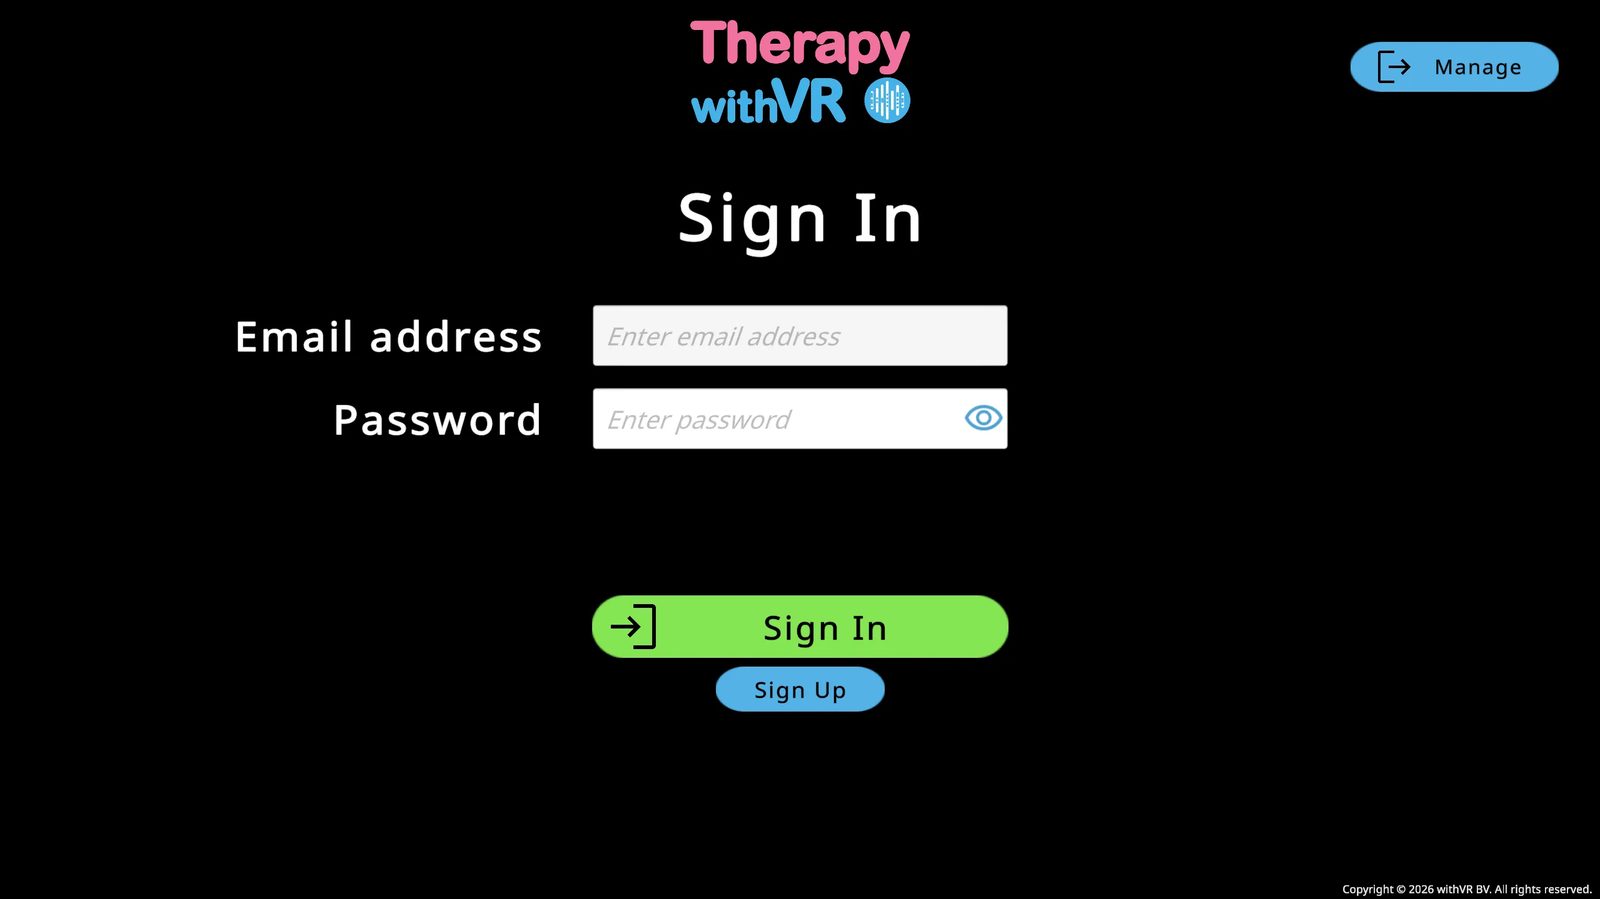
The Sign In Page
When you open the web app, you will land on the Sign In page. From here you can sign in, create a new account, or reset your password.
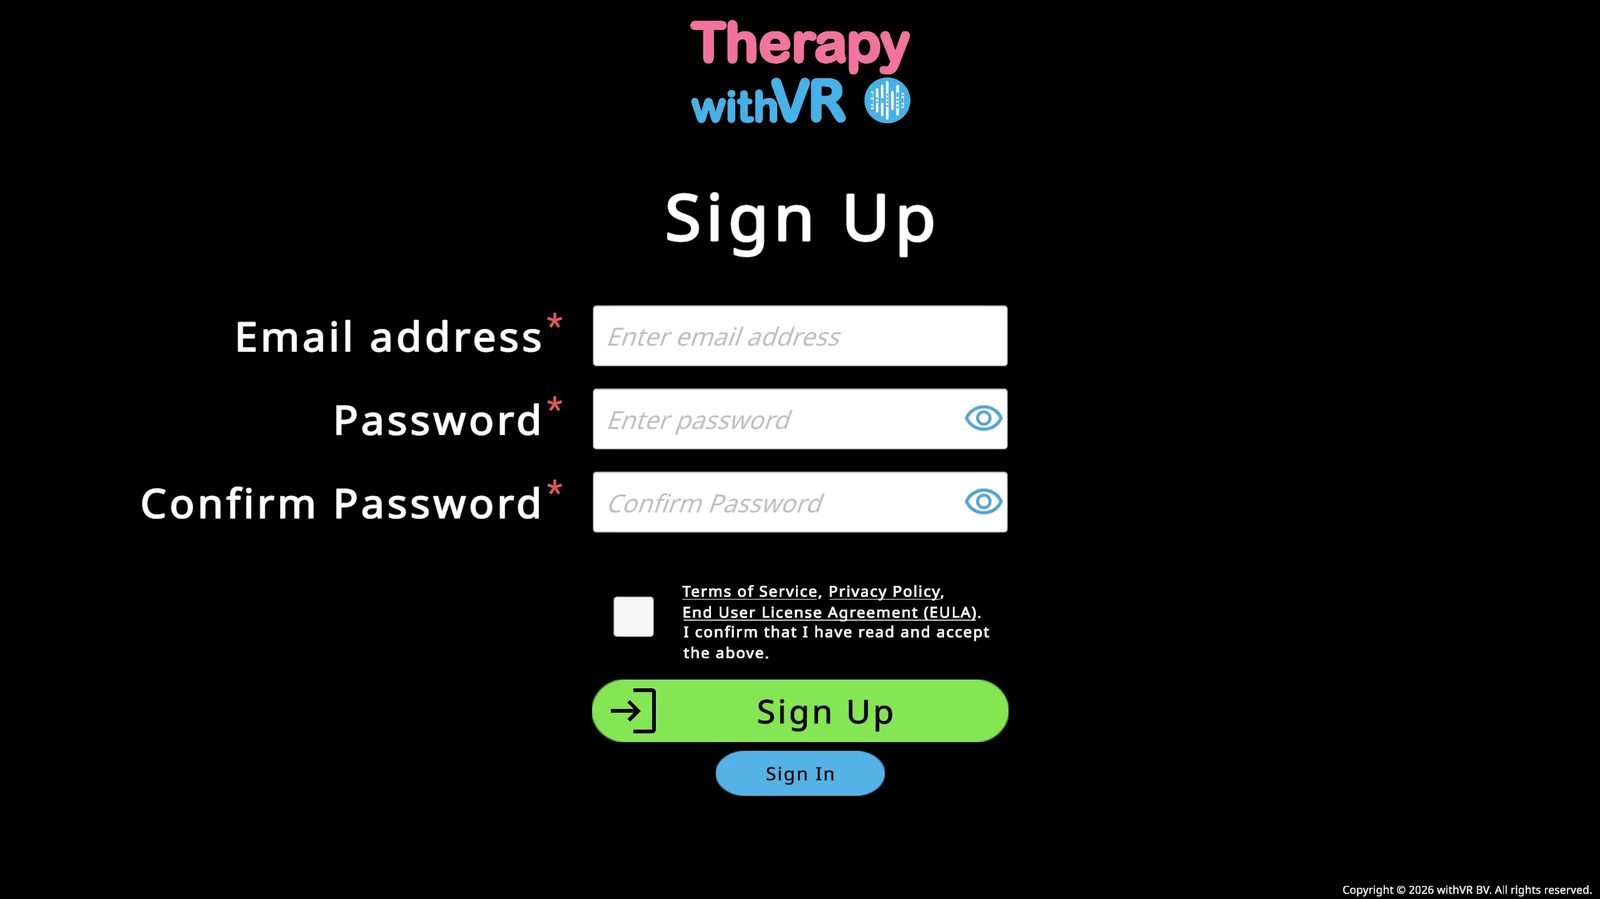
Creating an Account
Click the blue Sign Up button on the Sign In page.
Enter your email address and choose a password. Enter it again to confirm. Use the eye icon to show or hide what you are typing.
Read and accept the Terms of Service, Privacy Policy, and EULA by checking the checkbox, then click the green Sign Up button. You must be at least 18 years old to create an account.
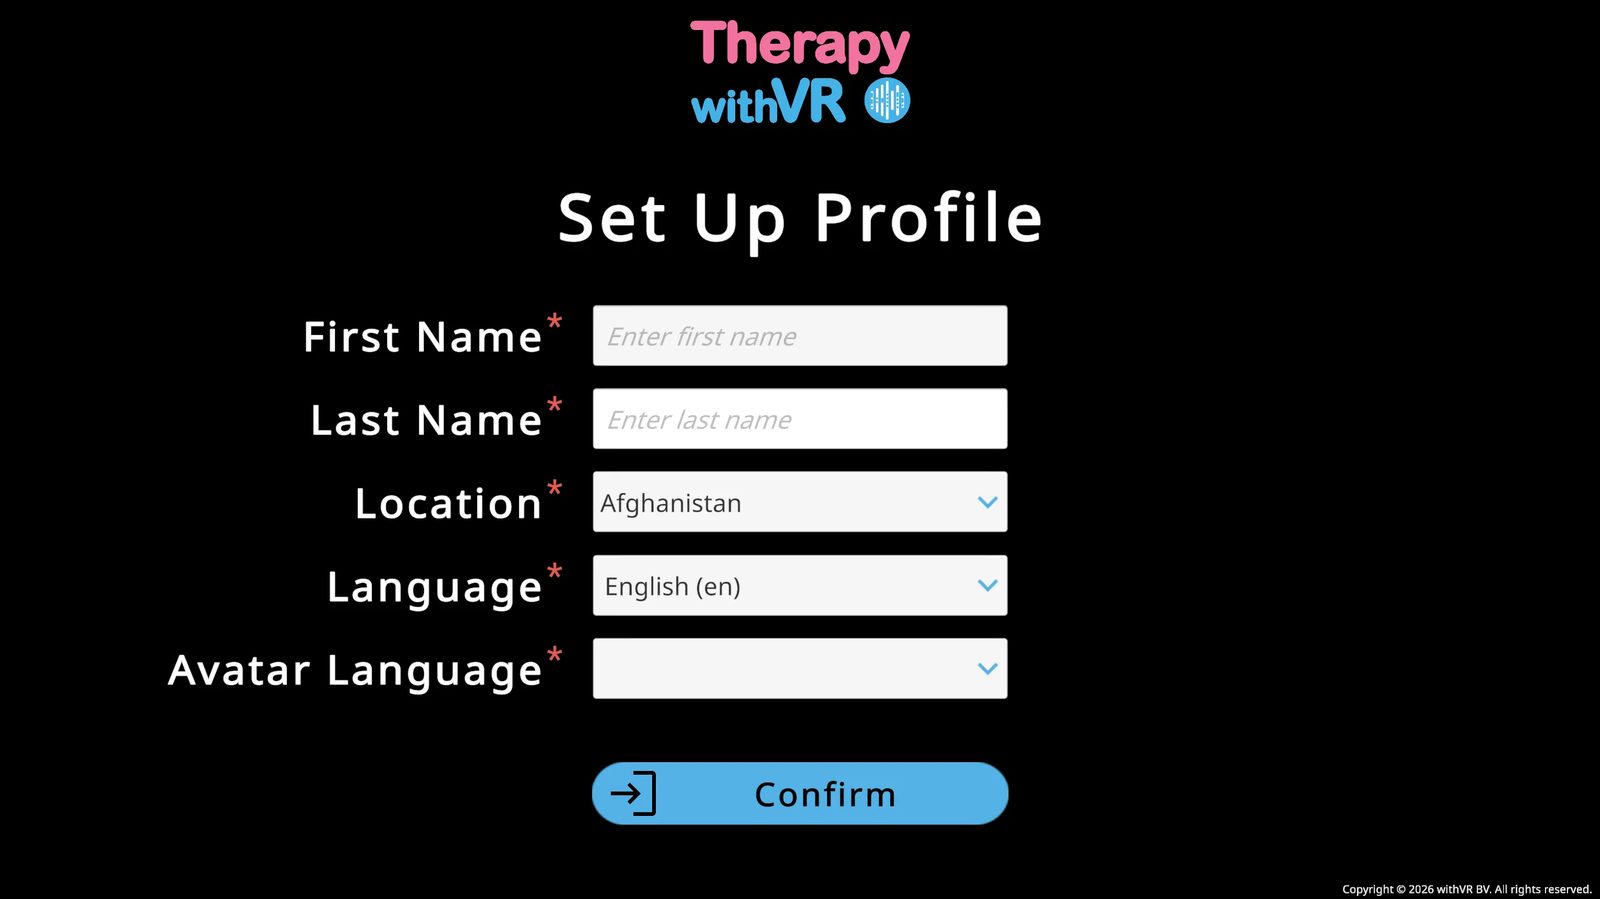
Fill in your profile: First Name, Last Name, Location (alphabetical dropdown - not auto-detected), Language, and Avatar Language. Click Confirm.
Language sets the web app interface language.
Avatar Language loads culturally appropriate default avatars and Google Text-To-Speech voices from that region.
These can be different from each other.
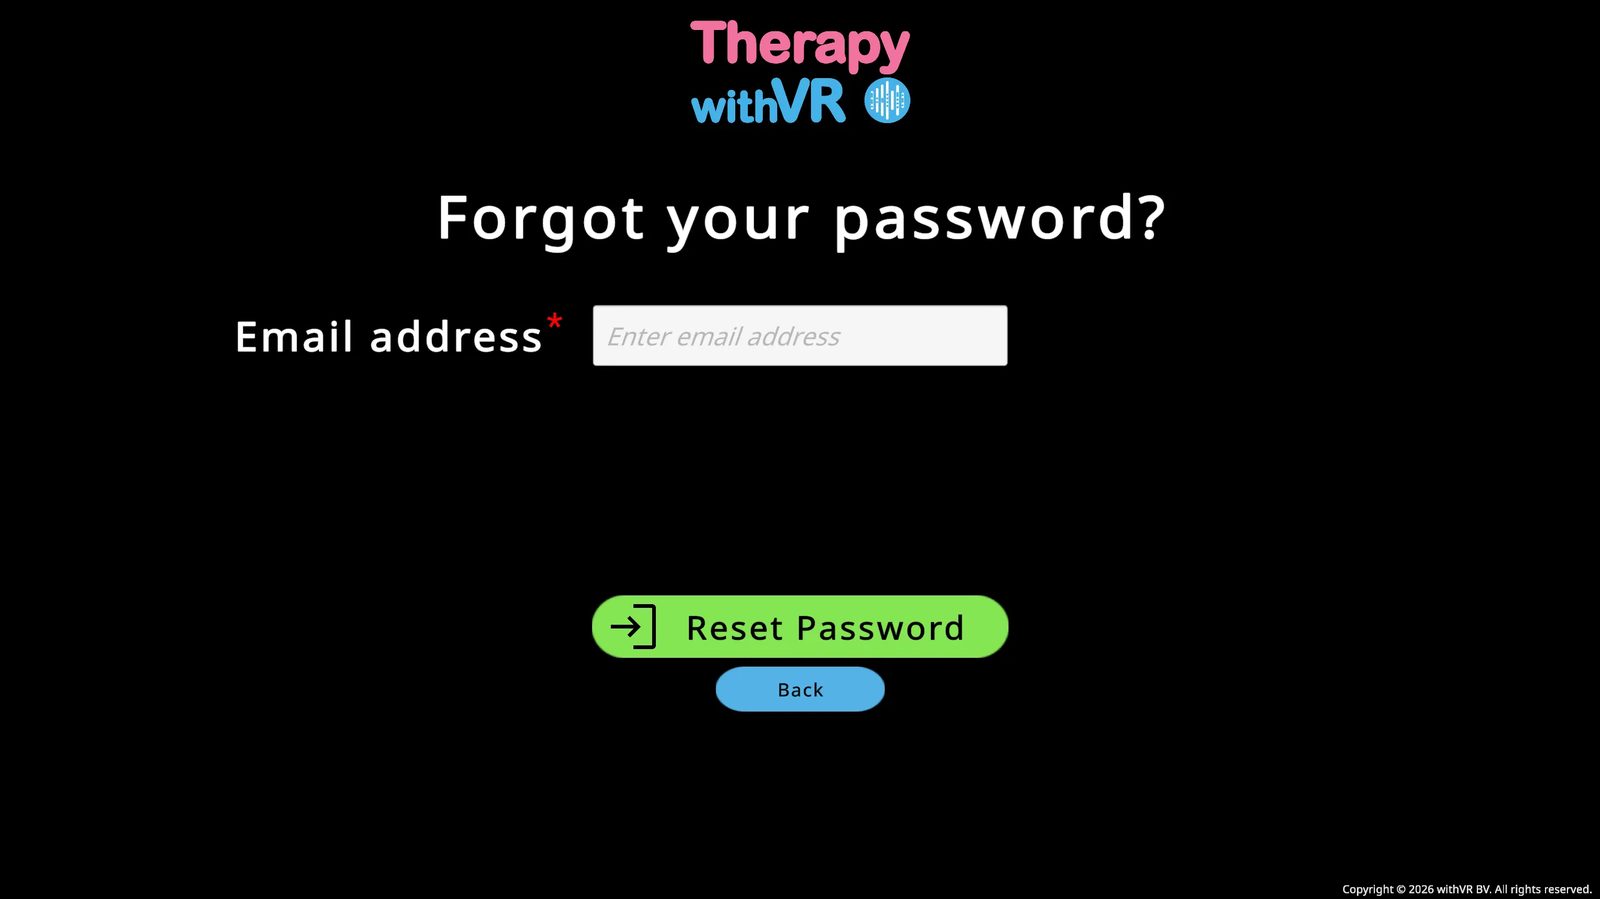
Resetting Your Password
You must be signed out to reset your password. The Manage button only appears on the Sign In screen.
Go to the Sign In page and click the blue Manage button (top right).
Enter your email and click Reset Password. Check your inbox and spam folder.
After resetting, refresh the web app before trying to sign in again.
Welcome Screen & Main Menu
Your starting point every time you sign in to the web app - and the place to check your VR app status before each session.
The Welcome Screen
After signing in, you will see the Welcome to Therapy withVR screen with a blue Start button and a VR app status message below it.
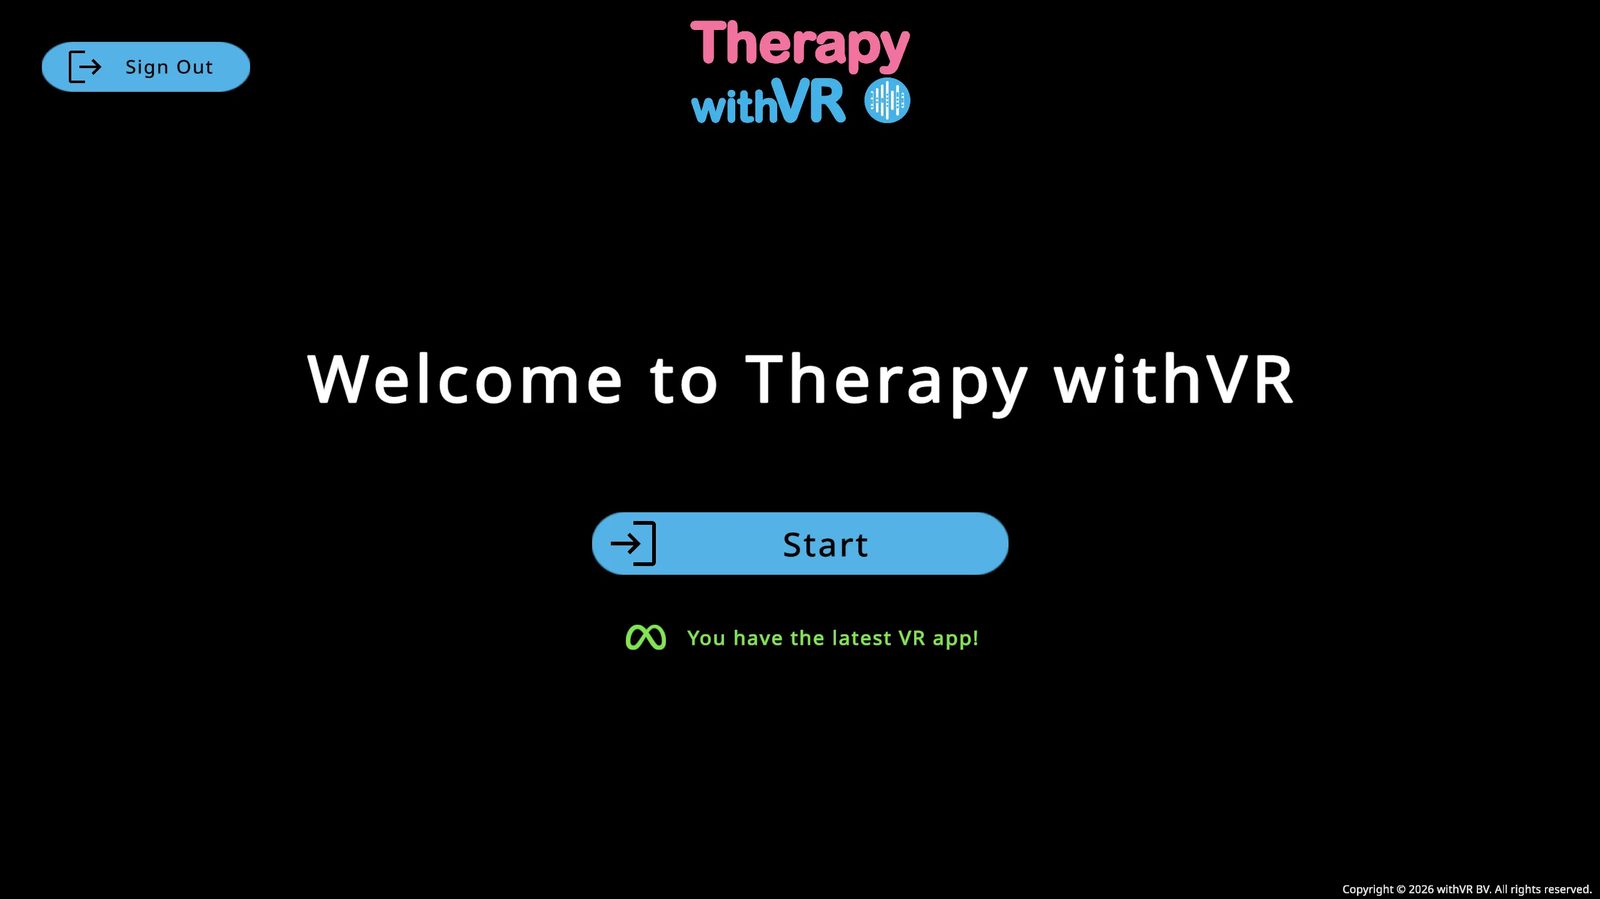
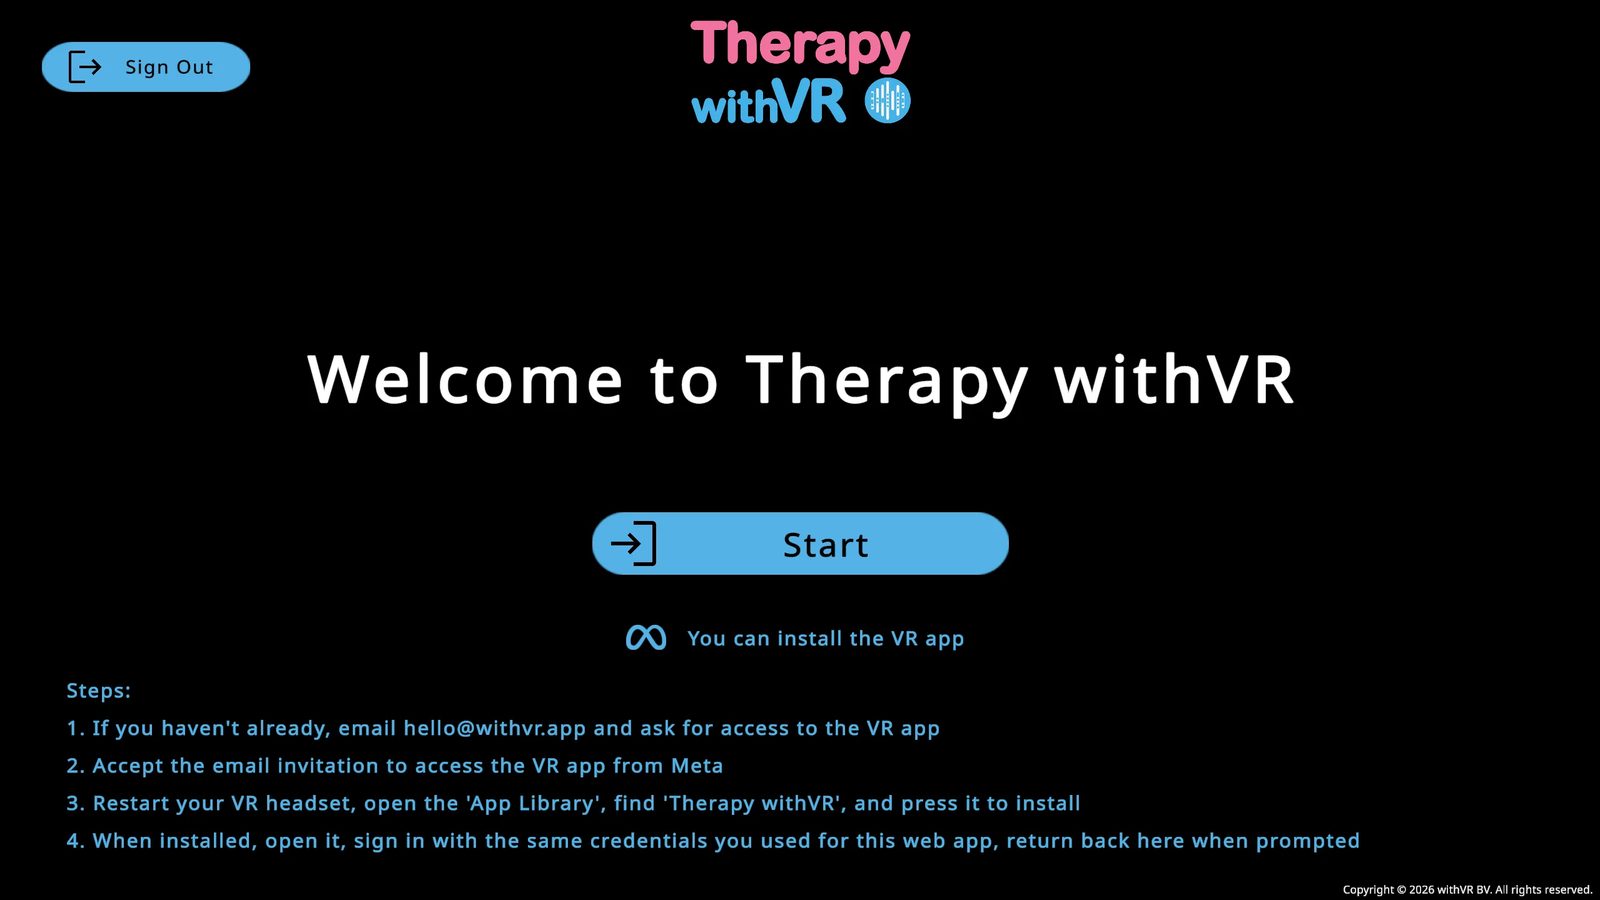
VR App Status
Below the Start button, the Welcome screen always shows the current status of your VR app. You do not need to put the VR headset on to check.
| What you see | What it means |
|---|---|
| Green - "You have the latest VR app!" | You are ready to go |
| Red - "Your VR app can be updated!" | An update is available - steps are shown below the message |
| Blue - "You can install the VR app" | The app has not been installed yet - steps are shown below the message |
The Main Menu
Click Start to enter the Main Menu. You will see three options:
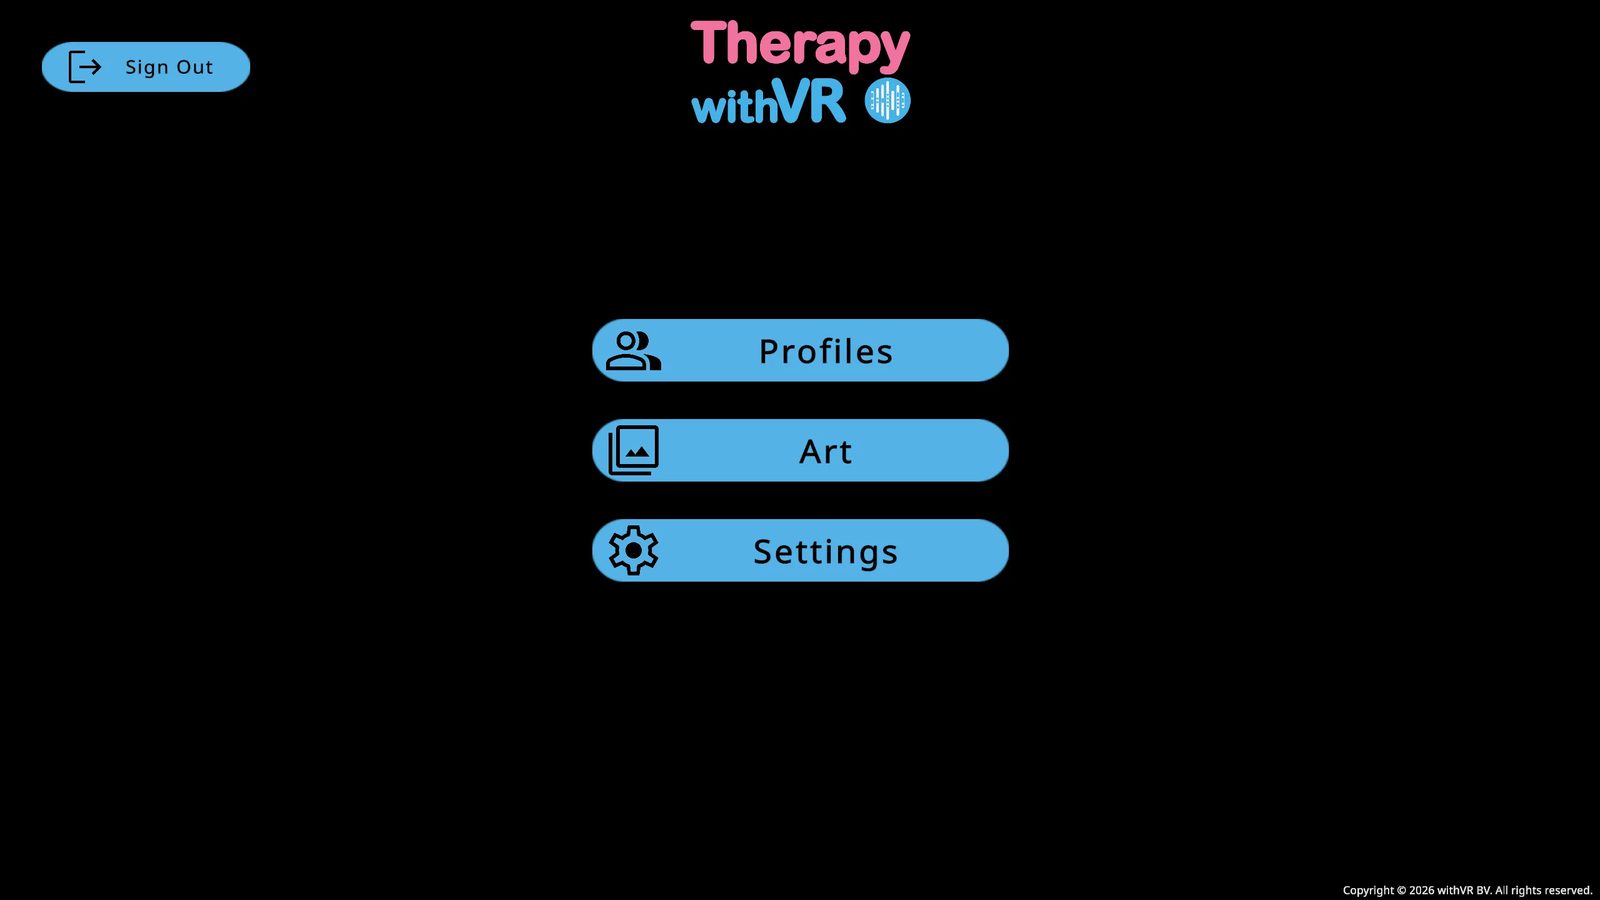
Profiles
Manage your avatars and session settings. This is where you will spend most of your time.
Art
Access artwork from artists who stutter for display in the Waiting Room.
Settings
Change your interface language and configure optional AI features.
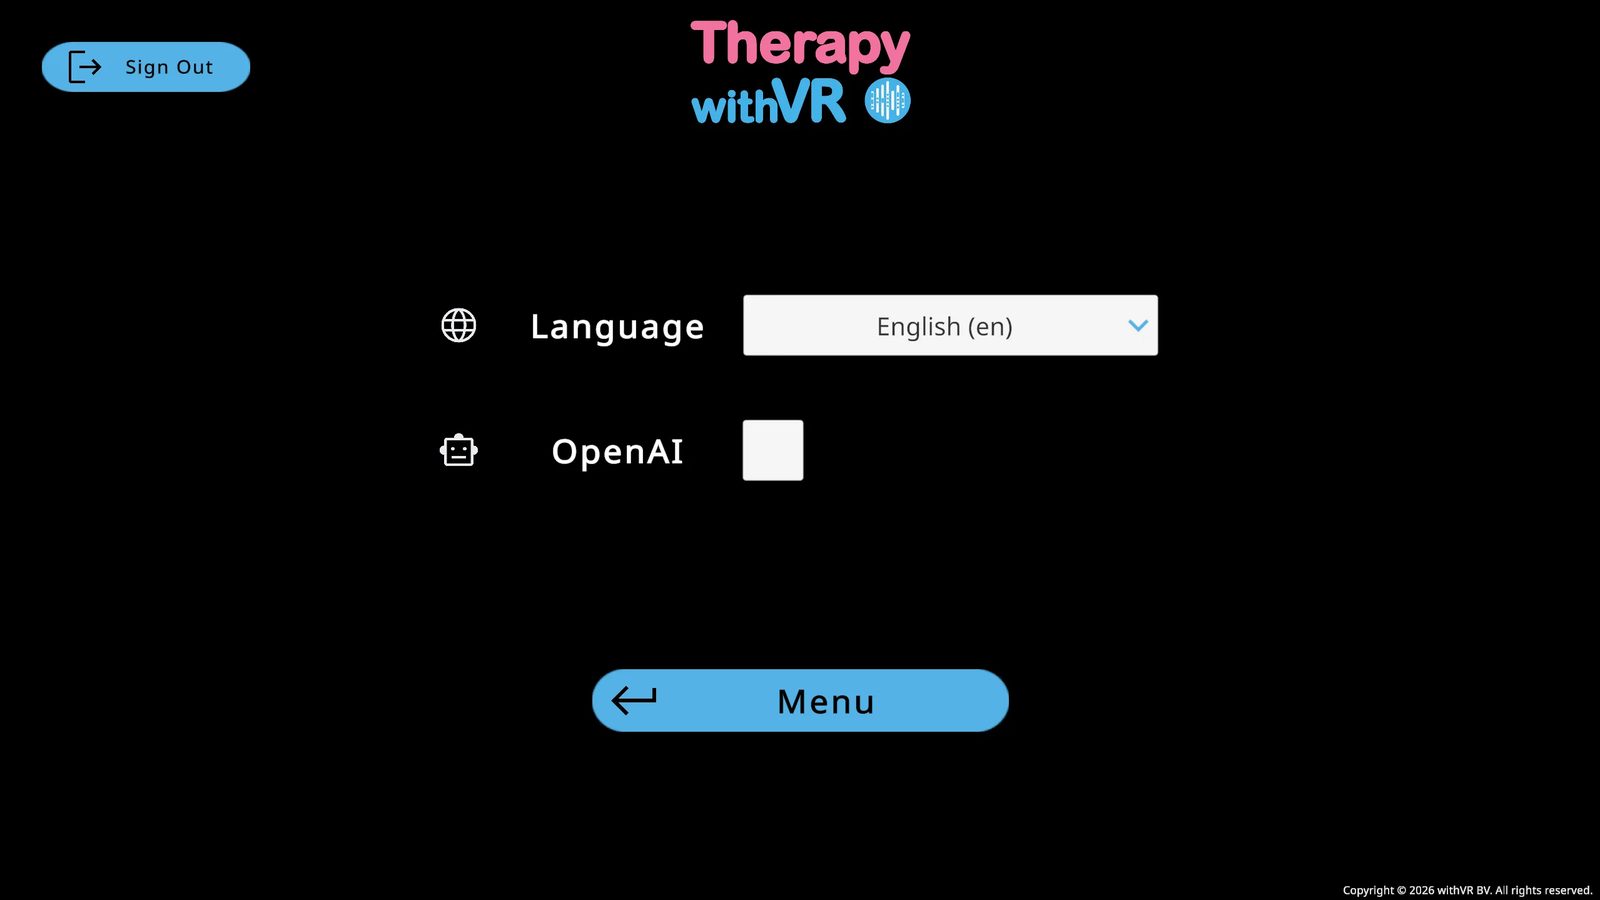
Settings
Language
Change the web app interface language at any time from the Language dropdown. Changes take effect immediately across the entire software.
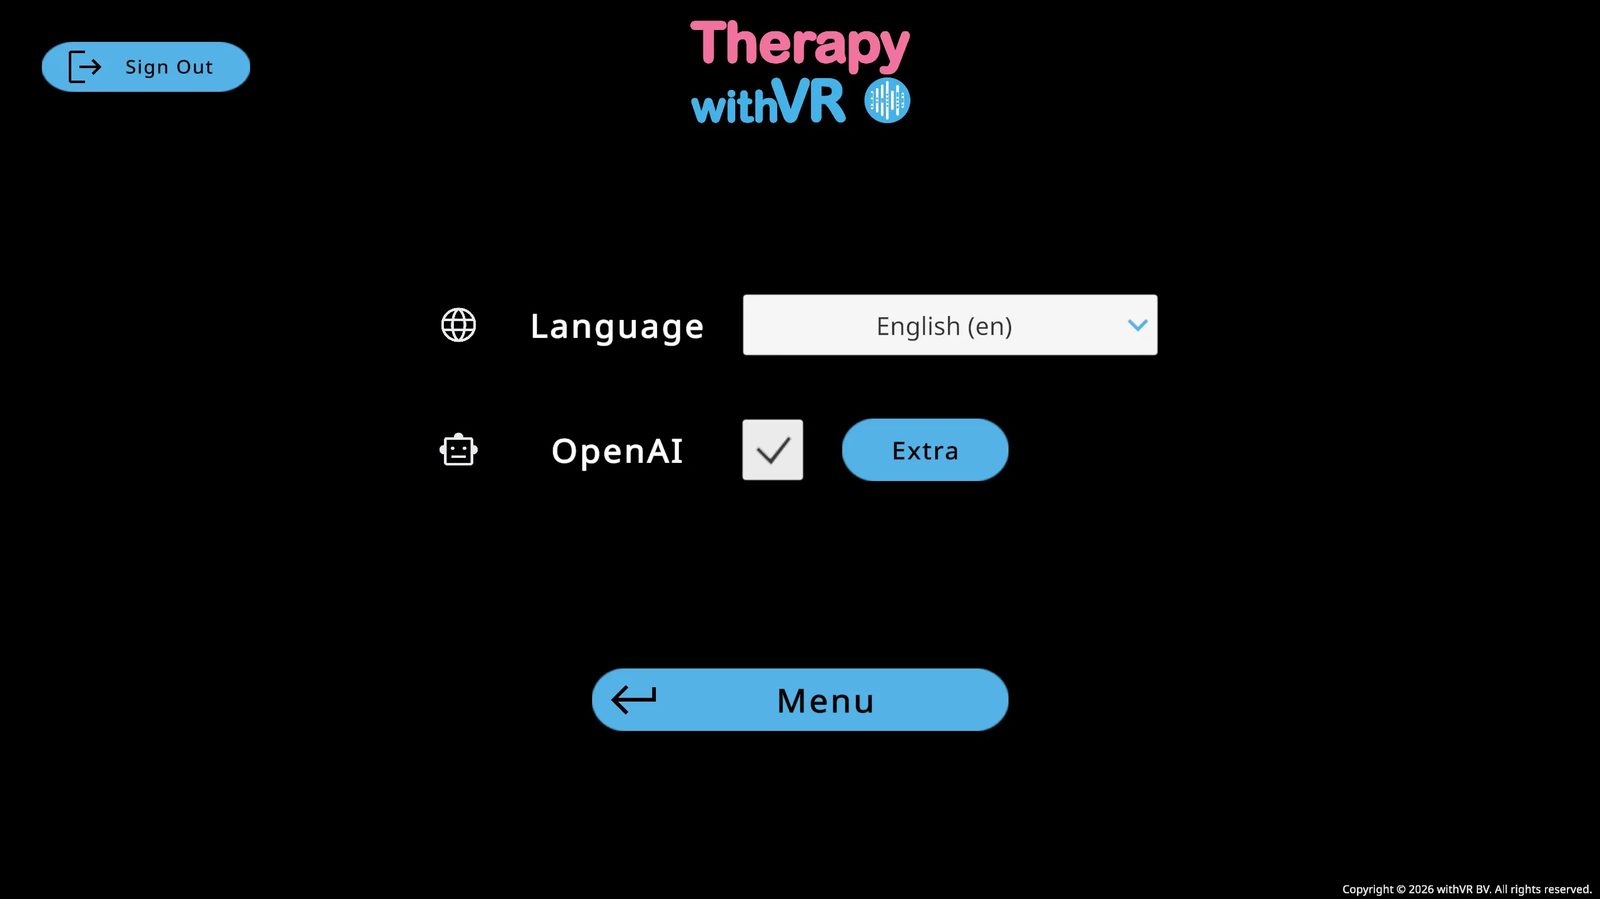
OpenAI Features
Optional AI features are off by default. Check the OpenAI checkbox to enable them. An Extra button appears to configure individual features.
Important Information for Clinicians
- You are always in control. AI features generate content. You decide whether to use it, modify it, or discard it.
- AI-generated content should be reviewed before use. Text generation and translation may produce errors or inappropriate content. Always review before presenting to an individual.
- Do not enter identifiable information into AI text fields. Text entered into translation, generation, or autocorrect fields may be processed by OpenAI. Use pseudonyms or generic descriptions instead of real names or identifying details.
- Avatar voices are AI-synthesized. Avatar voices are AI-synthesized using Google Text-to-Speech in every session. The person inside VR hears a synthetic voice, not a human recording. Before using the platform with an individual, ensure they are informed that the voices they will hear are AI-generated.
- Be aware of automation bias. Automation bias is the tendency to trust AI-generated output simply because it came from a machine. Always apply your own professional judgment when reviewing AI-generated text. Your expertise takes precedence over any AI output.
- AI features can be turned off. OpenAI-powered features are optional and off by default. If they are not appropriate for your setting, do not activate them.
What Uses AI
| Feature | What it does | Provider |
|---|---|---|
| Avatar voices | All avatar speech inside VR is generated using text-to-speech. The voice reads aloud whatever text the clinician has entered or selected. | Google Text-to-Speech |
| Sentence translation | Translates conversation sentences between languages. | OpenAI |
| Text generation | Generates suggested conversation text based on a topic or prompt. Optional - off by default. | OpenAI |
| Autocorrect | Corrects spelling and grammar in text entered by the clinician. Optional - off by default. | OpenAI |
What Does Not Use AI
- Session control (starting, pausing, stopping)
- Avatar behavior and gestures
- Environment selection and customization
- Profile creation and management
- All clinical and educational decisions
Data and Privacy
Text sent to OpenAI for translation, generation, or autocorrect is processed via the OpenAI API. Under OpenAI's API data usage policy, API inputs are not used to train OpenAI's models. Text sent to Google for voice synthesis is processed via Google Cloud Text-to-Speech.
No client names, session recordings, or personally identifiable information are sent to these services as part of normal platform operation. For more detail, see the Privacy Policy.
For a full list of all AI features and what each one does, see Features > AI.
Art
A curated collection of artwork by artists who stutter - for use in sessions and the Waiting Room.
Current Artists
| Artist | Type |
|---|---|
| The Stutterverse | Poet |
| Eddy Janssens | Photographer |
| Franky Banky | Comic artist |
| Juststutter | Illustrator |
| Paul Aston | Painter |
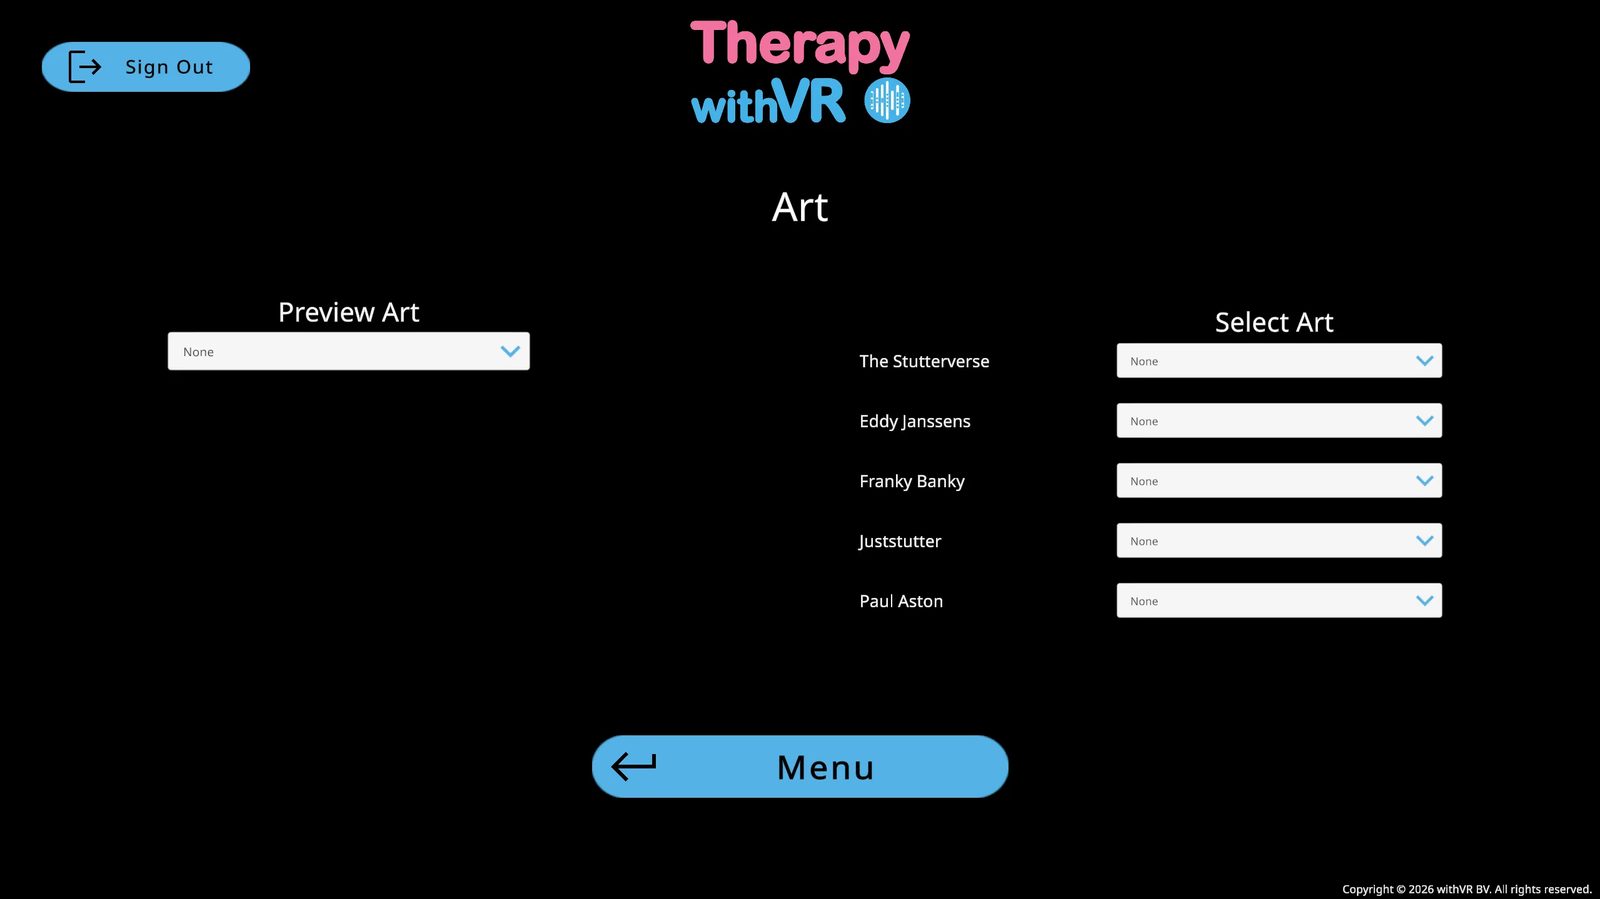
The Art Screen
From the Main Menu, click Art. The screen has two columns: Preview Art on the left for browsing, and Select Art on the right for choosing what to display inside VR.
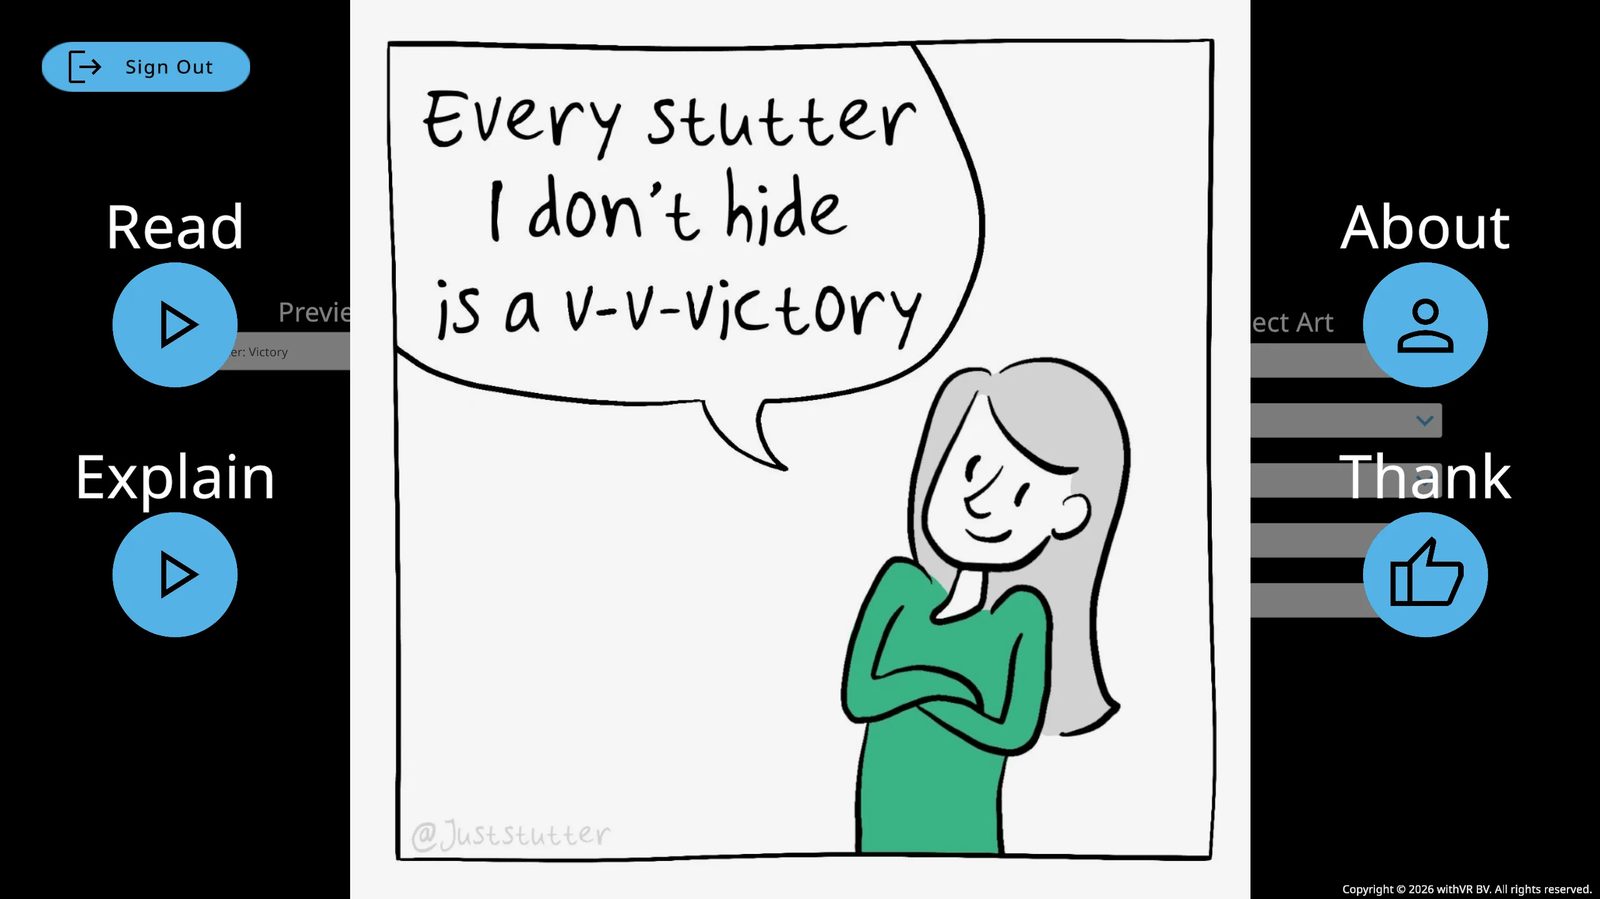
Previewing Art
Use the Preview Art dropdown to browse artwork. Click any image to view it full screen. Click again to return.
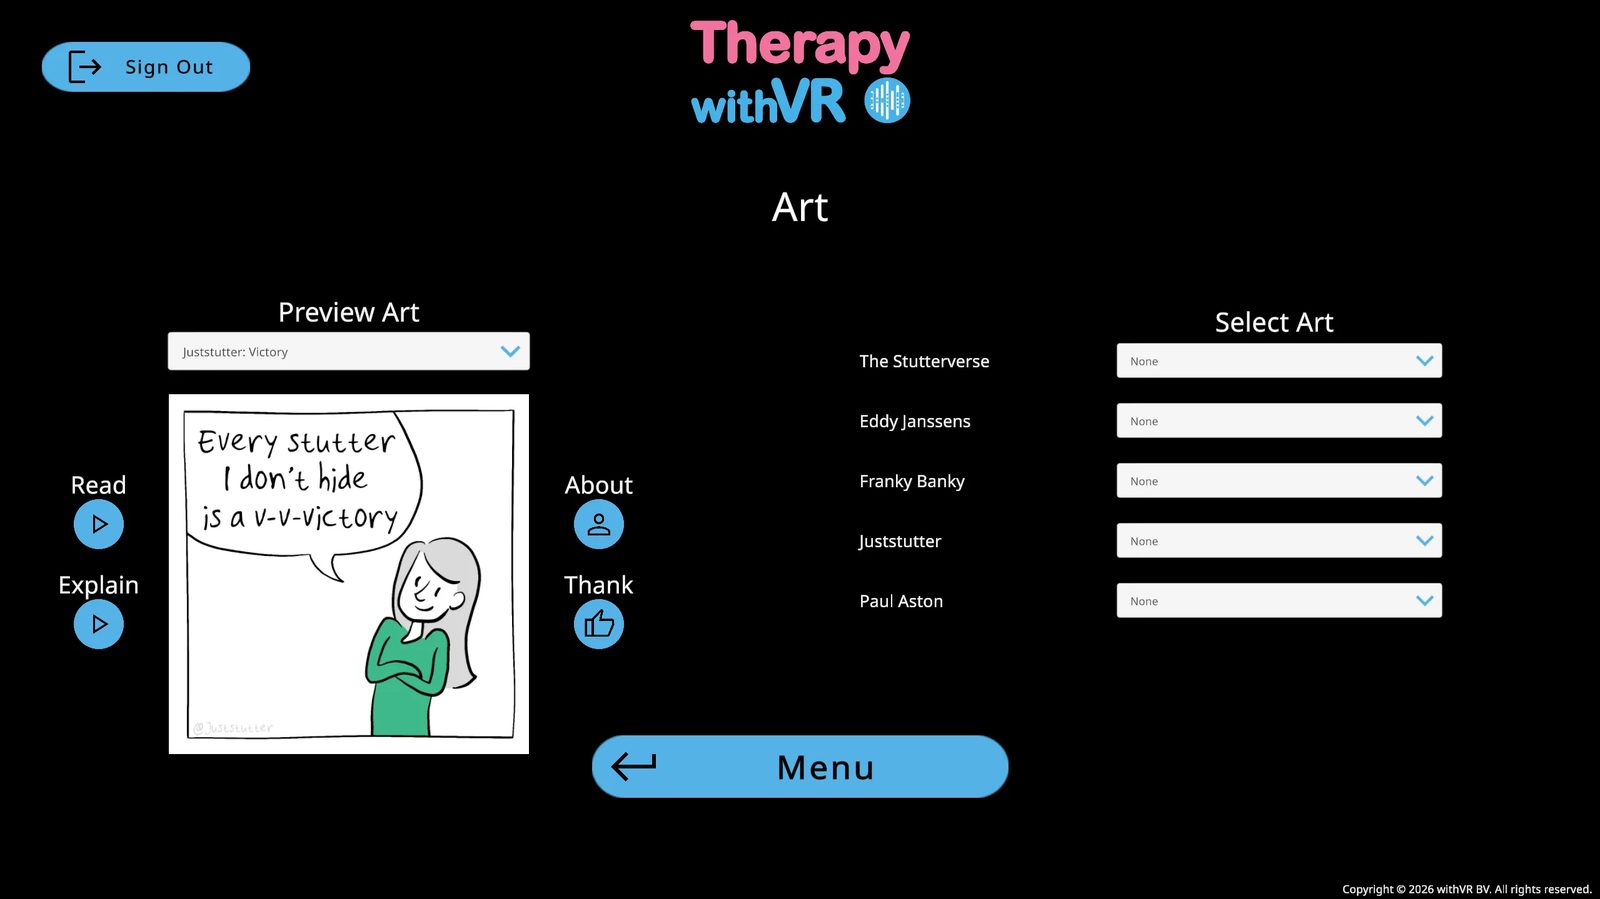
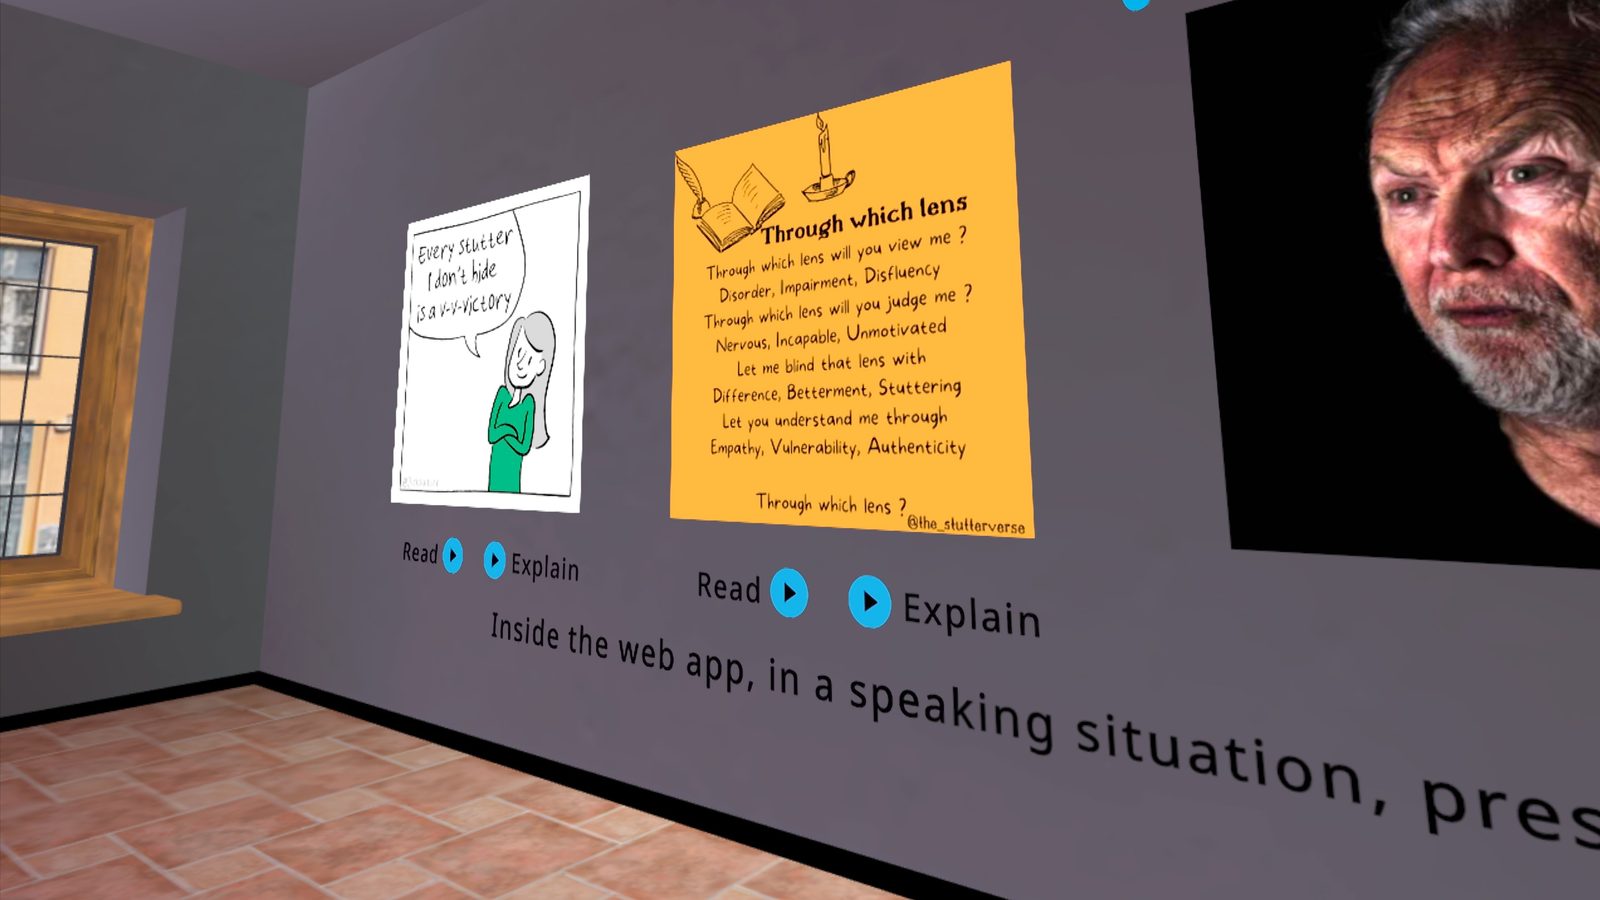
Some artworks have audio buttons:
- Read - plays the artist reading the text in the artwork
- Explain - plays the artist explaining why they made it and how they felt
A playing button turns red with an X - click it again to stop.
About the Artist
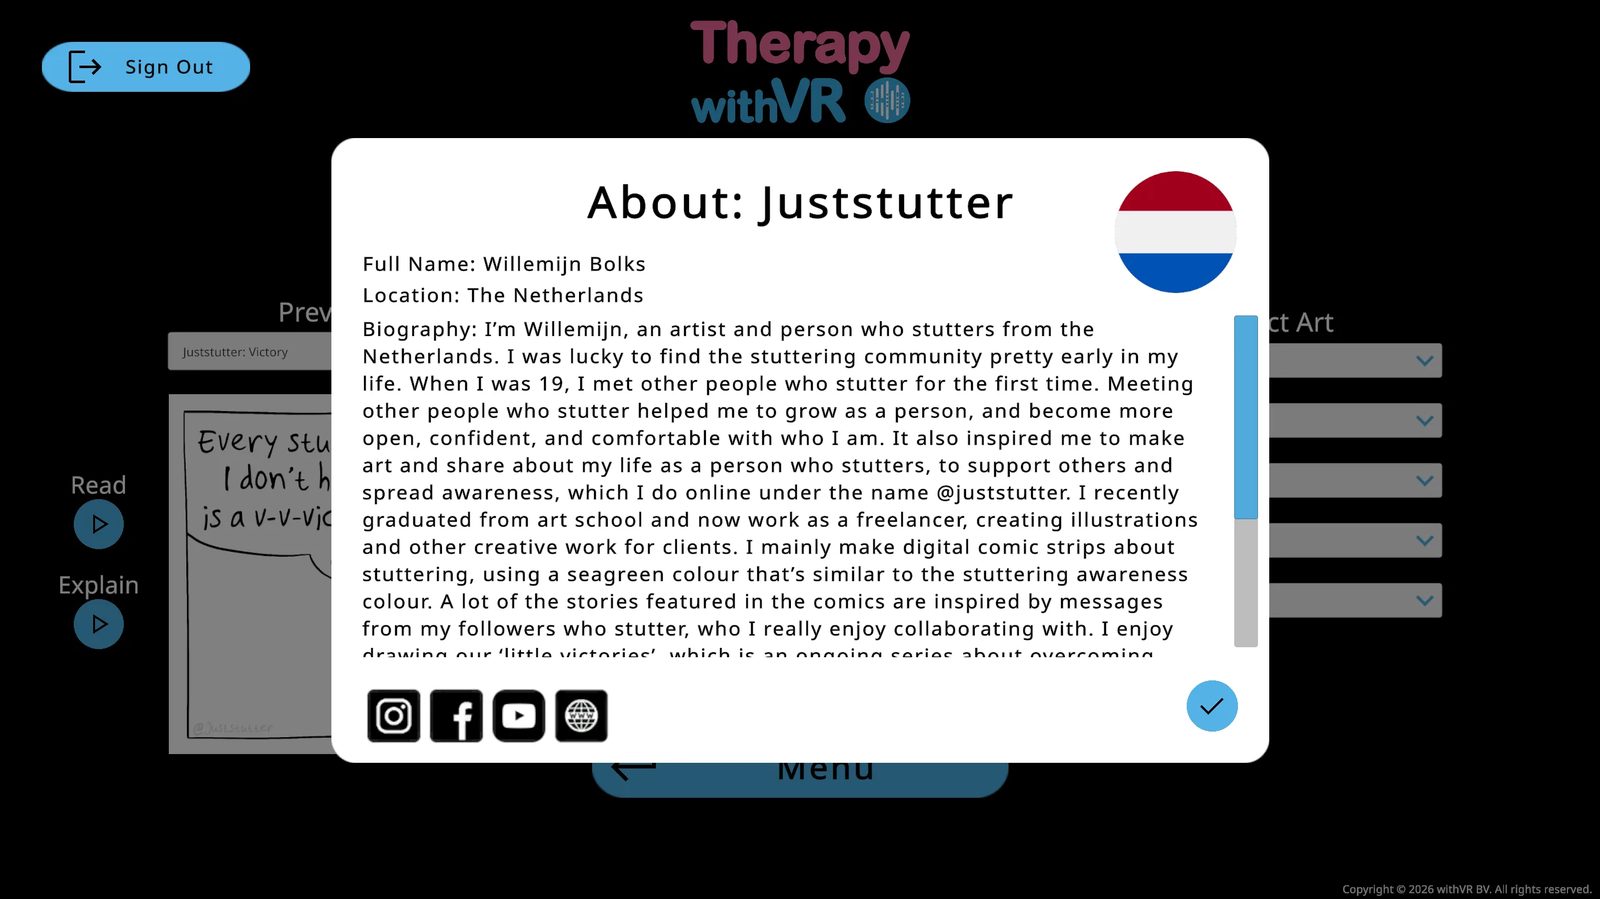
Click the About button (person icon) to see the artist's full name, location, country flag, and biography. Social media icons at the bottom show a QR code when clicked - scan with your phone to open the link. Click the blue tick to close.

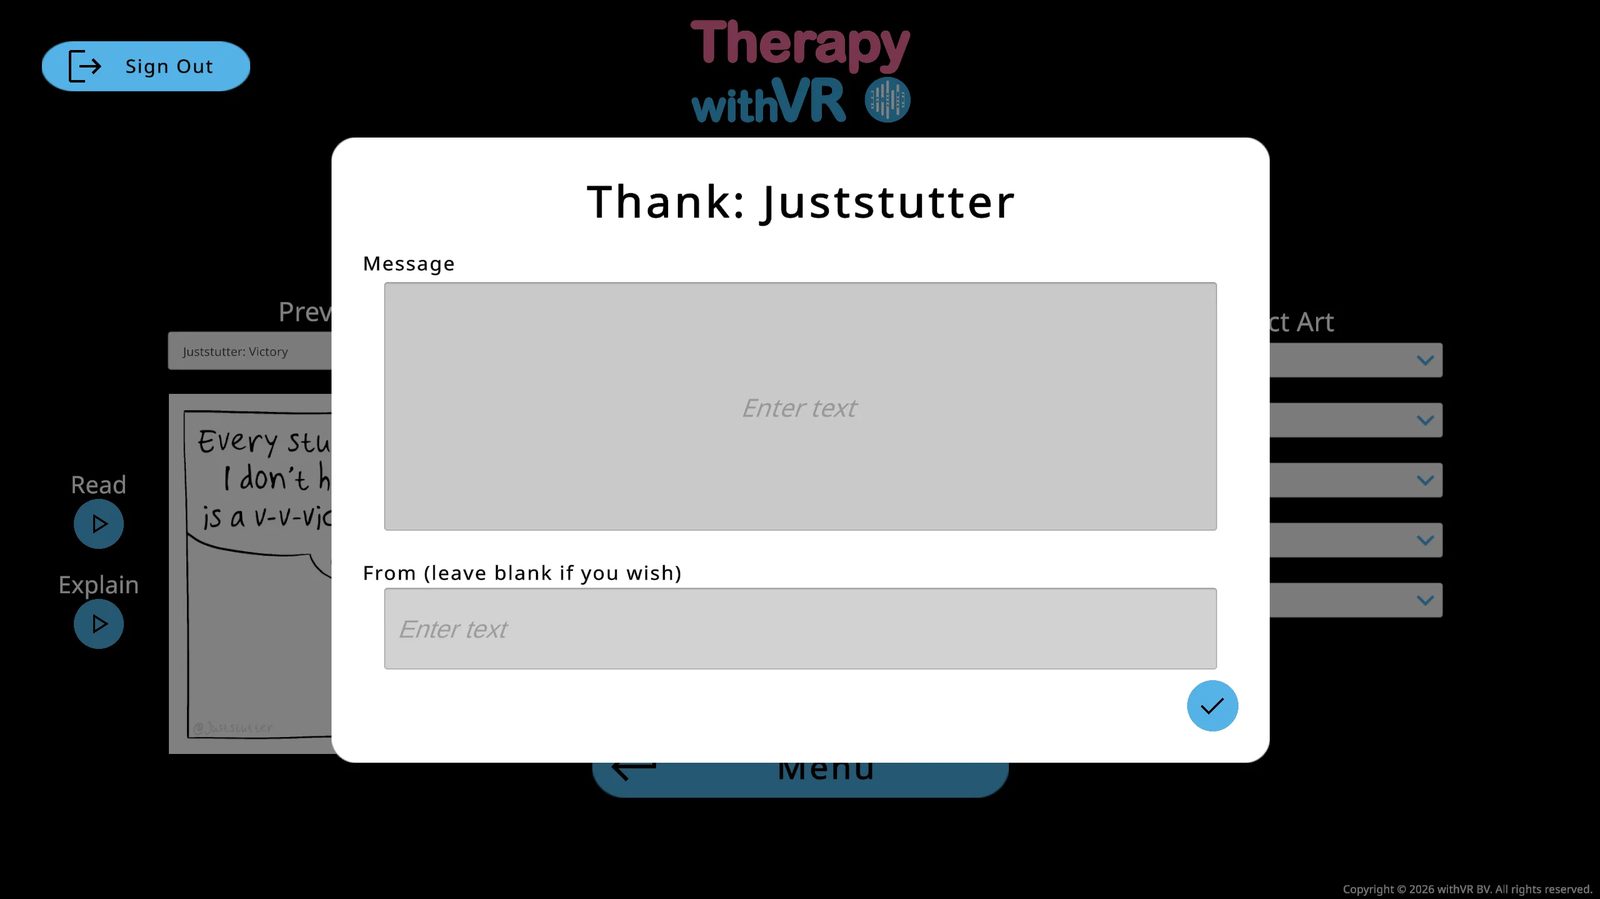
Thanking an Artist
Click the Thank button (thumbs up icon) to send a message - share how you used their work or simply say thank you. The From field is optional. Click the blue tick to send.
Displaying Art Inside VR
In the Select Art column, use each artist's dropdown to choose what to show on the wall in the Waiting Room. Options are None, specific artwork titles, or Random (loads a different piece each time the Waiting Room opens).
AI
Optional AI features that help you create more responsive, natural-feeling conversations - all controlled by you.
Overview
Therapy withVR includes optional AI-powered features that support you in creating more meaningful and relatable experiences for the individuals you work with. These features help you generate conversation content, respond quickly during a session, translate between languages, and adjust how avatars sound and speak.
The person inside VR does not interact with the AI directly. Everything the avatars say is controlled by you. The AI generates suggestions and content - you always decide what gets used.
Enabling AI Features
AI features are optional and off by default. If they are not appropriate for your setting, you do not need to activate them.
From the Main Menu, open Settings.
Check the OpenAI checkbox. A blue Extra button appears.
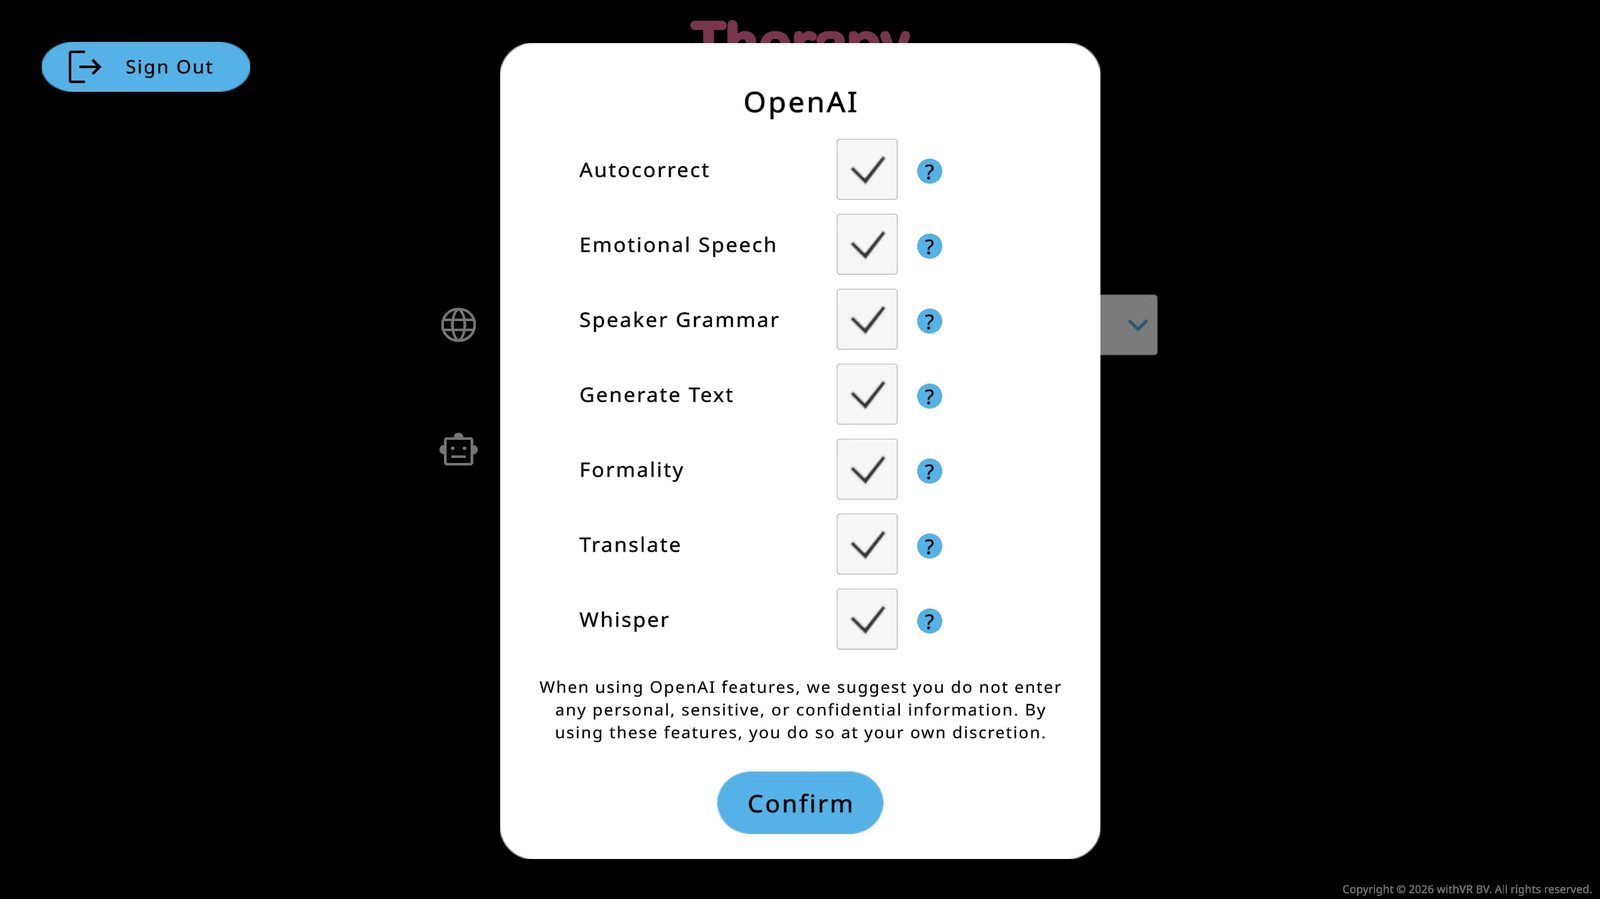
Click Extra to open the feature panel. When you first enable OpenAI, all features in this panel are enabled by default. Check that each feature you want to use is turned on. Uncheck any you do not need. Click Confirm.
Informed Consent
The avatar voices the person inside VR hears are AI-synthesized - they are not human recordings. If you enable optional AI features, some of the sentences avatars say may also be AI-generated. No personally identifiable information about the person inside VR is sent to any AI provider as part of normal use.
Before using the platform with an individual, ensure they are informed of the following:
- That the voices inside VR are AI-generated, not human recordings
- That some conversation content may also be generated by AI
- That no audio, video, or speech from the person inside VR is captured or sent anywhere
How you communicate this is up to you - it may be part of a written consent form, a verbal explanation before the session, or your organization's standard technology disclosure process.
For more guidance on informed consent and technology in your practice, see the Technology Checklist for SLPs resource pack at withvr.app.
Feature Reference
The following features are available when OpenAI is enabled. Each one is controlled independently from the Extra panel in Settings.
Generate Text
During a session, type a topic into the input bar (for example, "cooking" or "Roblox") and click the Generate Text robot icon. Three AI-generated questions appear as bubbles. Click one to have the selected avatar say it. You can also add instructions to your topic to shape the output - for example, "Roblox but use simple words for 3rd grade" or "weekend plans using Gen Alpha slang."
Generate Text (read-aloud)
Click the book icon (next to the repeat button) to generate a longer passage on a topic, in language suited to the individual. This is useful when the individual is practicing reading aloud or sustained speech rather than conversation.
Formality
Use the formality dropdown (Neutral, Informal, or Formal) to control the tone of AI-generated text. This affects both Generate Text output and AI Prompt responses. A job interview scenario might call for Formal. A casual chat in the Café works better with Informal. Neutral sits in between.
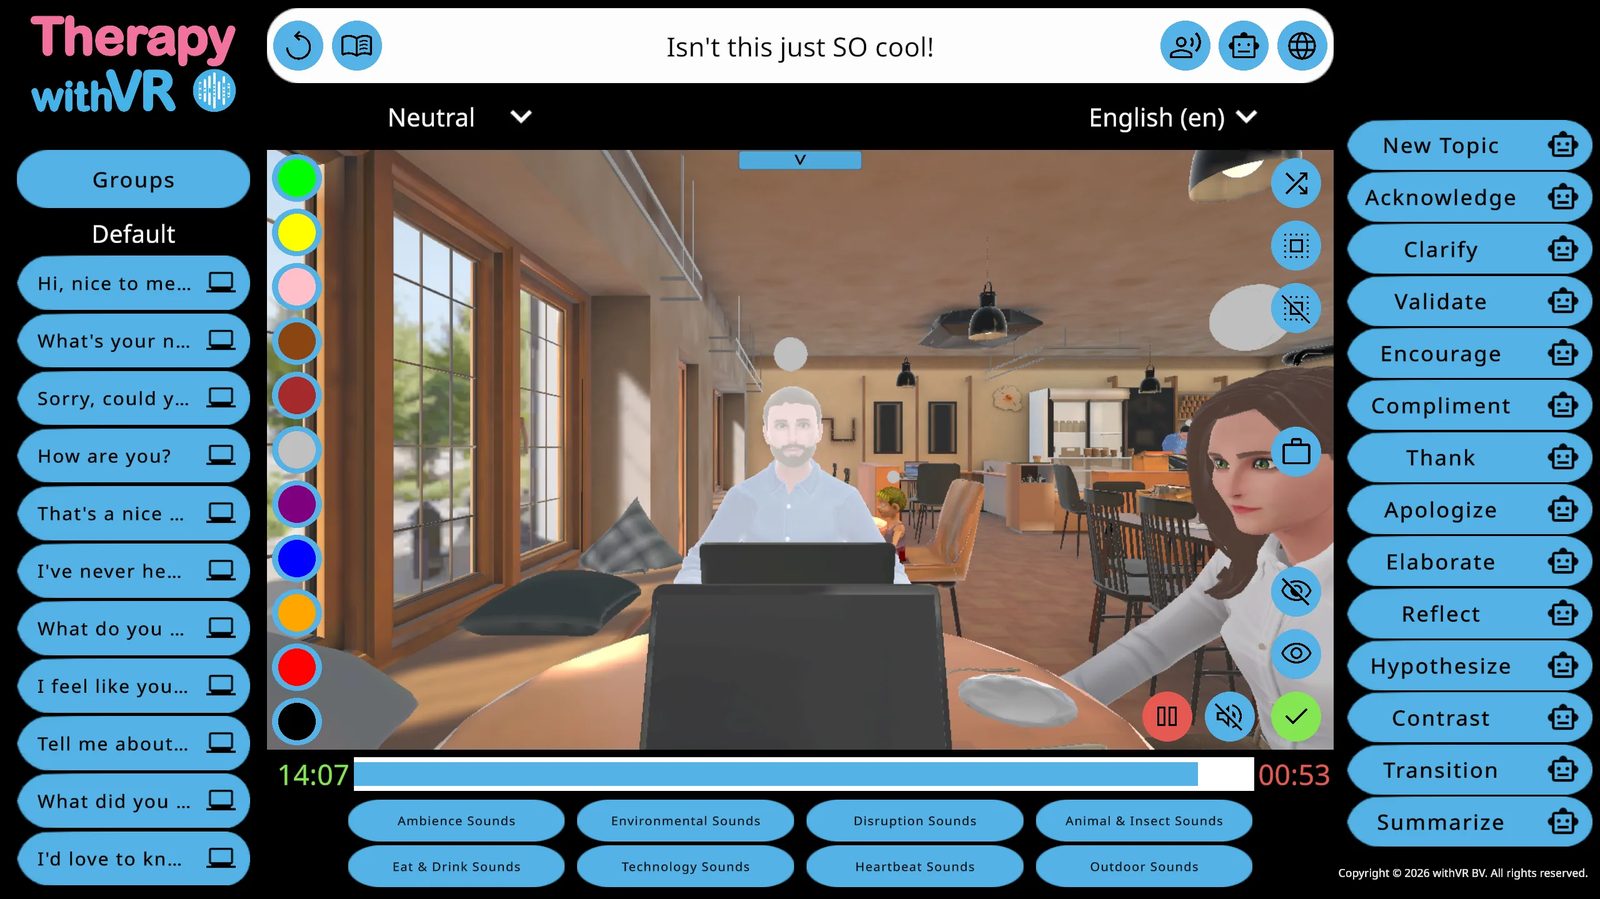
AI Prompts
14 buttons on the right panel of the session screen for responding quickly to what the person inside VR just said. Each works in two ways:
- Click the robot icon next to the word - generates 3 options for you to choose from (safer, because you review before the avatar speaks)
- Click the word itself - the avatar speaks immediately without preview (faster, but you have less control over exact wording)
| Available AI Prompts | |||
|---|---|---|---|
| New Topic | Acknowledge | Clarify | Validate |
| Encourage | Compliment | Thank | Apologize |
| Elaborate | Reflect | Hypothesize | Contrast |
| Transition | Summarize | ||
Translate
Type text in the input bar, select a target language from the dropdown, and click the globe icon. The avatar says the translated version. This works even if you do not speak the target language yourself - the AI handles the translation.
Autocorrect
When enabled, Autocorrect fixes spelling and grammar in text you type for an avatar to say. This runs automatically before the avatar speaks, so small typing errors do not affect what the person inside VR hears.
Whisper
Whisper uses speech recognition to convert your spoken words into text. During Setup, click Start Recording next to a sentence field, speak for up to 5 seconds, and the text appears. This is useful for quickly adding sentences during preparation without typing each one.
Speaker Grammar
In some languages, the correct grammar depends on the gender of the speaker. For example, in Portuguese, a male speaker says "Obrigado" while a female speaker says "Obrigada." When Speaker Grammar is enabled, the AI automatically adjusts the grammar of each sentence to match the voice gender of the avatar before they speak. This happens behind the scenes - you write one sentence, and the AI adapts it for whichever avatar says it.
Emotional Speech
When an avatar has a WAVENET or STANDARD voice type and any emotion other than Neutral is applied, the AI automatically generates SSML code behind the scenes to adjust the voice. This changes the pitch, speed, pause length, emphasis, and volume to match the avatar's emotion - making a Happy avatar sound upbeat, or a Sad avatar sound slower and quieter.
You do not see or edit the SSML. You simply set the avatar's emotion, and the AI adjusts the voice to match. If the avatar's emotion is set to Neutral, no changes are made to the voice. If the avatar uses a different voice type (not WAVENET or STANDARD), this feature does not apply - the avatar speaks in its standard voice regardless of the emotion setting.
What Uses AI
| Feature | What it does | Provider |
|---|---|---|
| Avatar voices | All avatar speech inside VR is generated using text-to-speech. | Google Text-to-Speech |
| Generate Text | Generates suggested conversation text based on a topic. Optional - enabled by default when OpenAI is turned on. | OpenAI |
| AI Prompts | Generates contextual responses during a session. | OpenAI |
| Translate | Translates conversation sentences between languages. | OpenAI |
| Autocorrect | Corrects spelling and grammar in text entered by the person running the session. | OpenAI |
| Whisper | Converts spoken words to text during Setup. | OpenAI |
| Speaker Grammar | Adjusts gendered grammar to match the avatar's voice. | OpenAI |
| Formality | Adjusts formality level of AI-generated text. | OpenAI |
| Emotional Speech | Adjusts avatar voice to match their emotion (WAVENET/STANDARD voices only). | OpenAI |
What Does Not Use AI
- Session control (starting, pausing, stopping)
- Avatar behavior, gestures, and facial expressions
- Environment selection and customization
- Profile creation and management
- Sound effects and ambience
- Art display in the Waiting Room
Data and Privacy
Avatar voices are AI-synthesized using Google Cloud Text-to-Speech in every session. This is not an optional feature - all avatar speech uses synthetic voices. The person inside VR always hears an AI-generated voice, not a human recording.
Text sent to OpenAI for translation, generation, autocorrect, speaker grammar, formality, or emotional speech is processed via the OpenAI API. Under OpenAI's API data usage policy, API inputs are not used to train OpenAI's models by default. Text sent to Google for voice synthesis is processed via Google Cloud Text-to-Speech.
No names, session recordings, or personally identifiable information are sent to these services as part of normal use. For more detail, see the Privacy Policy.
Updating the Software
How to keep the VR app and web app up to date.
Web App
The web app updates automatically. Every time you open the withVR web app in your browser, you are using the latest version. There is nothing you need to do.
If you notice something behaving unexpectedly after a long session, try refreshing the page in your browser. This ensures you have the most recent version loaded.
VR App
The VR app is updated like any other Meta Quest app. There are two ways to check and install updates:
Method 1: Check from the web app
The Welcome screen of the web app always shows the current status of your VR app. You do not need to put the VR headset on to check.
| What you see | What it means |
|---|---|
| Green - "You have the latest VR app!" | No update needed - you are ready to go |
| Red - "Your VR app can be updated!" | An update is available - follow the steps shown below the message |
| Blue - "You can install the VR app" | The app has not been installed yet - follow the steps shown below the message |
Method 2: Update from the VR headset
Put on the headset. Press the Meta button (controller) or pinch with your hands to open the menu.
Open Library (Navigator) or Apps (older UI).
Find Therapy withVR. Look at the button on its card:
- Open or Play - you are on the latest version. Done.
- Update - click it. Wait for the download to finish, then open the app.
- Install - the app is not installed yet; see Setup & Onboarding.
No Update button but you are sure one exists? Try these in order:
- Open the Store tab, then look for Manage or Updates in the left menu.
- Or click your profile icon → Settings → Apps.
- Or restart the headset (hold power, wait 5 seconds, hold power again) and check Library again - a known bug can hide the Update button until a restart.
How to Tell Which Version You Have
The web app version is shown in the top right corner of the documentation and in the web app itself. The Welcome screen status check confirms whether your VR app matches the latest available version.
What to Do If an Update Fails
- Make sure the VR headset is connected to WiFi
- Check that the VR headset has enough storage space (the app requires approximately 430 MB)
- Restart the VR headset - hold the power button until the screen goes black, wait a few seconds, then turn it back on
- Try updating again from the App Library
- If the update still fails, contact support@withvr.app
Profiles
Profiles save your complete session settings for a specific use case or individual.
The Profiles Screen
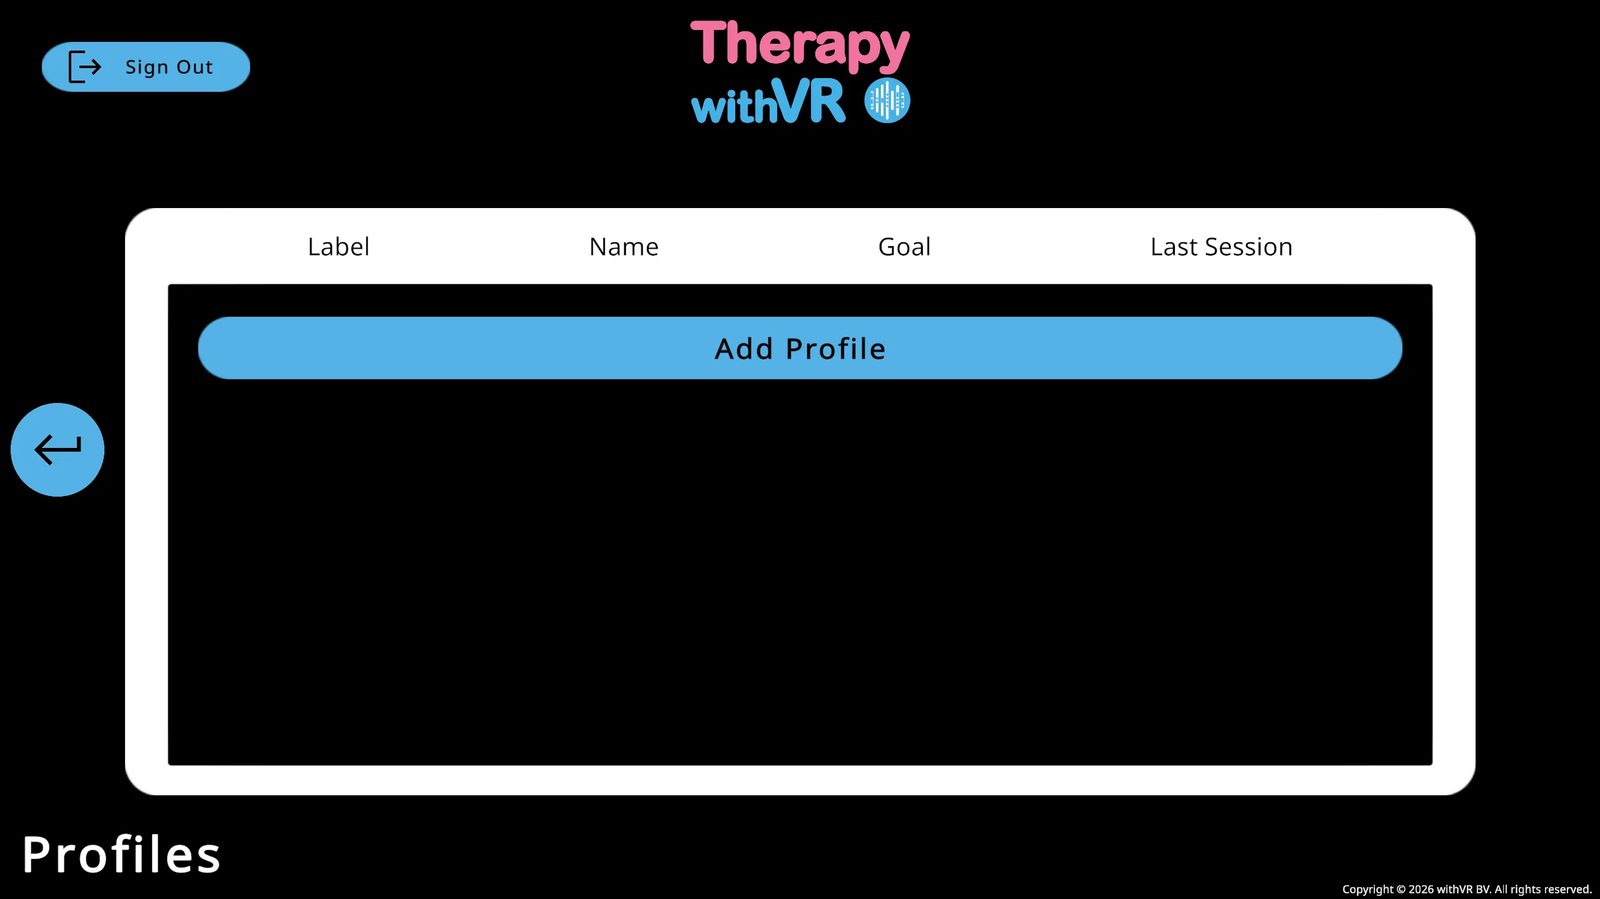
Creating a Profile
Click Add Profile and fill in a Label and a Name. Click Add to save. You can create as many profiles as you need.
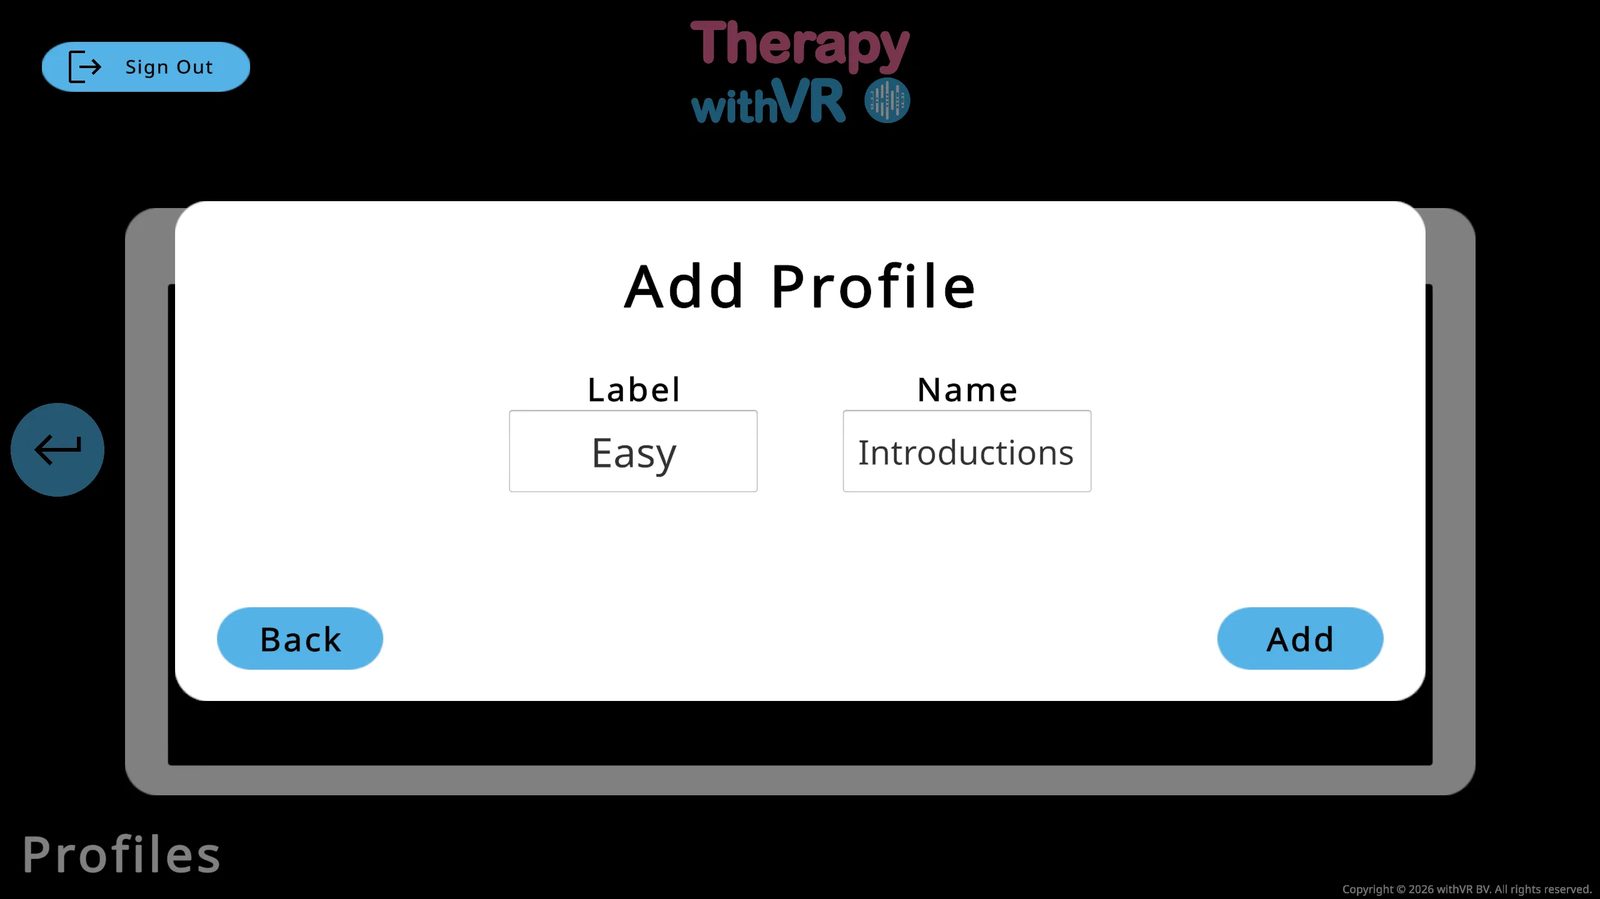
| Column | Description |
|---|---|
| Label | A short identifier - e.g. difficulty level or colleague initials |
| Name | The use case or topic - e.g. "Introductions" |
| Goal | The goal set for this profile (appears after first session) |
| Last Session | When this profile was last used |
Profile names are encrypted in the database using AES encryption - even if the database were accessed without authorization, names would not be readable. For an extra layer of privacy, consider using a pseudonym, initials, or a reference code instead of a real name.
The Goal field is stored as plain text. Do not enter any personally identifiable information in the Goal field.
Managing a Profile
Click any profile row to open its options:
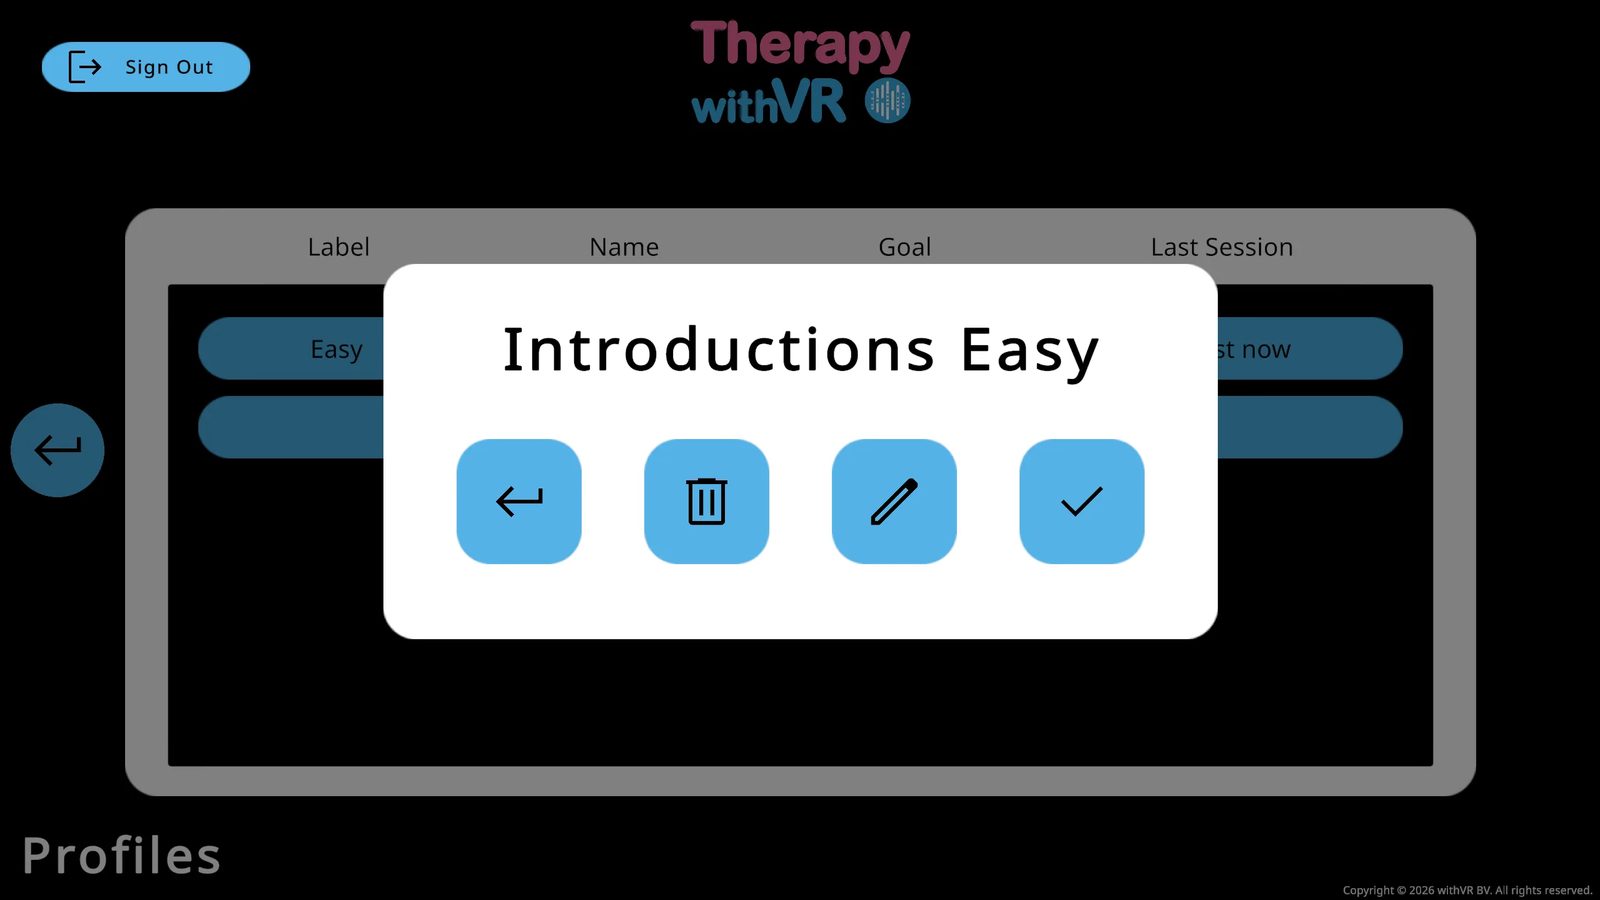
| Button | What it does |
|---|---|
| ← Back | Closes the popup and returns to the profile list |
| 🗑 Delete | Permanently deletes the profile and all its settings |
| ✏ Edit | Edit the Label and/or Name |
| ✓ Select | Selects this profile and opens the Situations screen |
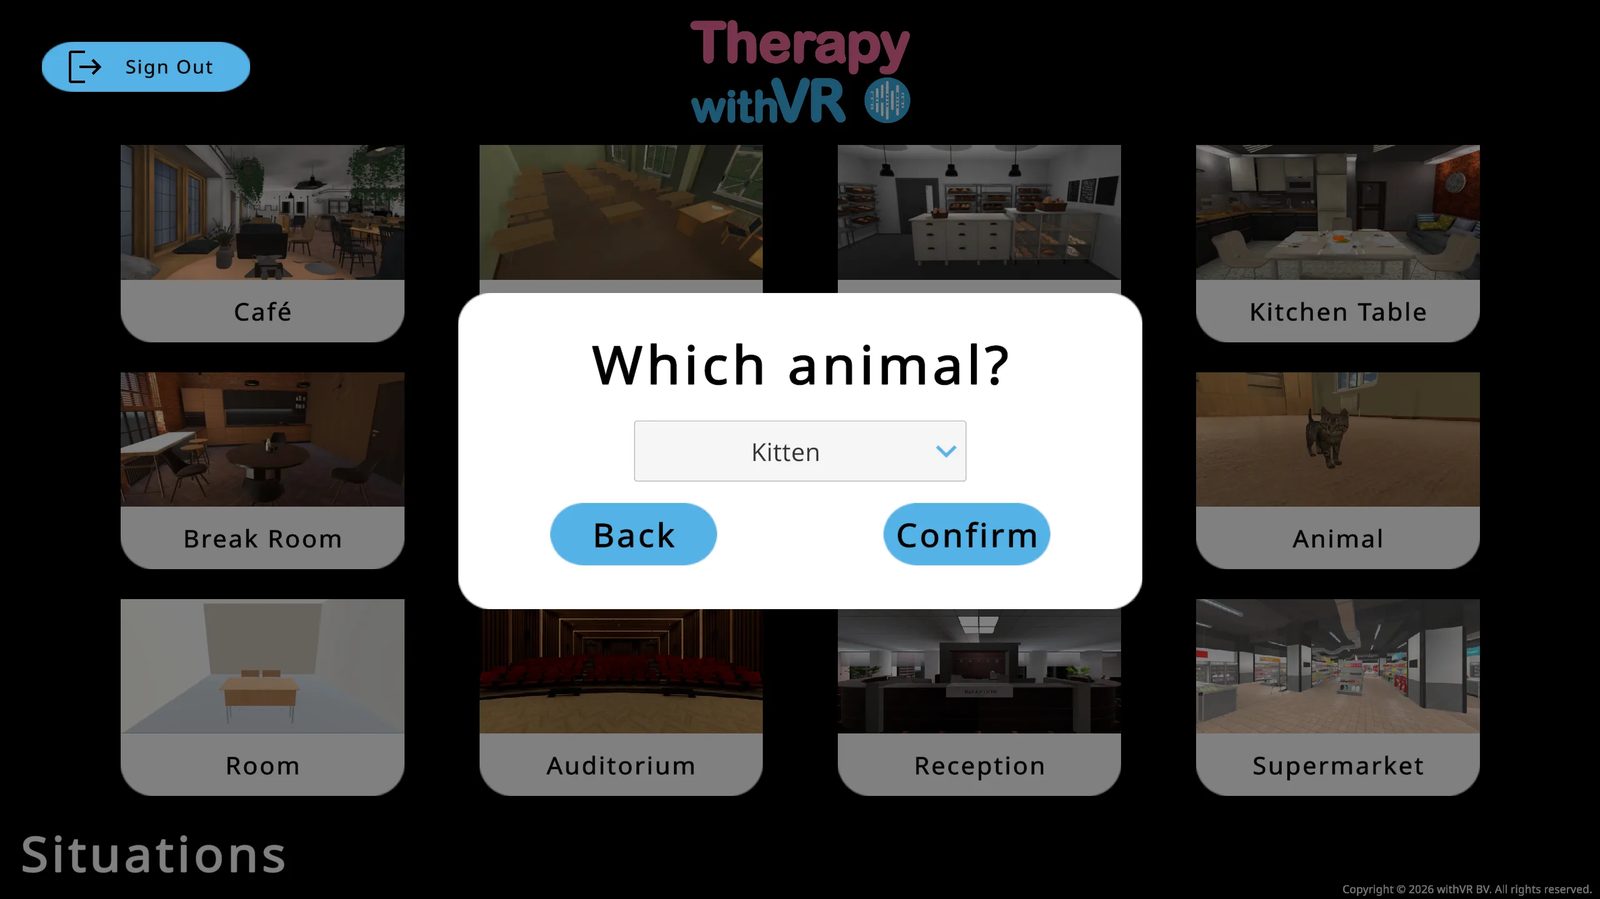
Choosing a Situation
After selecting a profile, you will see the 12 situations. Click one to load its Setup screen.

Two situations have extra options before Setup loads:
- Speaking Circle - choose number of seats (2-12, includes the person's own chair)
- Animal - choose Kitten or Bunny

Setup: Preparing a Situation
Configure avatars, emotions, voices, objects, sentences, and session duration. All settings save automatically.
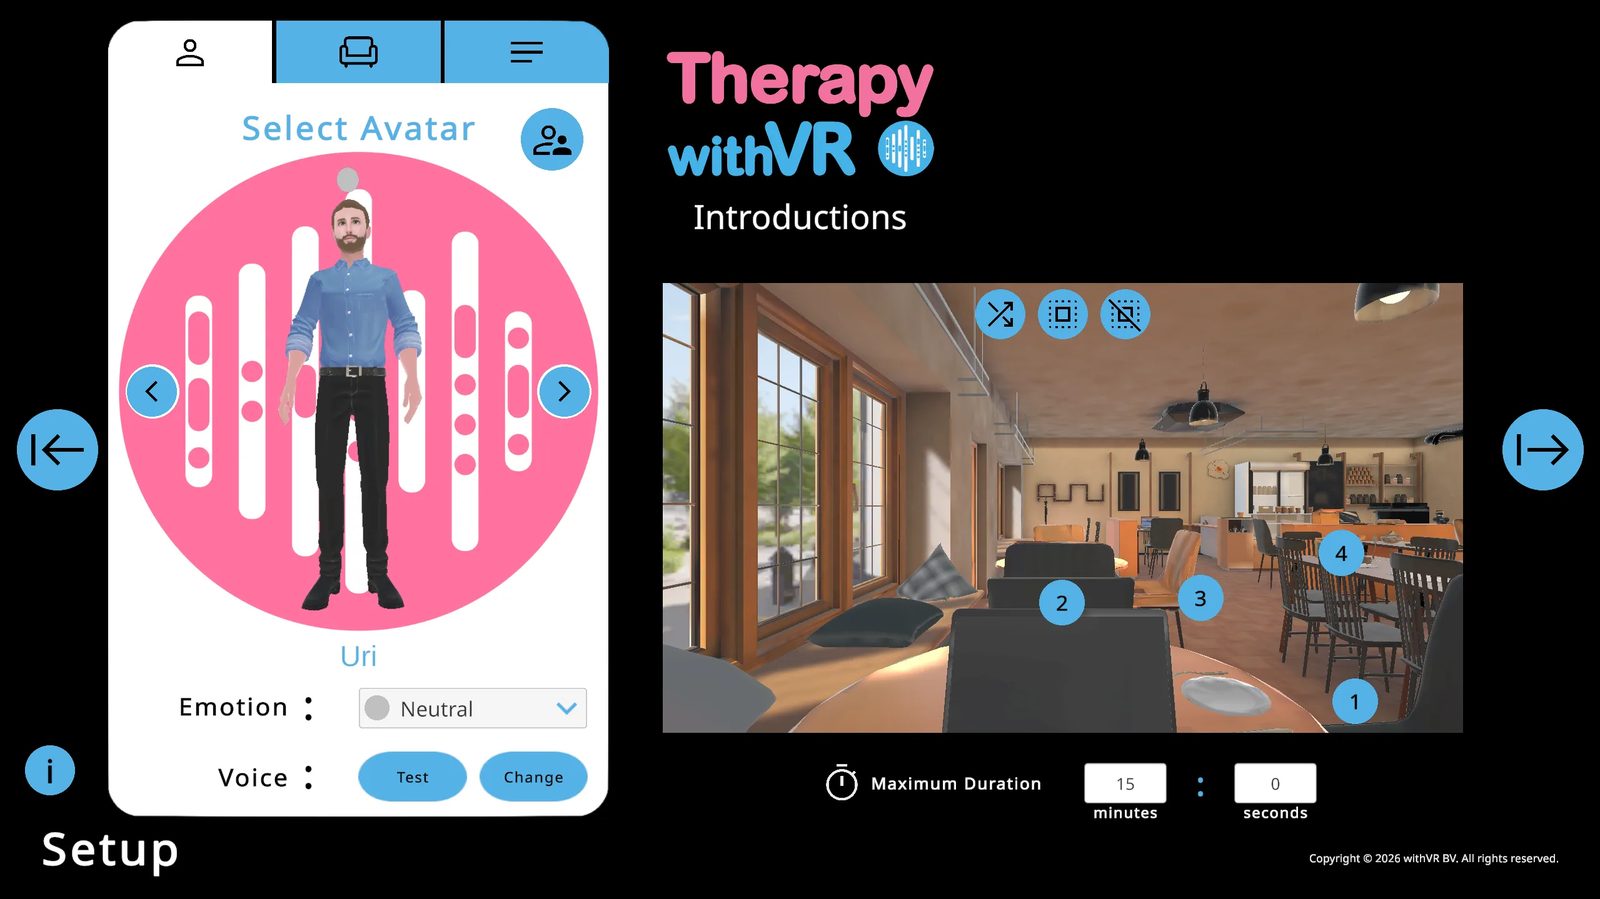
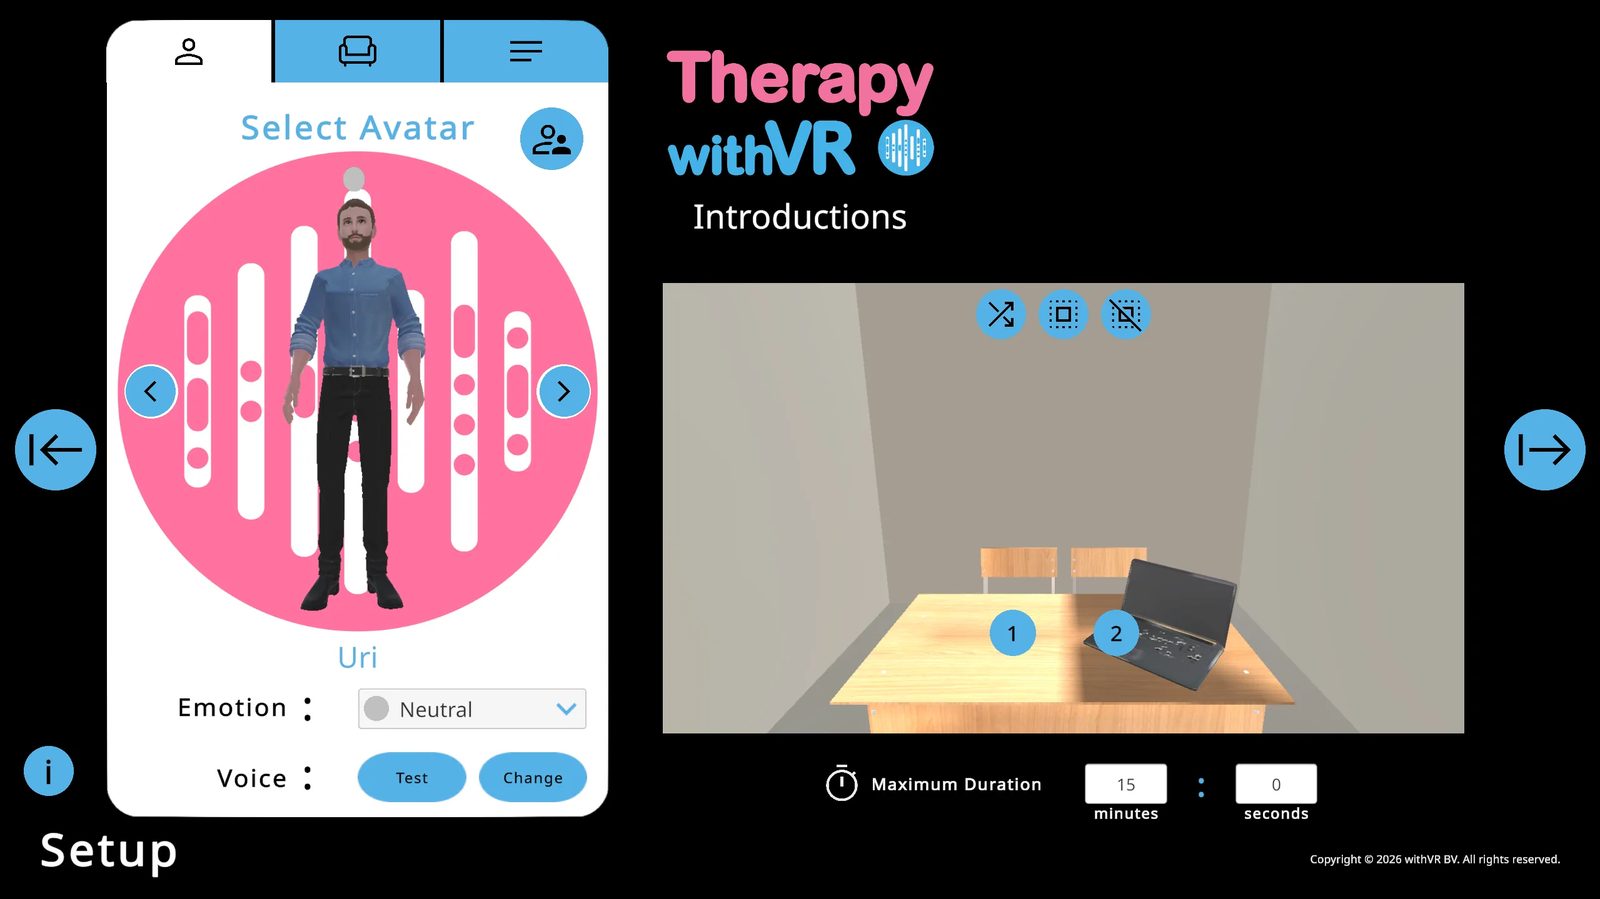
Tab 1: Select Avatar
Placing Avatars
Use the left/right arrows to browse avatars. Click a numbered blue circle in the VR preview to place the current avatar there. The circle turns green when occupied. You can place the same avatar in multiple positions.
Three icon buttons at the top right of the VR preview let you place a random avatar in one position, fill all positions with random avatars, or clear all positions.
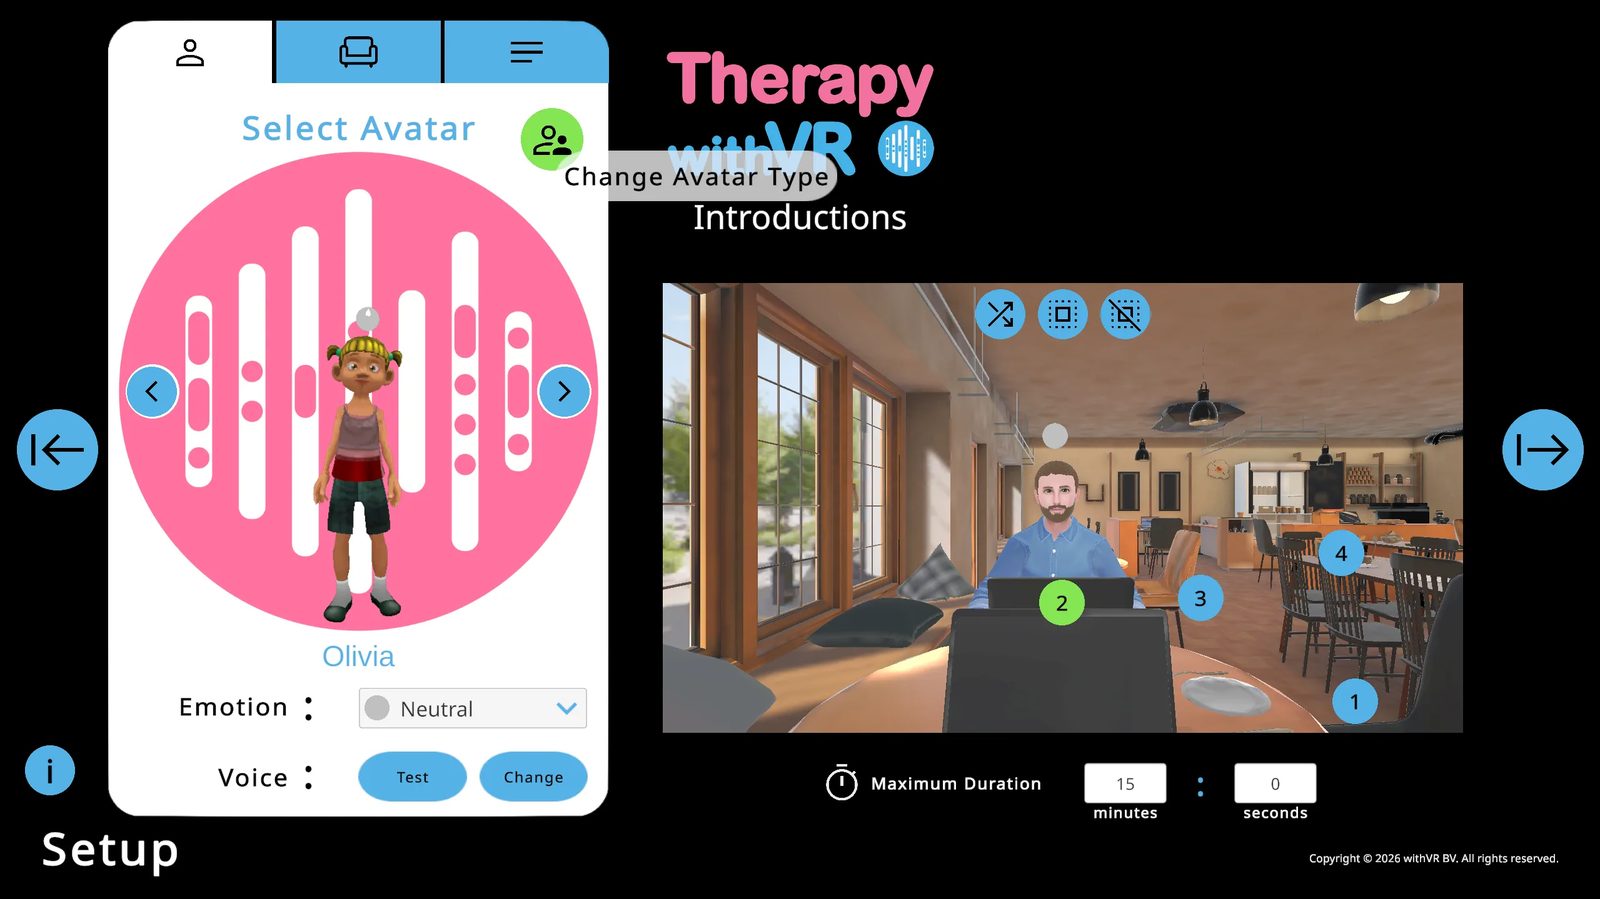
Emotions
Change an avatar's emotion from the Emotion dropdown below their name. The change instantly updates their facial expression, the color of the sphere above their head, and their appearance inside VR.
| Emotion | Color | Emotion | Color |
|---|---|---|---|
| Neutral | Gray | Confused | Purple |
| Happy | Yellow | Anxious | Orange |
| Sad | Blue | Excited | Green |
| Angry | Red | Calm | Brown |
| Bored | Dark red | Surprised | Pink |
| Fearful | Black |
Voices
Click Test to hear the current voice. Click Change to configure language, voice type (CHIRP3-HD, WAVENET, or STANDARD), gender, and specific voice. CHIRP3-HD voices are preferred - they sound more natural and start speaking faster. Pitch and rate adjustment is only available for WAVENET and STANDARD voices.
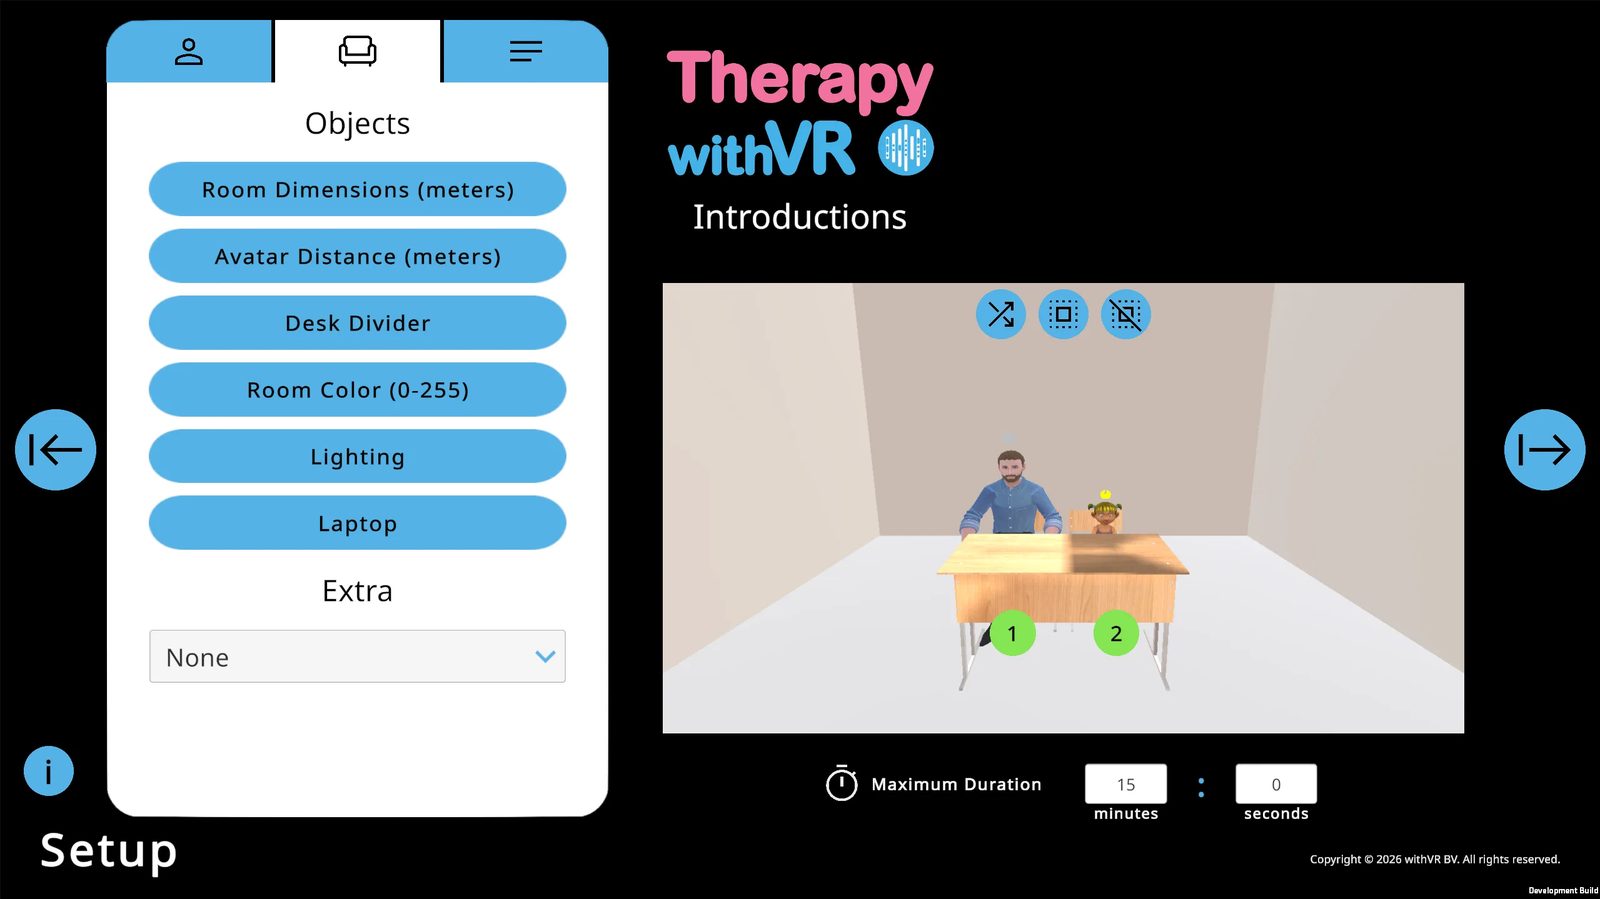
Tab 2: Objects
Toggle situation-specific objects on and off. The Laptop must be visible to display text on it during a session. The Extra dropdown adds one conversation-starter prop.
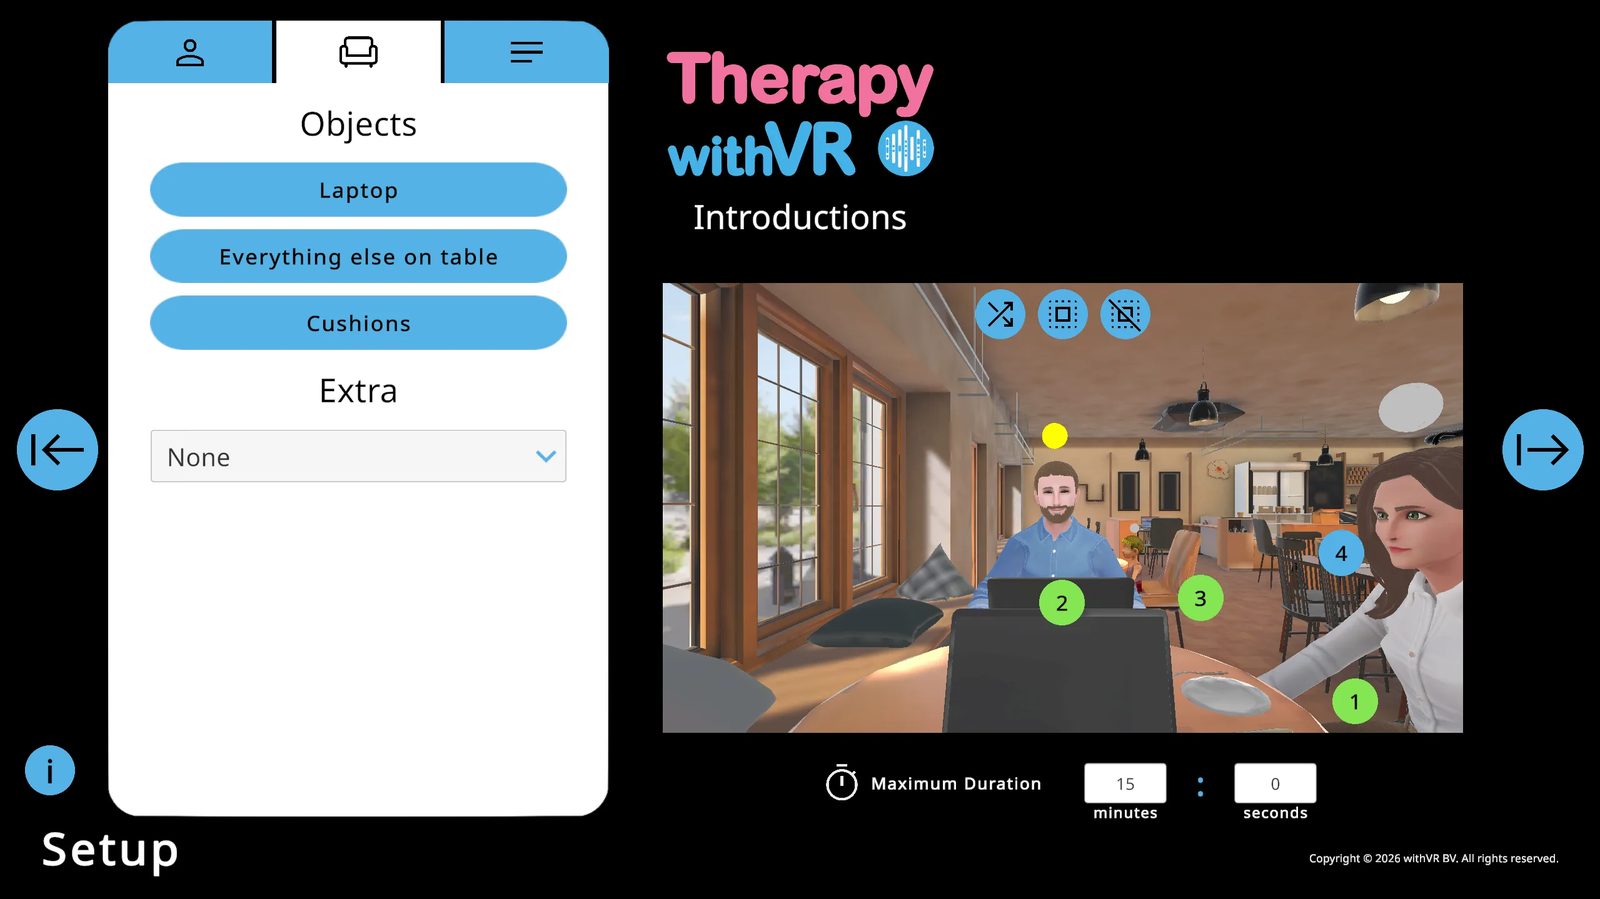
Extra object options: None, Random, Wallet, Phone, Rubber Duck, Apple, Banana, Orange, Book, Ball, Cake, Stuttering Pride Flag.
Tab 3: Sentences
Sentences are organized into groups (Default + Groups 1-9). They serve two purposes: making avatars speak out loud, or displaying text on the laptop screen inside VR.
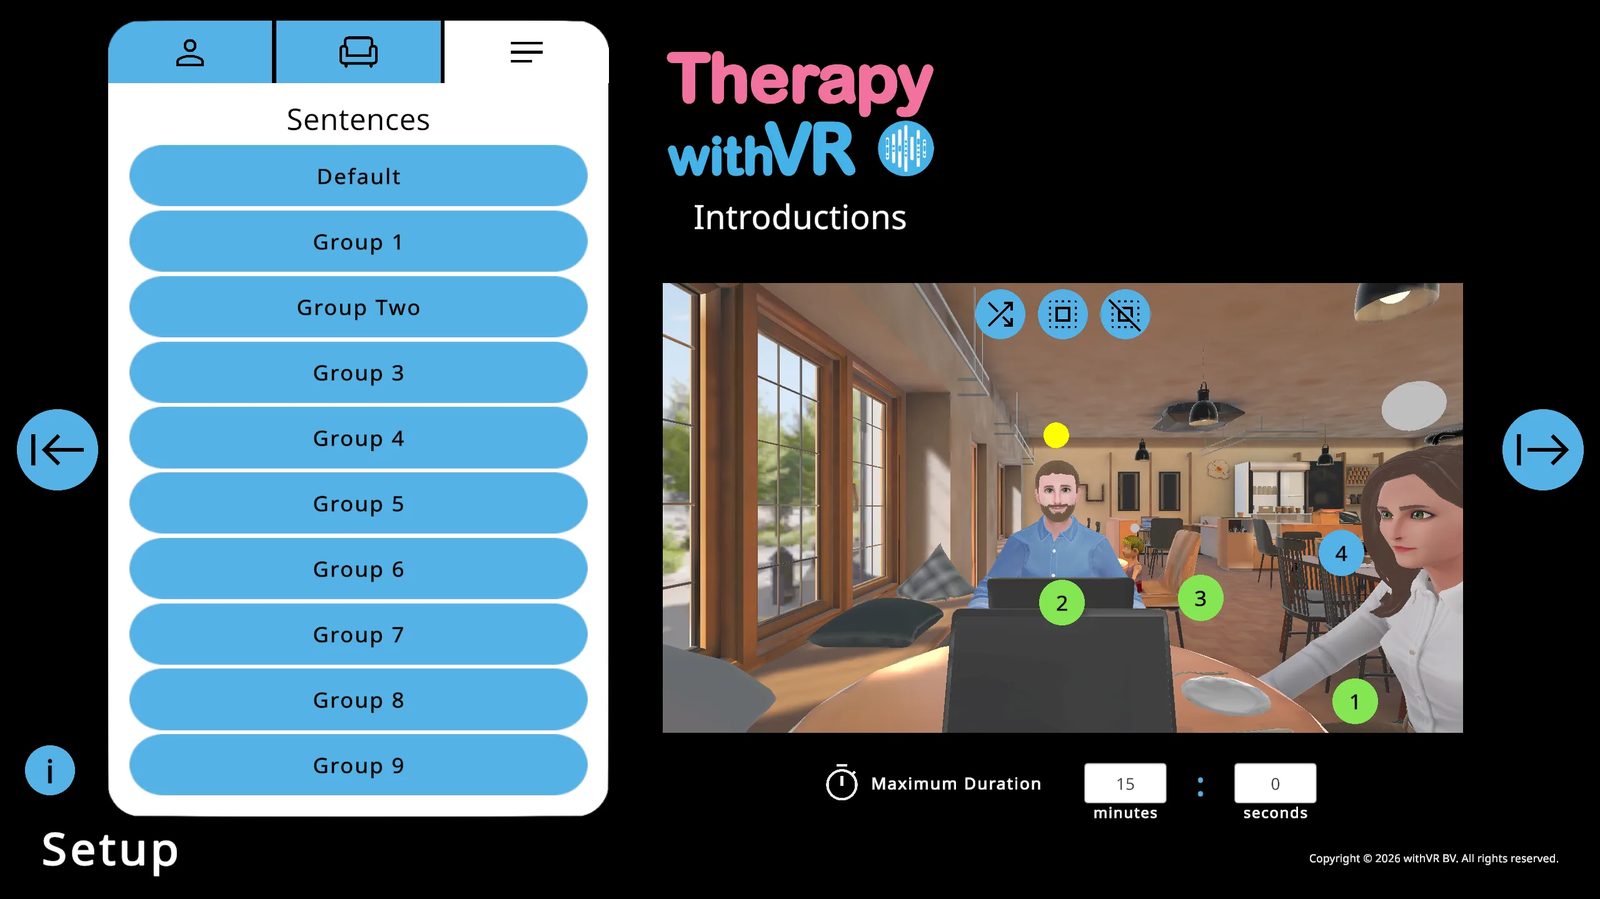

Click any sentence to edit it - type directly, or use Start Recording to speak it in (requires OpenAI Whisper enabled). You have 5 seconds to record. Click Edit to save.

Maximum Duration
Default: 15 minutes. For a first session, set to 5 minutes or less. The timer counts up during a session and the session ends automatically when it reaches the maximum. You can stop it earlier at any time.
The Room Situation
The most customizable situation - with full control over dimensions, colors, lighting, and layout.
Room-Specific Objects
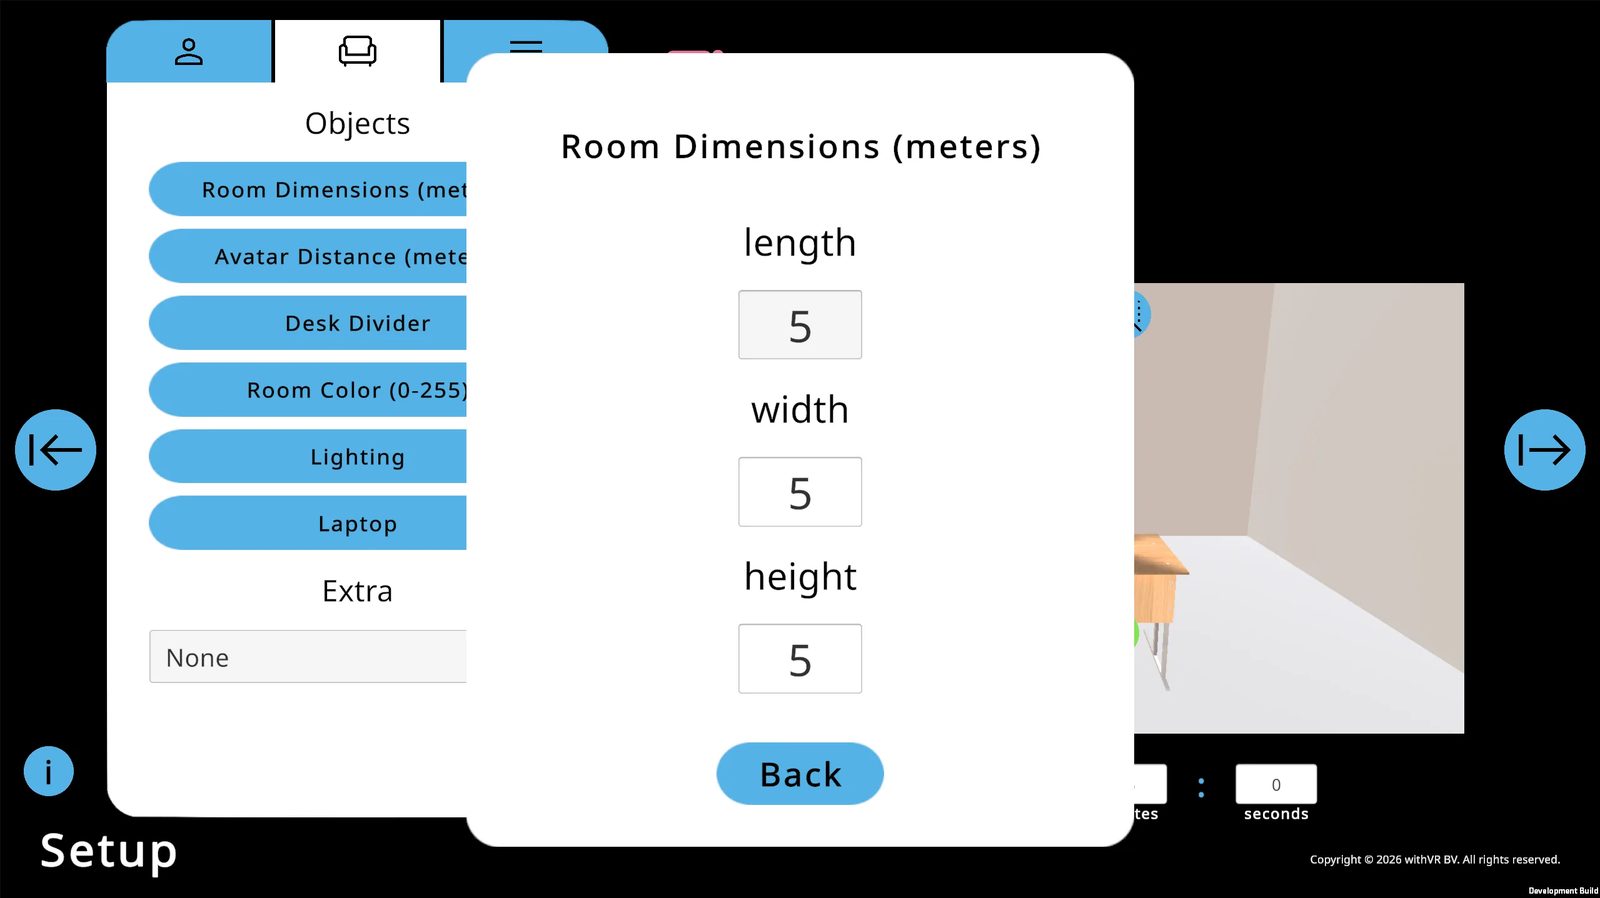
1. Room Dimensions
Set the Length, Width, and Height of the room. All default to 5 meters.
2. Avatar Distance
Control how close or far the avatar is from the person inside VR. Backward/Forward defaults to 2 meters. Left/Right defaults to 0 meters.
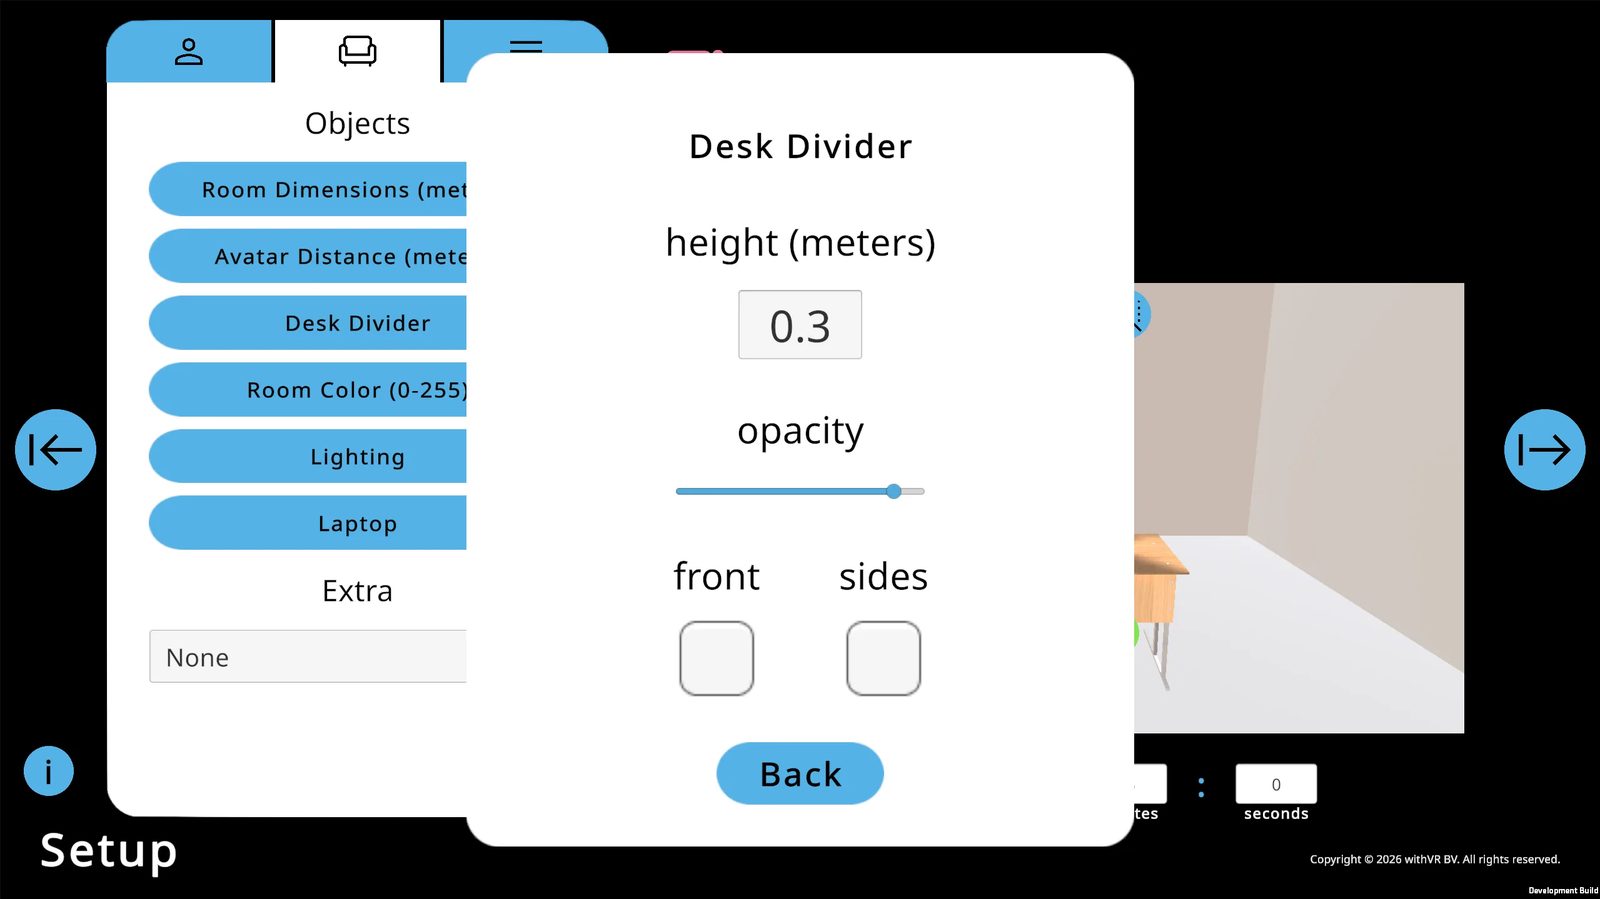
3. Desk Divider
Add a divider between the person and the avatars. Set the height (default 0.3 meters), opacity, and whether the front and side panels are visible.
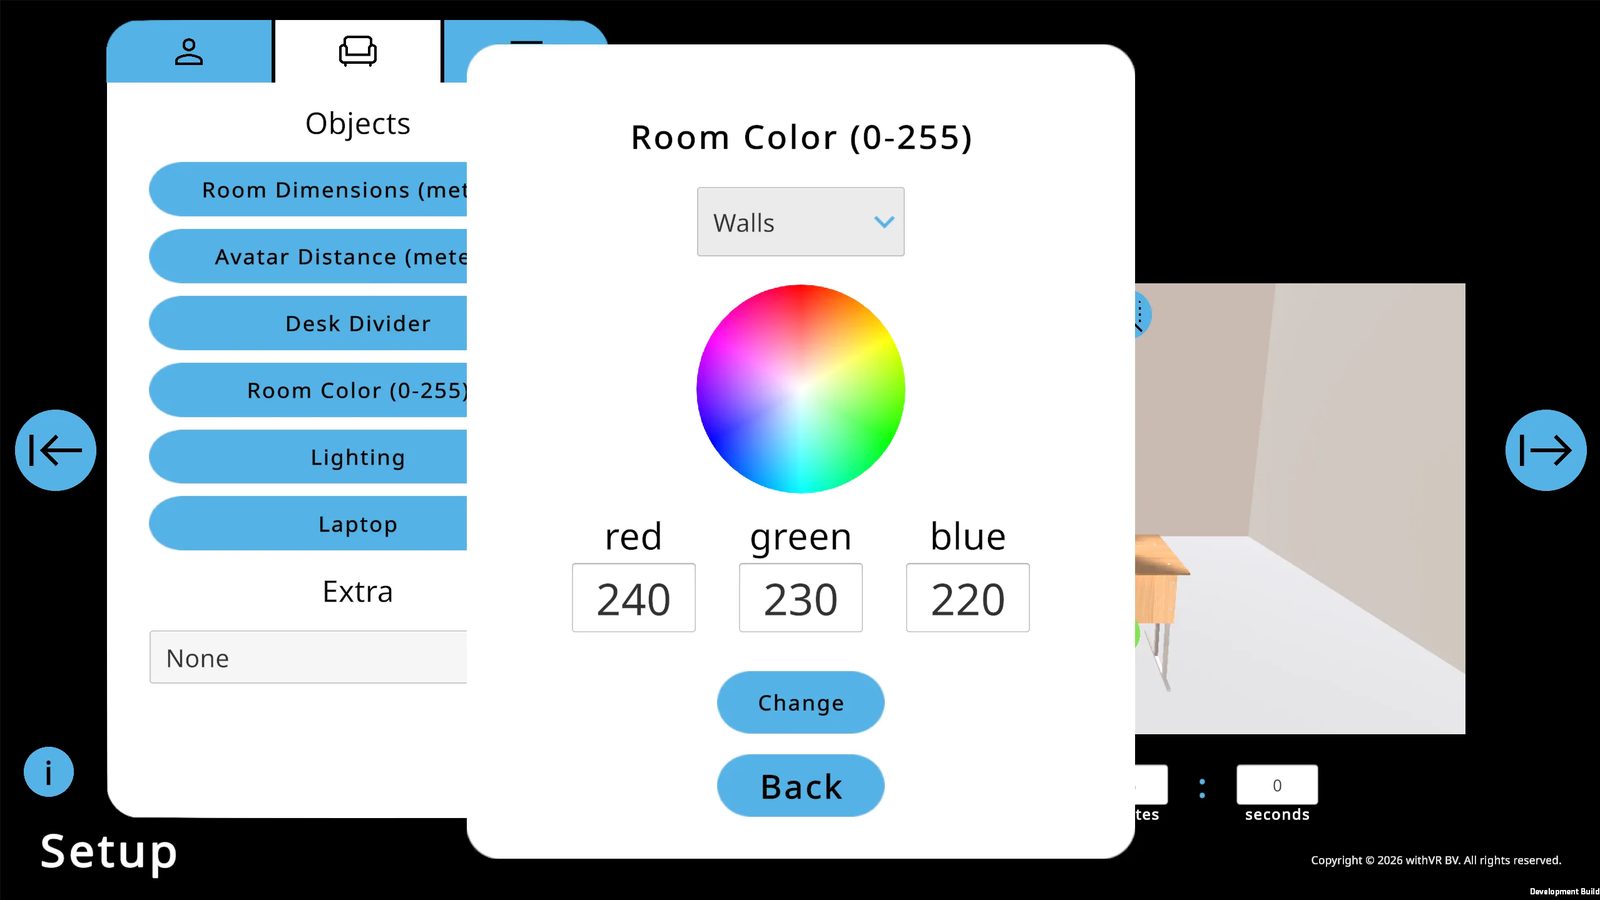
4. Room Color
Select a surface (Walls, Floor, Ceiling), choose a color using the color wheel or RGB values (0-255 each), and click Change. Default wall color: RGB 240 / 230 / 220.
5. Lighting
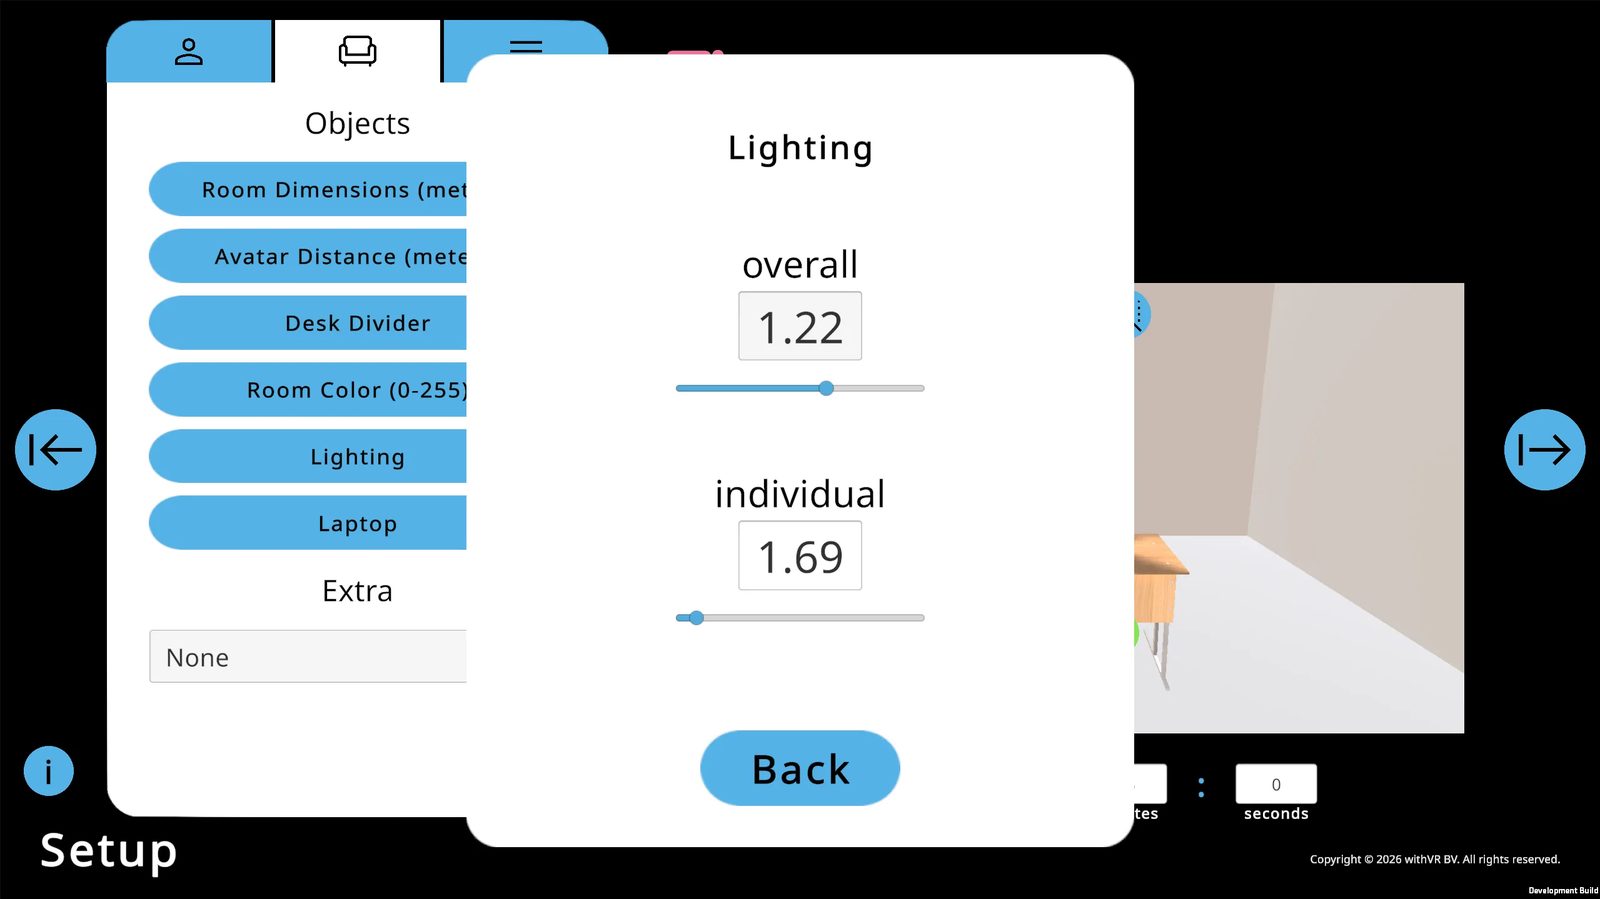
Two sliders: overall room brightness (default 1.22) and an individual light source (default 1.69).
6. Laptop & Extra
Same as all other situations. The Laptop is on by default - it must be visible to display text during a session.
Avatar Positions
2 positions - both seated at the table (left and right). The minimal environment places full focus on the interaction.
Good For
Recreating specific environments, interview simulations, highly customized scenarios, clinical and research use.
Starting a Session
From the Setup screen to the moment the session begins - two steps: the Goal screen and the Start popup.
Step 1: The Goal Screen
Click the blue → Start arrow on the far right of the Setup screen. A Goal popup appears.
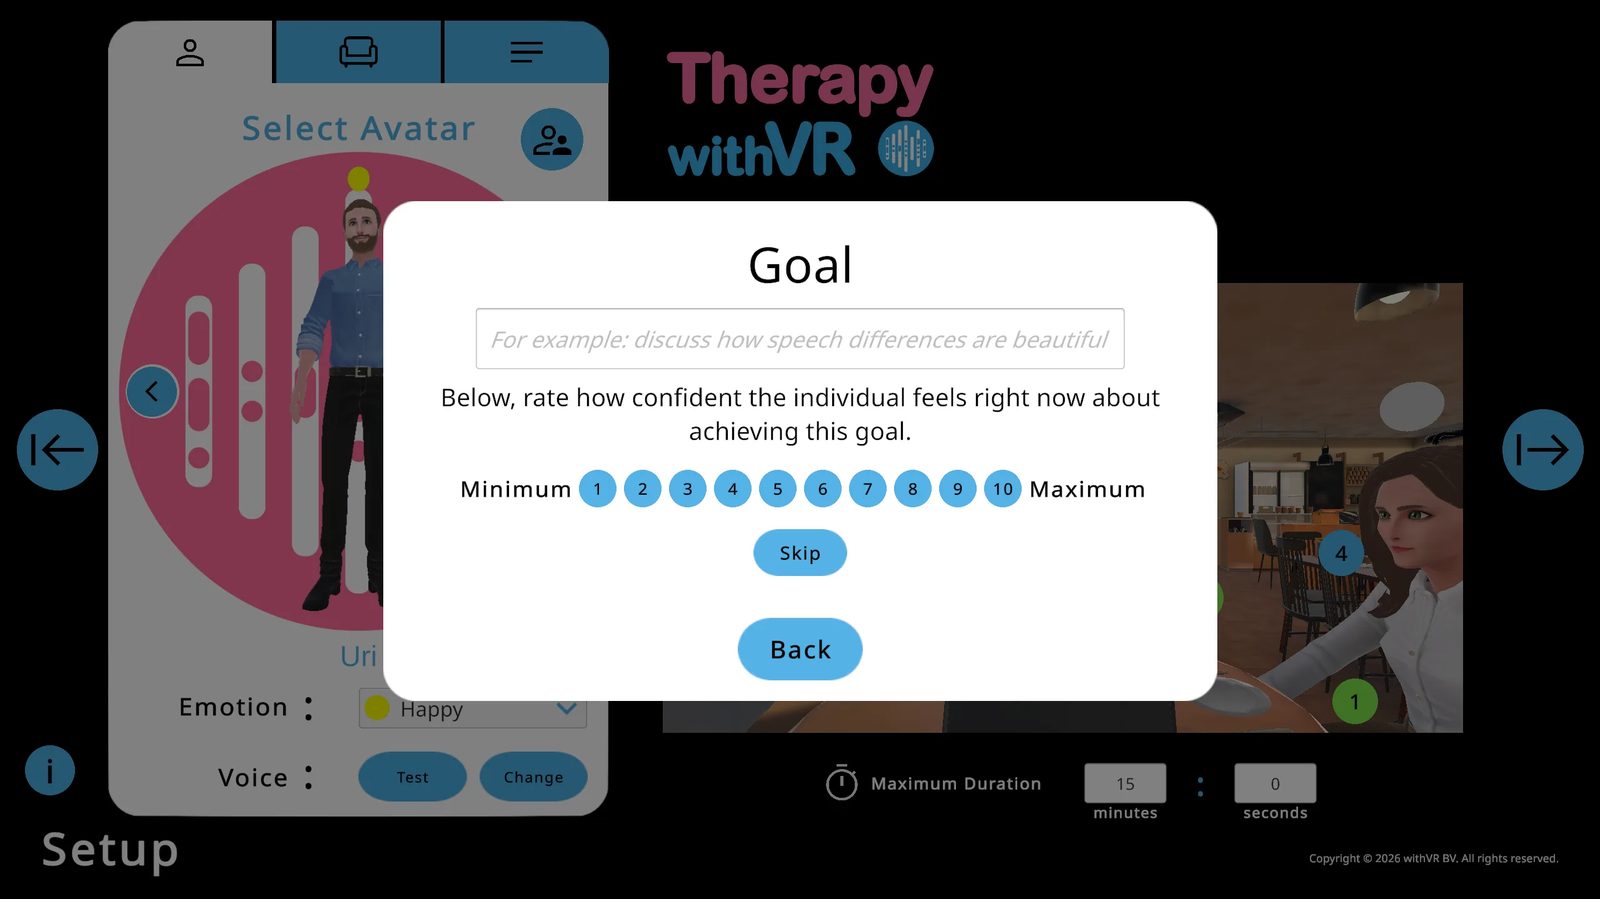
- Type a goal if you are using one, and rate confidence from 1-10
- Or click Skip to move on without recording a goal
- Click Back to return to Setup
Step 2: Choosing How to Start
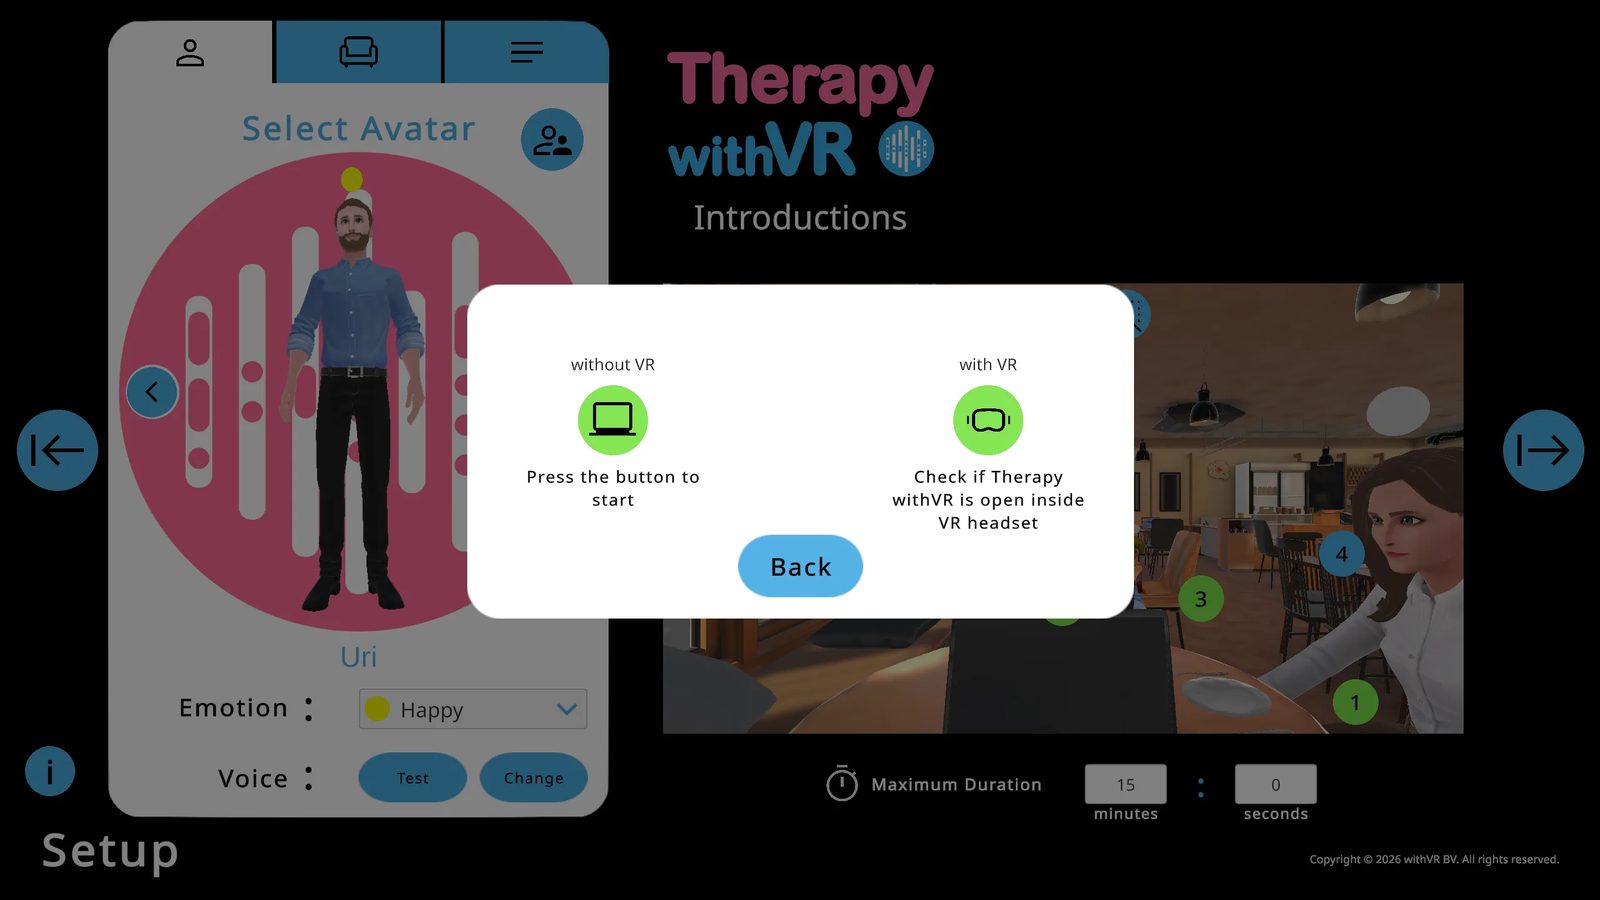
Without VR
Starts on the web app only. Sound plays from your computer. Click the button to begin immediately.
With VR
Starts inside the VR headset and on the web app. Sound plays from the headset. Recommended for full sessions.
Starting Without VR
The "without VR" option runs a full session entirely on the web app. Everything works the same - avatars, sentences, emotions, sounds, AI features - except the experience is on your laptop screen instead of inside a VR headset. This is not just a fallback or a practice mode. It is a valid way to run sessions, and many professionals use it regularly.
Common reasons to start without VR:
- Familiarization before VR - show the individual what the environment and avatars look like on your laptop screen before they put the VR headset on, so the experience is not completely unfamiliar when they enter VR
- Video call sessions - run a session over a video call by sharing your screen, when you and the individual are not in the same room
- When the VR headset is not available - you are visiting a school, clinic, or home and did not bring the VR headset with you
- When the individual cannot wear the VR headset - they may not like things on their head, they may be too young for the VR headset to fit comfortably, or they may have other reasons to prefer working without it
- Demos and presentations - showing the software to colleagues, managers, or at a conference on a laptop or projected onto a large screen
Starting With VR
Before clicking anything, make sure the person inside VR has opened the app, signed in, and the instruction text is visible on the wall.
Click the with VR button. If the VR headset is detected, the text changes to "Press the button again to start."
If not detected: close and reopen the VR app, sign back in, wait for the instruction text, then try again.
If still not detected: refresh the web app, navigate back to the Start popup, and try again.
Once detected, click the button again. The situation loads inside VR and the session begins.

The Waiting Room (VR)
What the person inside VR sees before and between sessions.
The Sign In Screen
When the VR app is first opened, the person sees a Sign In screen on the wall with Email Address and Password fields and a blue Sign In button. They use the trigger to select fields and sign in with their web app credentials.
The Waiting Room
After signing in and avatars have loaded, the person is in the Waiting Room - an empty café-style room with a chair beneath them. On the front wall: the Therapy withVR logo, instruction text ("...press 'Start' and then press the 'with VR' button twice"), and any artwork selected in the Art section.

Checking for VR App Updates
The Welcome screen of the web app shows your VR app status - no need to put the VR headset on to check.
| Status | What you see on the Welcome screen |
|---|---|
| Up to date | Green Meta logo - "You have the latest VR app!" |
| Update available | Red Meta logo - "Your VR app can be updated!" with update steps |
| Not installed | Blue Meta logo - "You can install the VR app" with install steps |
Exiting and Signing Out
The person inside VR has a few ways to leave the app:
| Action | How to do it |
|---|---|
| Sign Out | Press the Sign Out button on the right wall (top left) |
| Exit the app | Press the Exit button on the right wall (bottom left), then confirm |
| Exit via Meta button | Press the Meta button on the right controller, then select Quit |
Resetting Position Inside VR
If the person feels they are facing the wrong way, are in the wrong position, or are too high or too low, have them point the controller straight ahead and press and hold the Meta button on the right controller until the view resets. For more detail, see Meta's guide to resetting your view.
VR Boundaries
A Stationary boundary is sufficient for most sessions - the person typically stays in one place, either sitting or standing. If the person wants to move around slightly, a Roomscale boundary can be set up. Make sure the space is clear of obstacles, and the VR headset will display a warning when the person approaches the edge of their boundary. For more detail on setting up boundaries, see Meta's boundary guide.
The Session Screen
Your live control panel for everything that happens inside VR during a session.
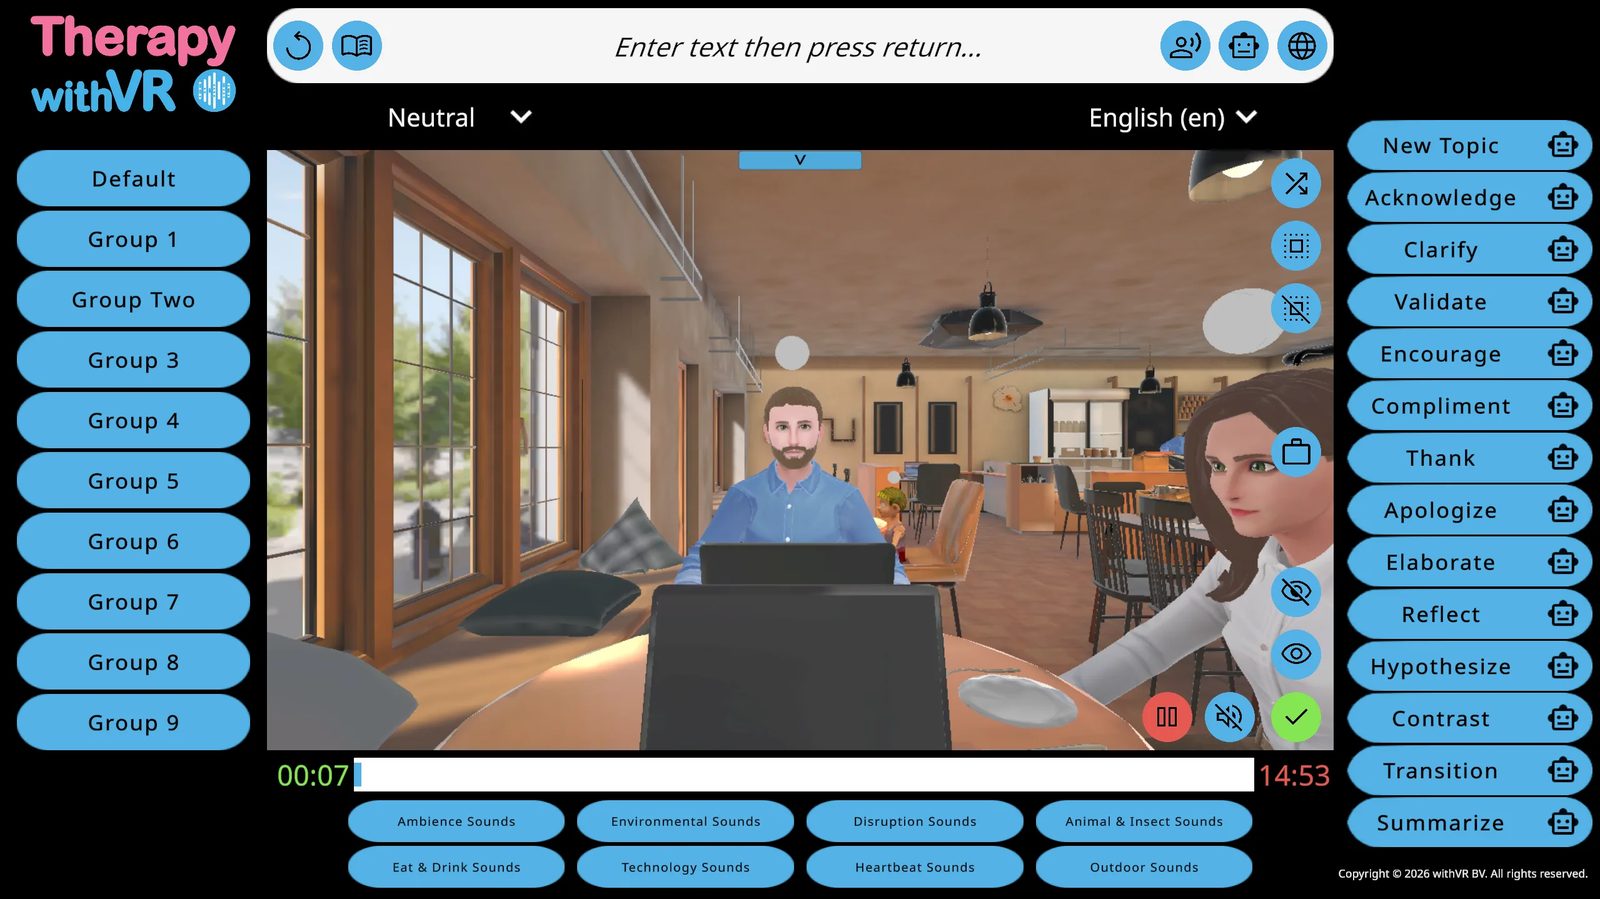
The Timer
Green timer (left) counts up from 0:00. Red timer (right) counts down from your maximum duration. A blue bar fills the space between them as the session progresses.
Selecting Avatars
Click an avatar in the VR preview to select them. A white highlight appears around the selected avatar - only visible on the web app, not inside VR. Three buttons at the top right of the preview let you select a random avatar, select all, or deselect all.
Changing Emotions
With at least one avatar selected, a column of colored circles appears on the left edge of the VR preview. Click any circle to apply that emotion instantly. Hover over circles to see their names.
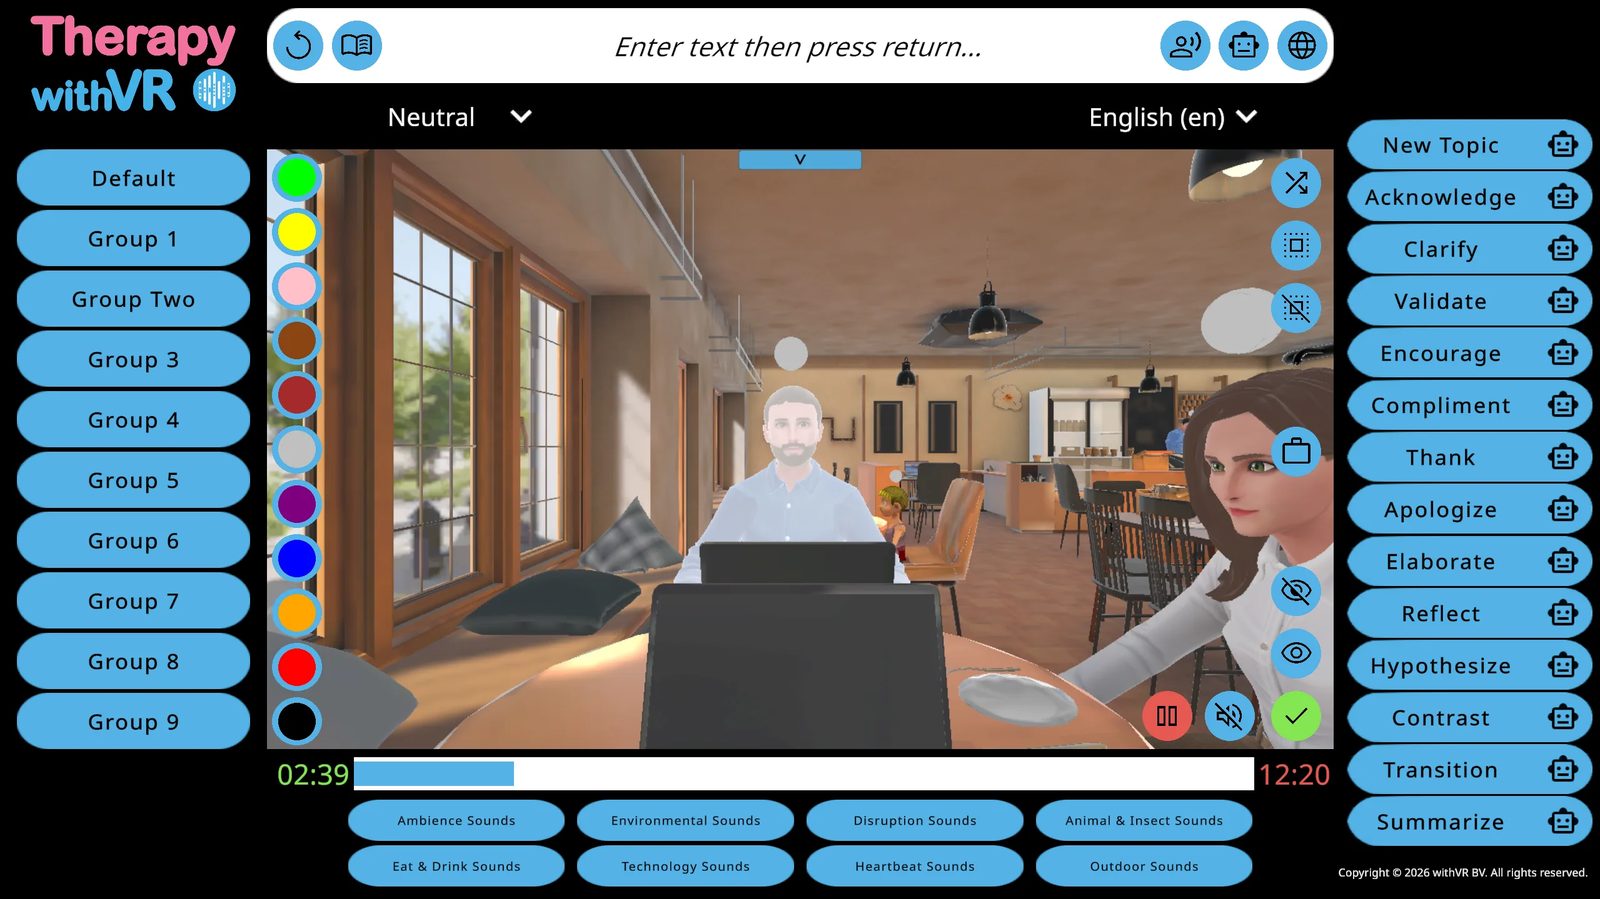
Making Avatars Speak
Method 1: Sentence Groups
Click a group name on the left panel, then click any sentence. The selected avatar says it immediately. If multiple avatars are selected, only the most recently selected one speaks.
Method 2: Type Anything
Click the text input bar at the top, type anything, and press Return. The selected avatar says it immediately.
Method 3: Repeat
Click the circular arrow icon (far left of the top bar) to repeat the last thing said. You can select a different avatar first.
Laptop Text Display
Click the laptop icon next to any sentence to show it on the laptop screen inside VR. Or click the laptop itself in the preview - a text field appears where you can type anything directly and press Return.
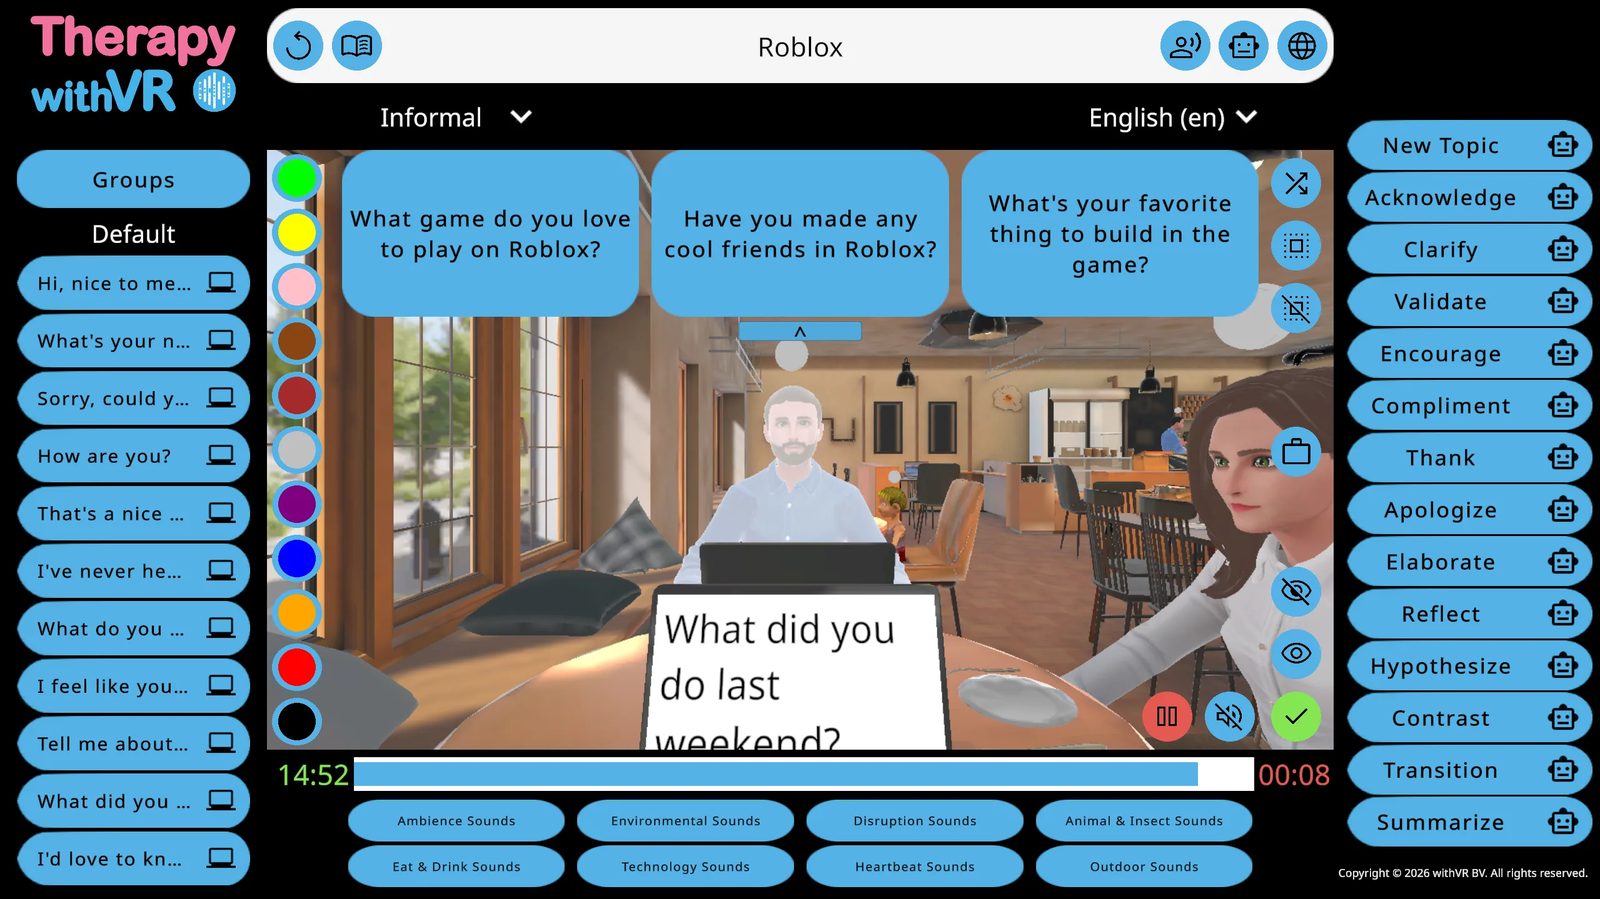

AI Features During a Session
Generate Text (topic-based)
Type a topic in the input bar (e.g. "Roblox"), then click the Generate Text robot icon. Three AI-generated questions appear as bubbles. Click one to make the selected avatar ask it. Use the formality dropdown (Neutral / Informal / Formal) to control the tone.
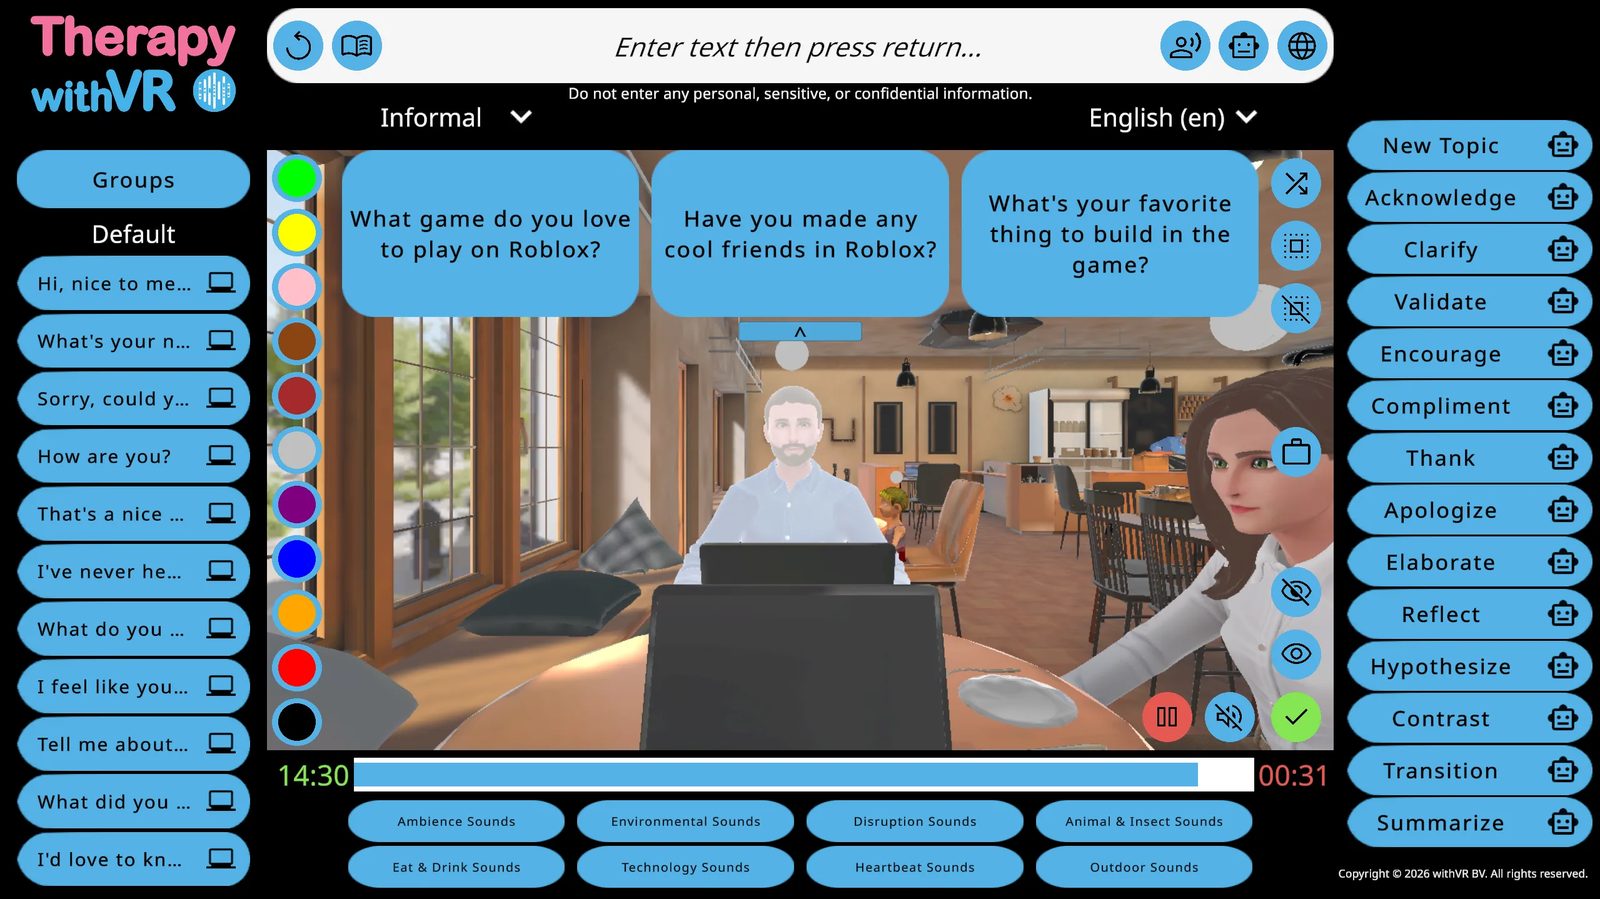
Generate Text (read-aloud)
Click the book icon (next to the repeat button) to generate a longer passage on a topic the individual knows well, in language suited to them.
Translate
Type in the input bar, select a target language from the dropdown, and click the globe icon. The avatar says the translated version.
AI Prompts
14 buttons on the right panel for responding quickly to what the person inside VR just said. Each works in two ways:
- Click the robot icon - generates 3 options for you to choose from (safer)
- Click the word itself - the avatar speaks immediately without preview (faster)
| Available AI Prompts | |||
|---|---|---|---|
| New Topic | Acknowledge | Clarify | Validate |
| Encourage | Compliment | Thank | Apologize |
| Elaborate | Reflect | Hypothesize | Contrast |
| Transition | Summarize | ||
Sounds
Eight sound categories at the bottom: Ambience, Eat & Drink, Environmental, Technology, Disruption, Heartbeat, Animal & Insect, Outdoor. Click a category to expand it and see individual sounds. Click a sound to play it. Low / Medium / High Ambience loops continuously. All sounds are spatial. Click the mute icon to stop all sounds immediately.
Eye Contact
Click the eye icon (bottom right of the preview) - selected avatars turn to face and follow the person inside VR. Click the eye with a line through it above it to make avatars look straight ahead again.
The Café Waiter
If an avatar is placed behind the bar, a briefcase icon appears ("Go To Table"). Click it to send the avatar to the table - they will arrive holding a notepad and pencil. Click again ("Leave Table") to send them back.
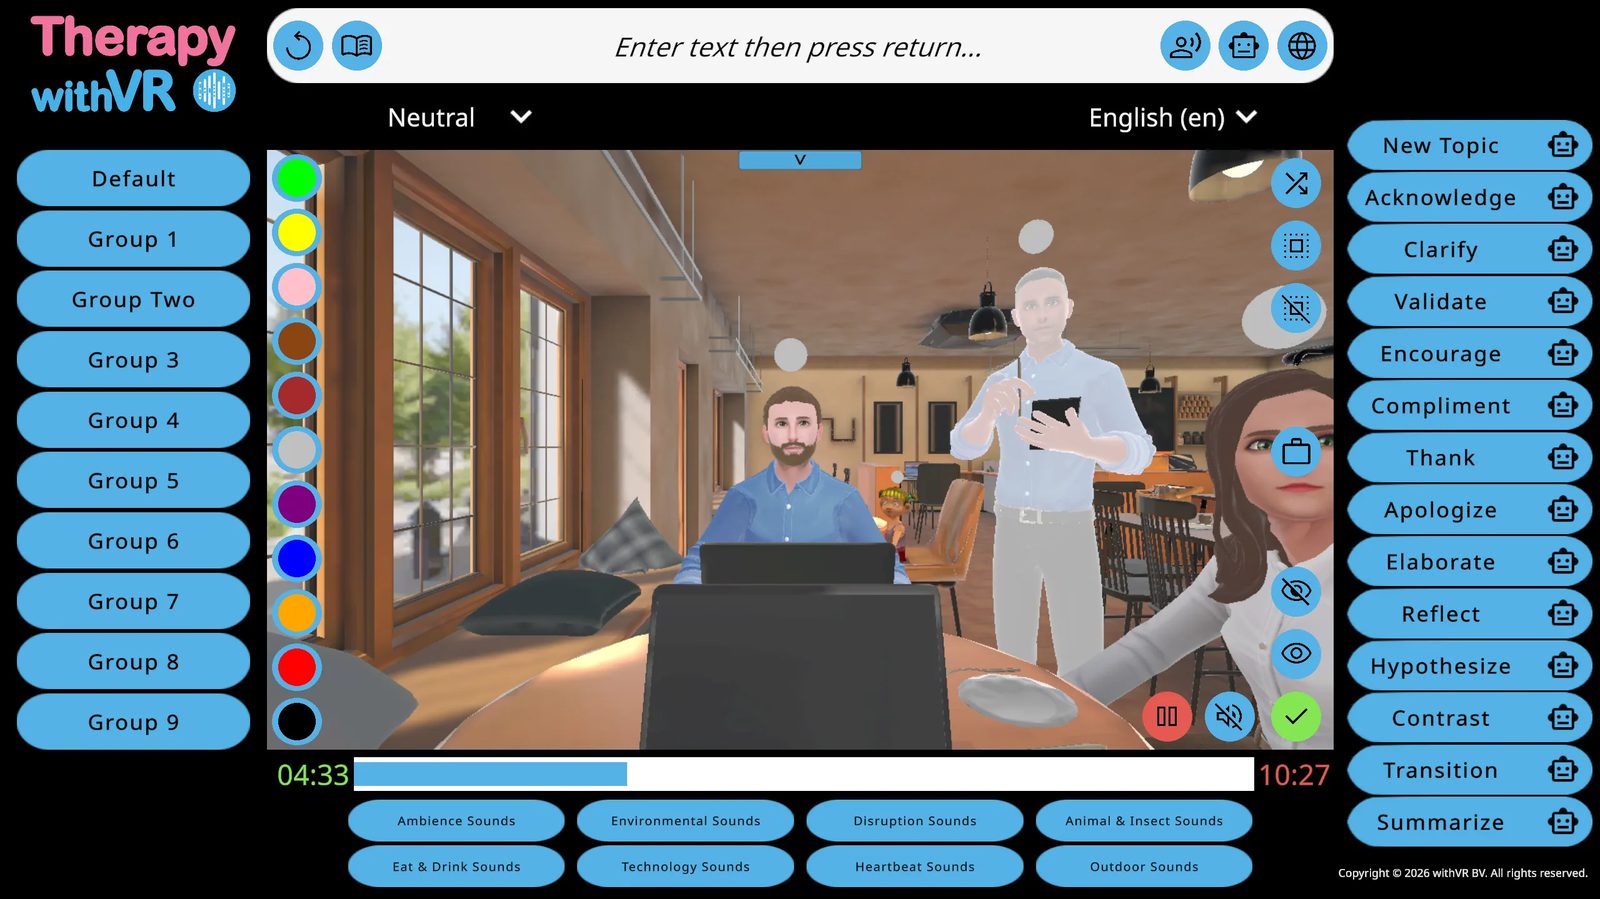
Pausing a Session
Click the red pause button (bottom right of the preview). The entire UI turns red. Timer, avatar movements, and sounds all pause. Use this time to check in with the person inside VR. Click the green play button to resume.
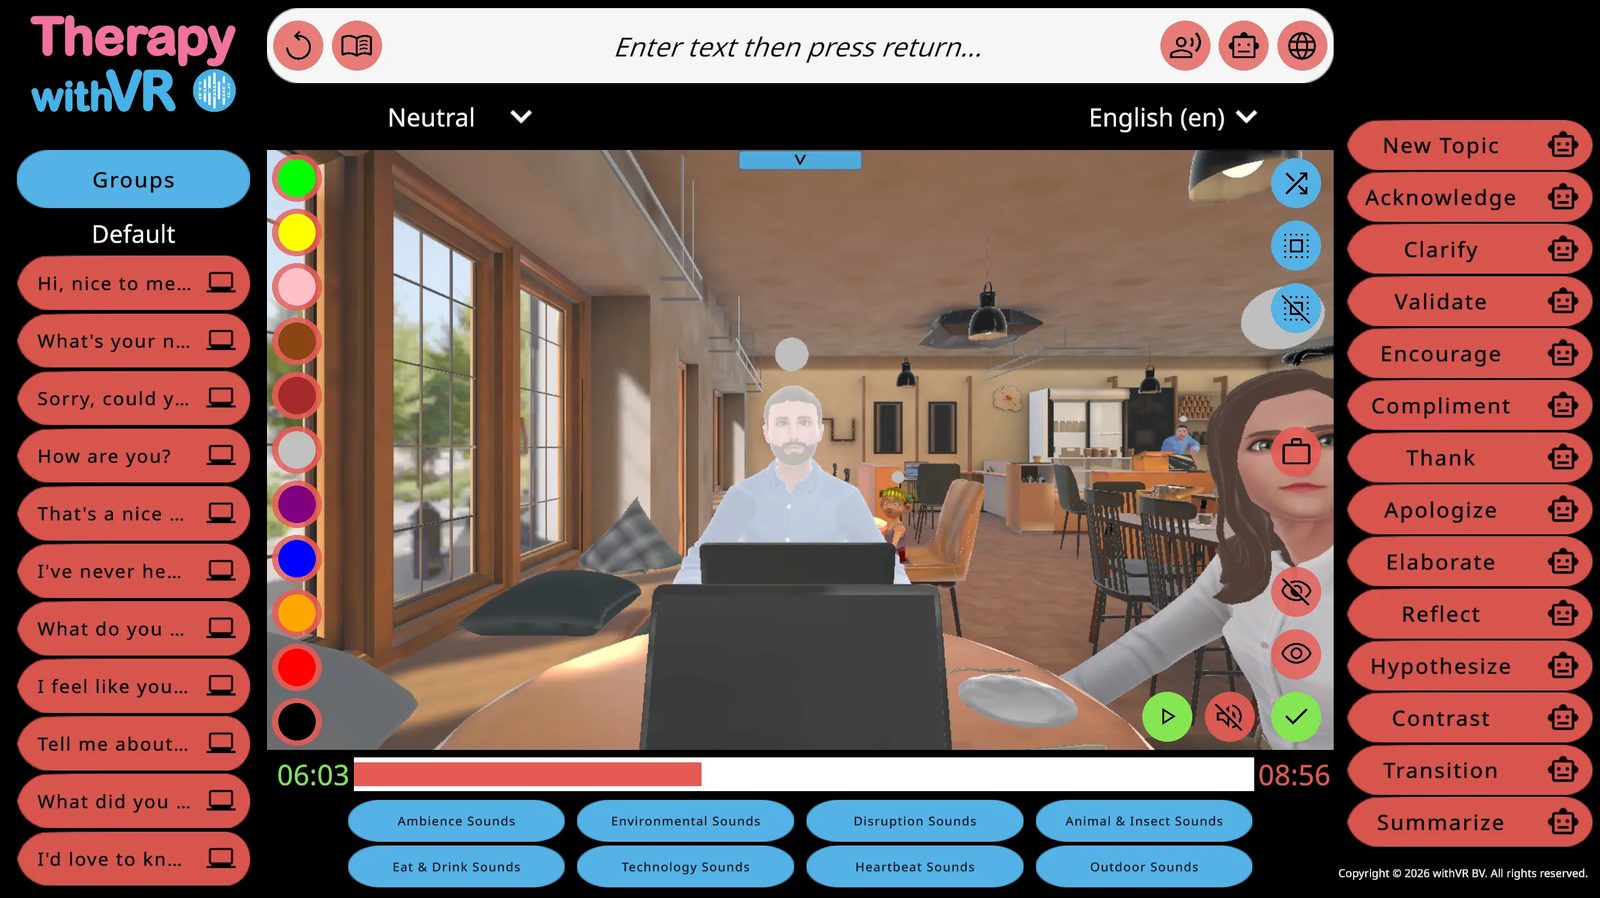
Finishing a Session
Click the green tick button (bottom right). Confirm with Yes. The Goal screen appears before you return to the Main Menu.
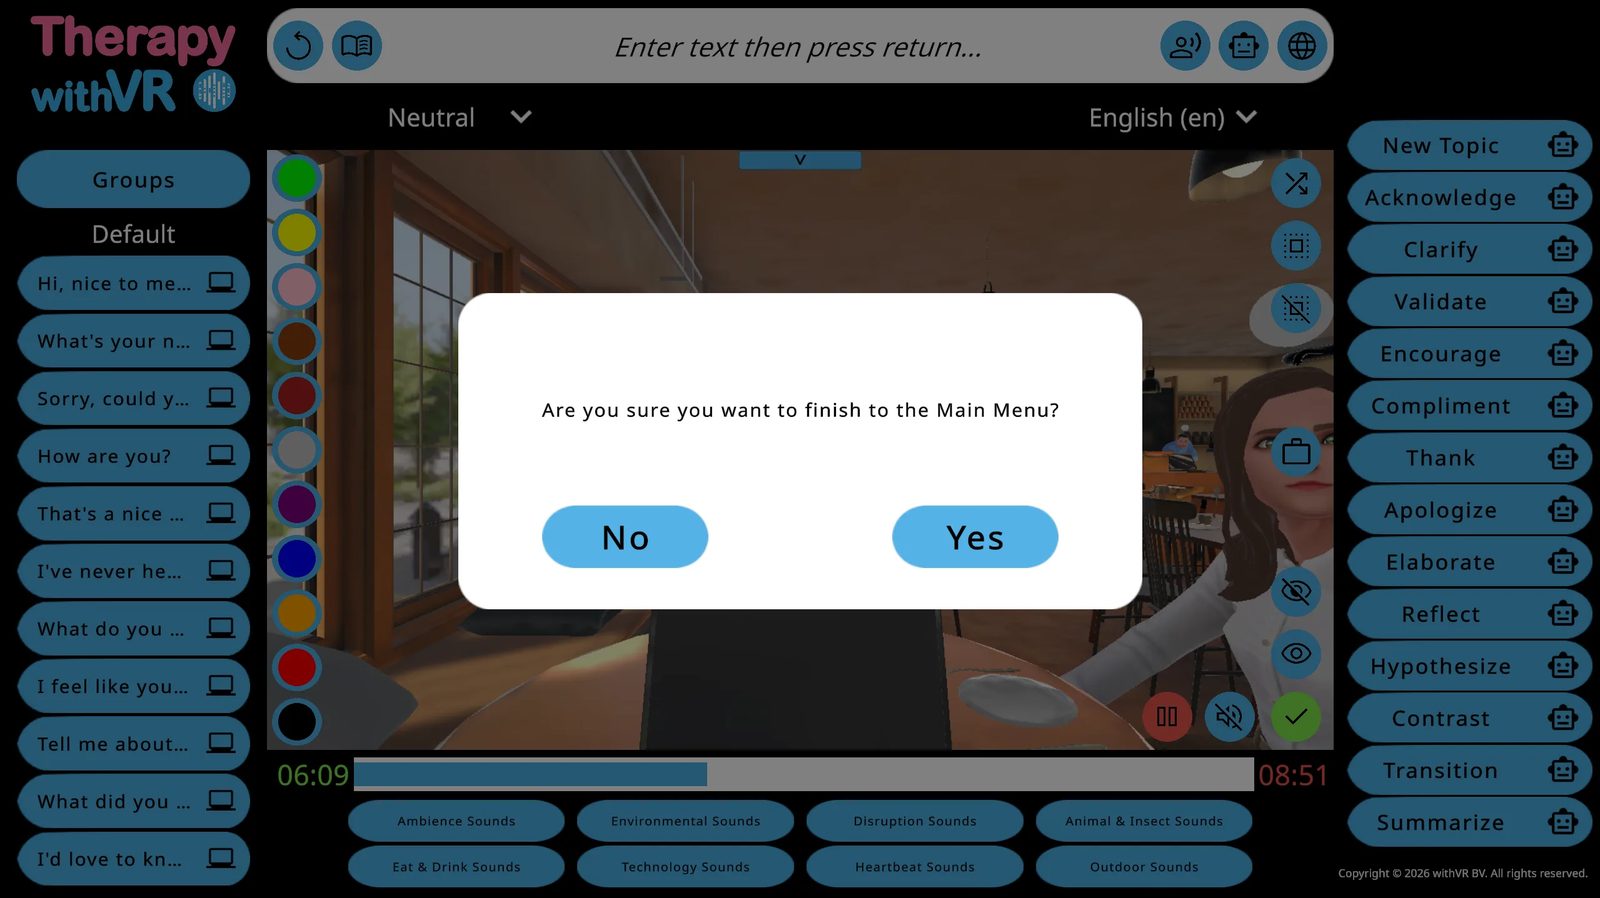
Each session automatically saves a log that includes timing, which avatars were used and where they were placed, emotions and animations triggered, sentences sent to the person inside VR, sounds played, and goal ratings. No audio or video is ever recorded. Nothing the person inside VR says is captured by the software.
Inside VR During a Session
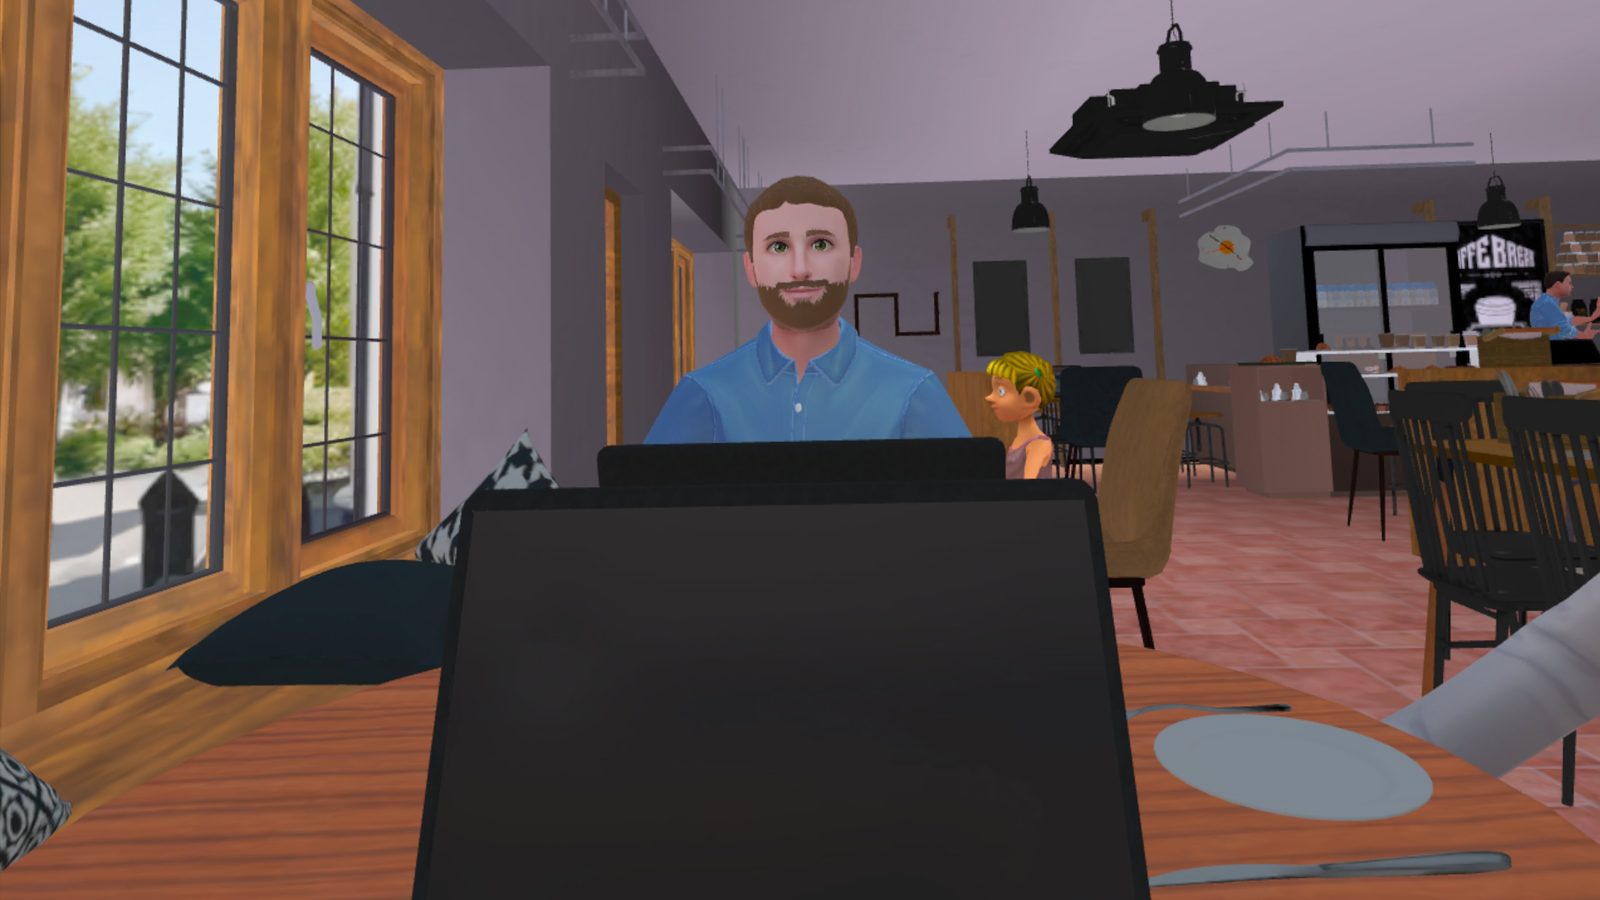
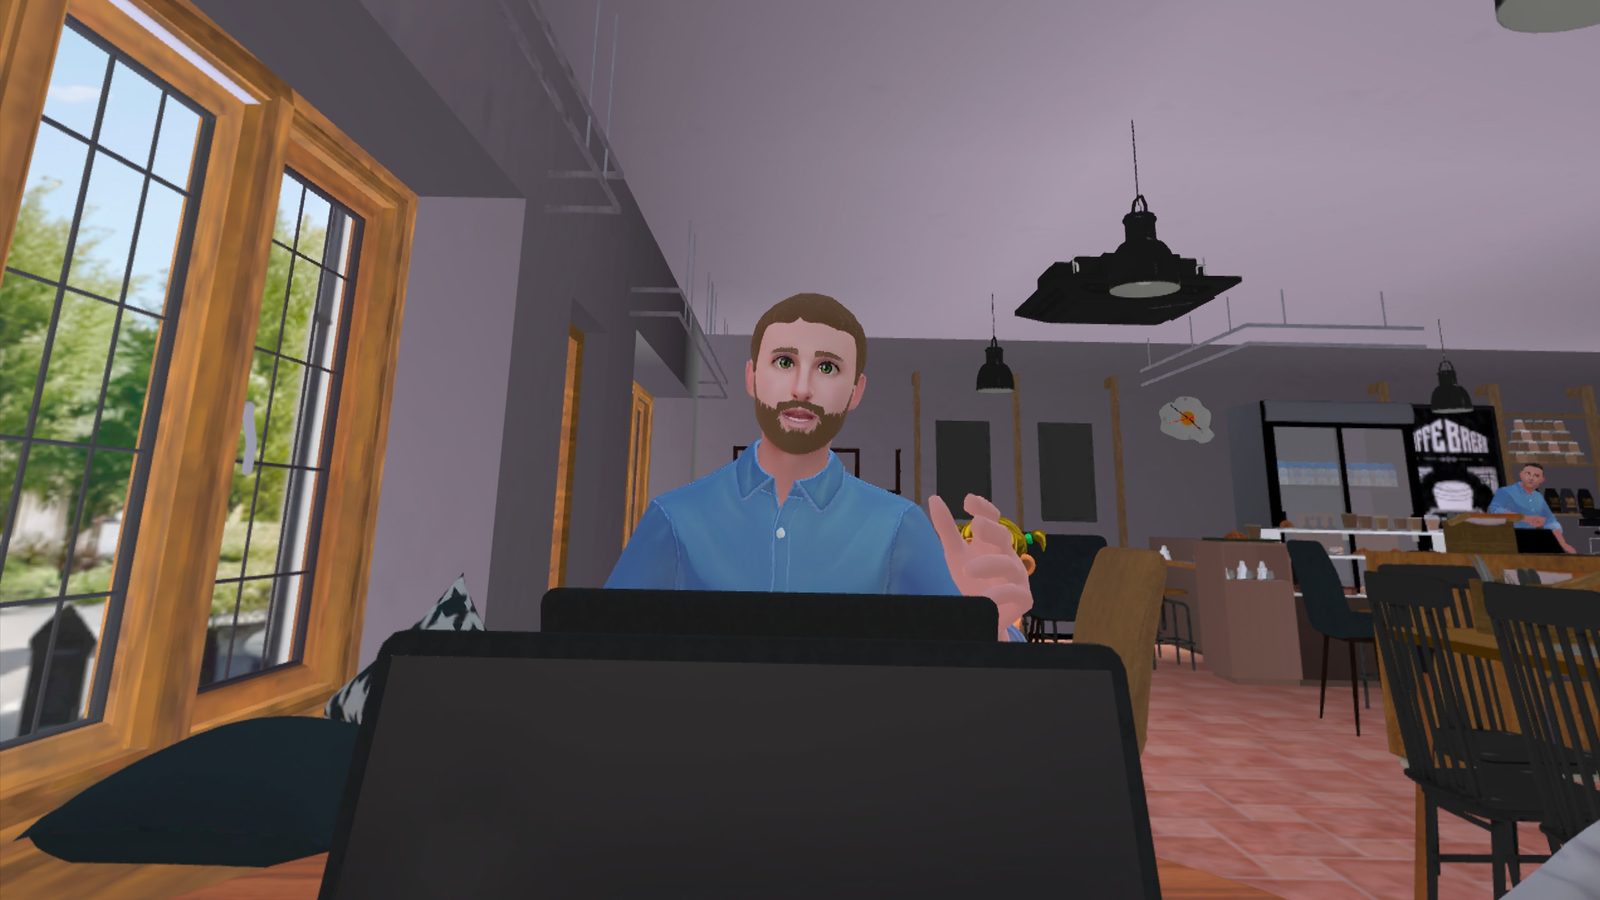
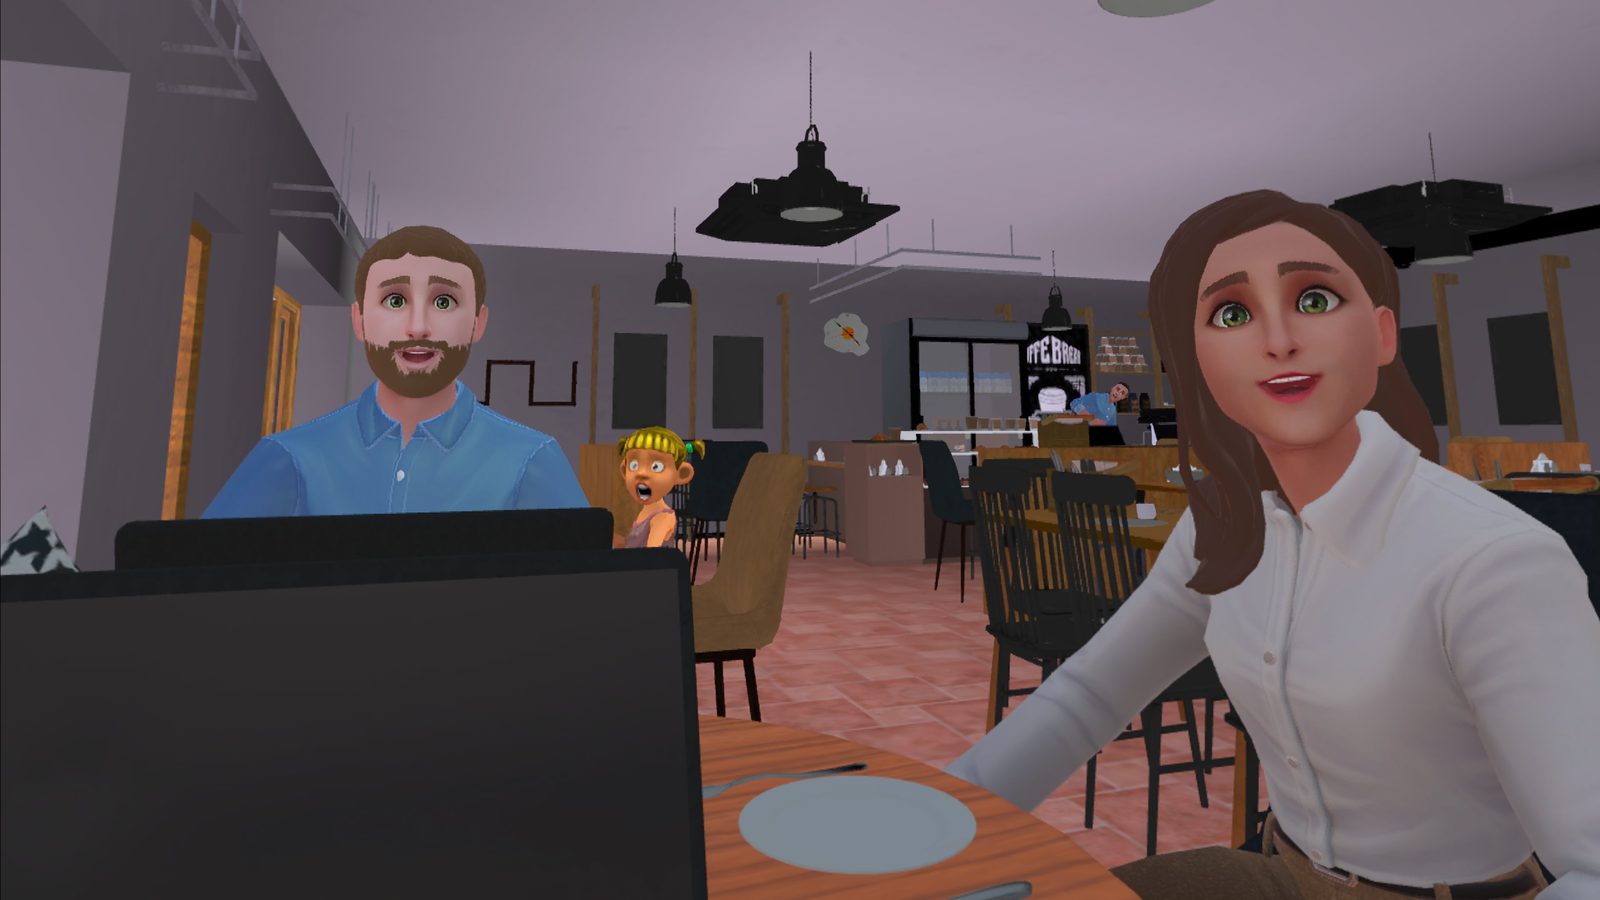
Ending a Session
The post-session goal rating and returning to the Main Menu.
Post-Session Goal Rating
After confirming the session is finished, the Goal screen appears. If a goal was entered, it is displayed. Rate confidence from 1-10, or click Skip. There is no Back button - the session has ended. Either action returns you to the Main Menu.
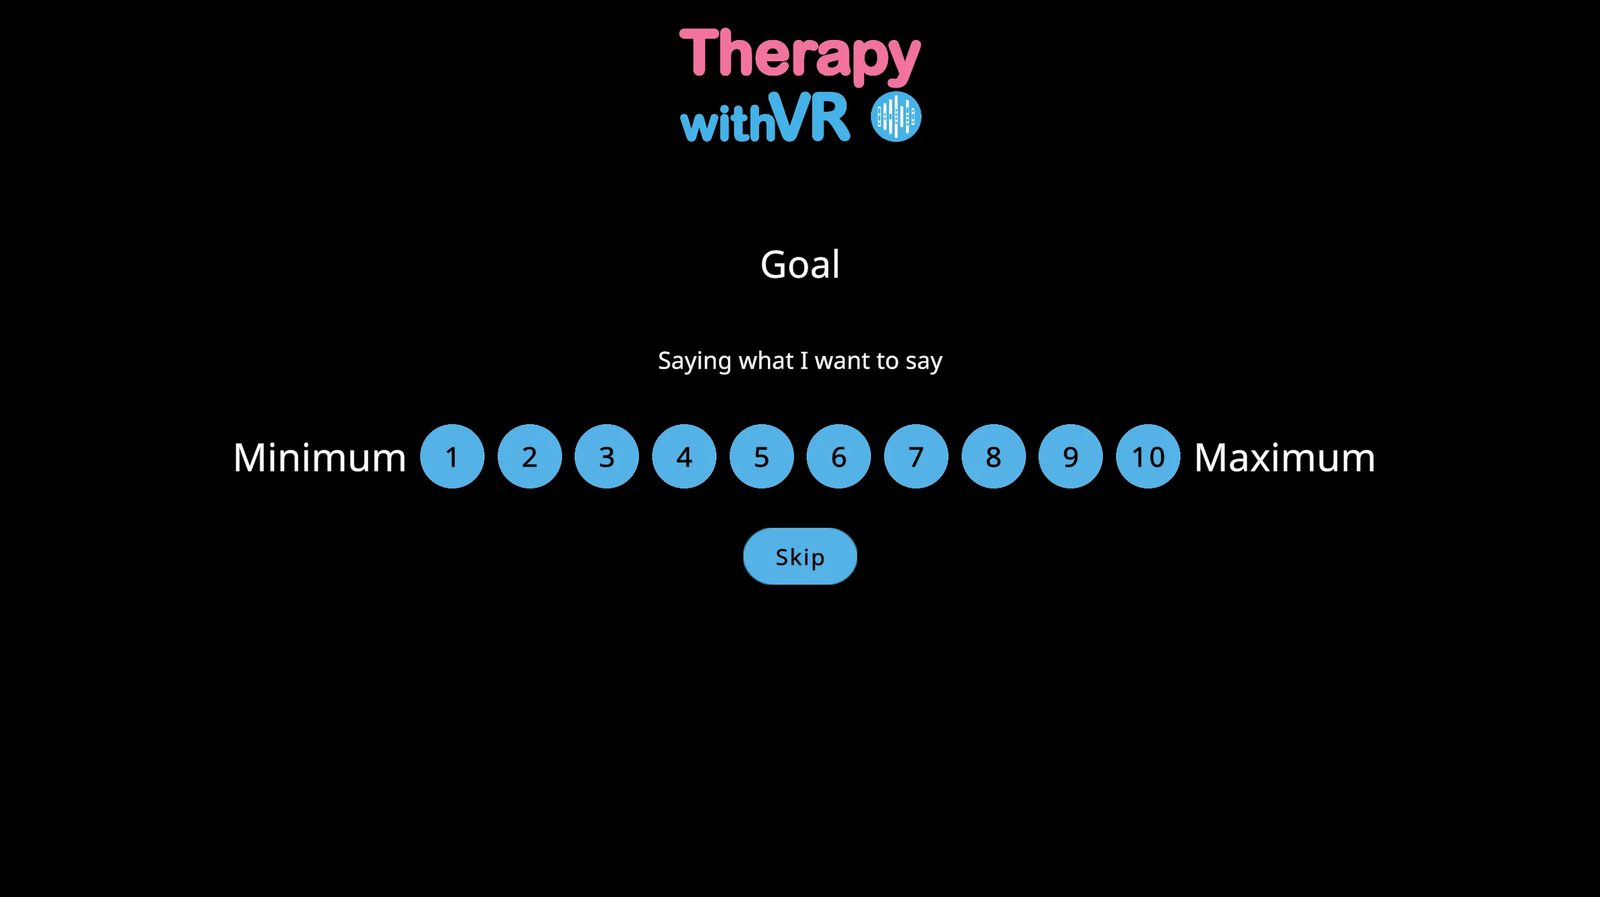
Rating the Goal During a Session
If a goal is set, it is displayed in the top area of the session screen with a small goal icon to its right. Click the icon at any moment to show the 1-10 rating scale inline. Click a number to record the rating. You can do this as many times as you like.
The Profiles Screen After a Session
The profile row now shows the goal text in the Goal column and the session time in the Last Session column.
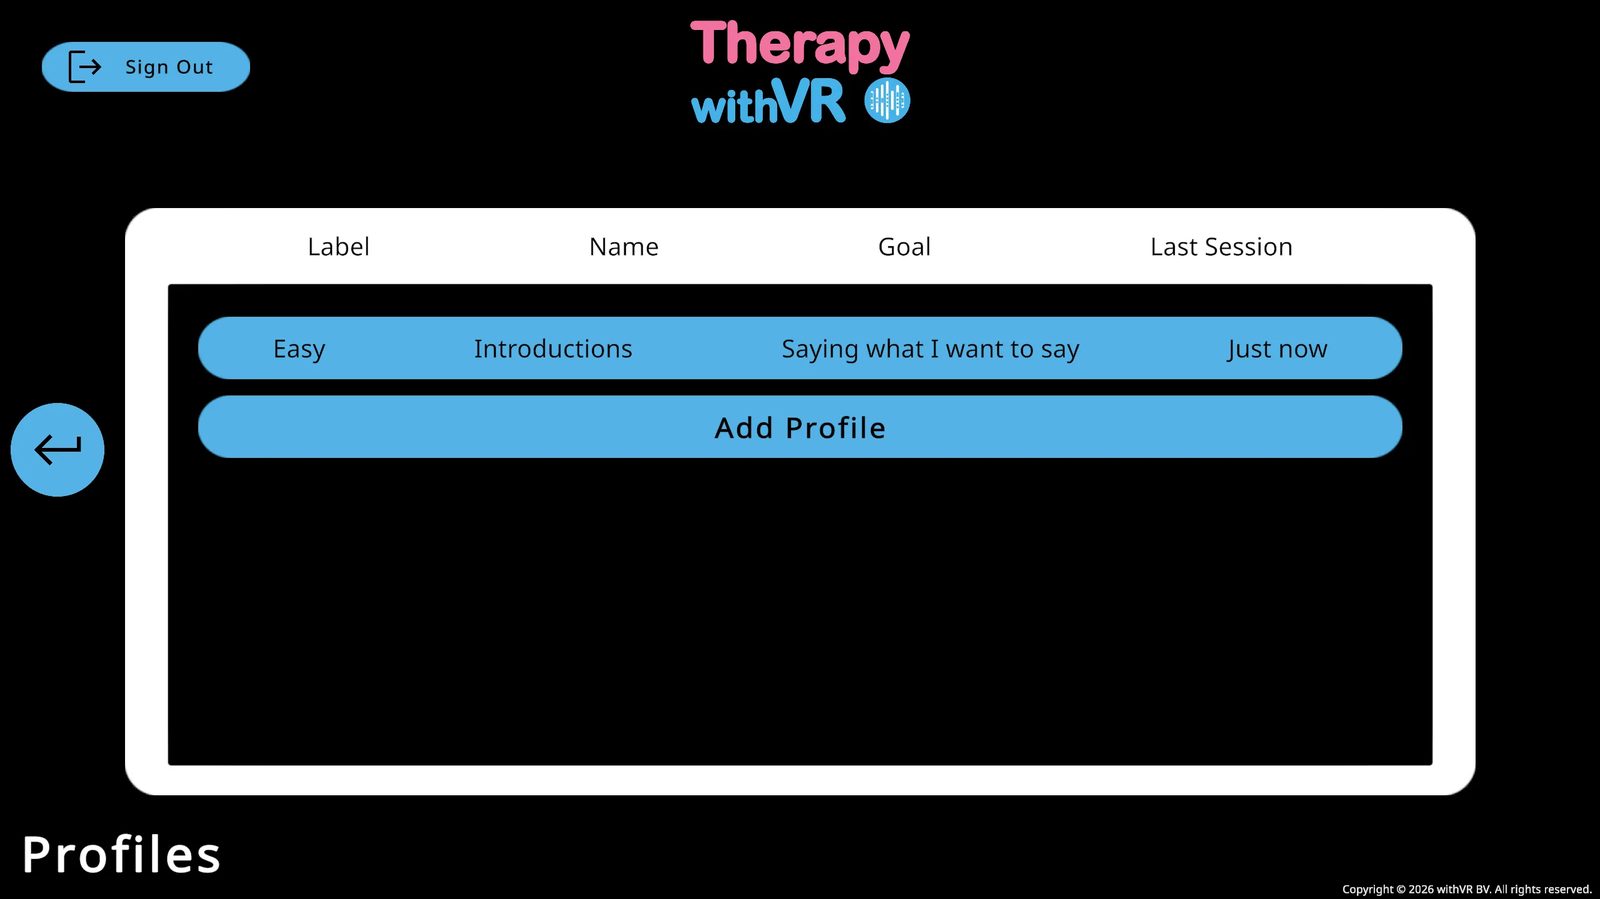
After the Session
- Debrief - ask how the person felt, what they noticed, and what they would like to do differently next time
- Record notes in your own system - not in the software
- Adjust Setup for the next session based on what you learned
Guide for the Person Wearing the VR Headset
Share this with the individual before their first session. Written in plain, accessible language.
Before You Put the VR Headset On
Everything has been set up for you in advance. You do not need to do anything technical. The session is entirely at your pace - nothing will happen without the person working with you making it happen. There is no right or wrong way to respond.
Putting the VR Headset On
Hold the VR headset with the lenses facing away from you and place it over your eyes.
Adjust the straps so it sits comfortably. If the image is blurry, adjust the position slightly up or down until it is clear.
The person working with you will let you know when everything is ready.
The Waiting Room
When the session begins, you will be in an empty café-style room - the Waiting Room. It is empty except for the chair you are sitting on. You may see artwork on the wall. You do not need to do anything - just look around and get comfortable.
When the Session Starts
You will be placed inside a new environment - a café, classroom, bakery, or another setting. You will see avatars around you. They will look and feel like real people in a real space. Your only job is to listen to what they say and respond naturally, in your own time. There are no buttons to press and no way to do anything wrong.
If You Want to Pause or Stop
Simply say so out loud at any time. The person working with you will hear you and can pause or end the session. You can also exit yourself: press the Meta button on the right controller and select Quit.
Resetting Your Position
If you feel like you are facing the wrong way or are in the wrong position, point your controller straight ahead and hold the Meta button until the view resets.
How You Might Feel
It is completely normal to feel curious, a little nervous, or slightly disoriented - especially the first time. These feelings usually pass within the first minute or two. If anything feels uncomfortable, let the person working with you know.
After the Session
When the session ends, you will return to the Waiting Room. The person working with you will let you know when it is safe to take the VR headset off. Take a moment before standing up - especially if it was your first time in VR.
A Note on Privacy
Everything that happens inside VR is between you and the person working with you.
- The VR app does not record any audio or video from sessions
- No recording of what you say or do is stored anywhere
- Session data is limited to timing, avatar positions, and actions taken - no personal content
- All data is stored on servers located in Frankfurt, Germany
The voices you hear from avatars are AI-synthesized using Google Text-to-Speech - they are not human recordings. If the person running your session has enabled optional AI features, some of the sentences avatars say may also be AI-generated. No personally identifiable information about you is sent to any AI provider as part of normal use.
Use Cases
Real examples from practitioners, researchers, and educators - each showing a different way to use Therapy withVR, with suggestions for how to set it up.
Gradually building a classroom audience for a child who finds group situations difficult
Who: An 8-year-old boy who found communicative situations challenging, particularly in groups. He was not yet at a point where he wanted to talk about stuttering.
What they did: Started in the Bakery situation - a single avatar, low pressure - where he communicated clearly and confidently. Then moved to the Classroom. He was not ready for avatars, so they began with an empty classroom, giving him time to look around and get used to the space. From there, the therapist mapped out a stepped plan: one child avatar, then three, then five - each step to become a goal for future sessions.
What it made possible: The session identified his tension level in a way that in-person role-play could not. It also gave both the therapist and the child a concrete ladder of next steps.
- Tjitske Hofstee-Bootsma, Speech-Language Therapist / Stuttering Specialist, Netherlands
You could try this
Use the Classroom situation with no avatars placed - the person can explore the space at their own pace. Add a single avatar in a back-row position to begin. Use the shuffle single button in Setup to add one random avatar at a time as confidence builds. Set the Maximum Duration to 5 minutes or less for a first session.
Practicing saying his name in class
Who: A boy who avoided saying his name in the classroom because he could not get it out.
What they did: Used the Classroom situation to repeatedly practice saying his name in front of avatar students. After multiple repetitions in the same session, the task became more familiar and less overwhelming.
What it made possible: After the session, he said it had become easier through repetition. He was open to saying his name at school and no longer wanted to avoid it.
- Tjitske Hofstee-Bootsma, Speech-Language Therapist / Stuttering Specialist, Netherlands
You could try this
Prepare a sentence group in Setup with a single sentence - the person's name, or "My name is..." - so you can trigger it quickly and repeatedly. Use the Classroom situation with a small number of seated avatars. Set all avatars to Neutral emotion to keep the environment calm. Use the Repeat button (circular arrow, top left of the session screen) to re-prompt without retyping between attempts.
Classroom practice for a teenager who stutters (French-language session)
Who: A 13-year-old boy in middle school. His main difficulty was moments where he had to talk about himself or answer teachers about his lessons.
What they did: The therapist and the individual chose the Classroom situation together and selected student avatars with varying moods. They prepared specific questions and responses together in advance - making preparation part of the session itself.
What it made possible: During the session he stuttered, but did not get stuck and followed through with his speech. He was highly motivated - including for the preparation stage.
“Together, we chose the classroom setting, and student avatars with varying moods. Then we prepared questions and lines for the avatars. During the session, he stuttered, but he didn't get stuck and followed through with his speech. He really likes this way of working, he is very motivated for the preparation as well.”
- Claire Saugnac, Orthophoniste / Speech-Language Therapist, Lacanau, France
You could try this
Use the Sentences tab in Setup to prepare questions together with the individual before the session - asking them what they expect to be asked, what they want to practice answering. Vary avatar emotions across the classroom positions: some Neutral, some Bored, some Anxious - to reflect the unpredictability of a real classroom. If the individual speaks a language other than English, set avatar voices to match using the Voice configuration panel in Setup.
Job interview practice for a student who finds sentence formulation challenging
Who: A secondary school student who finds forming longer sentences challenging. He could produce 2-3 word phrases comfortably with his therapist, but reverted to this pattern under pressure.
What they did: Used Therapy withVR to simulate a job interview. The VR environment made visible what familiar role-play could not - how he communicated when the situation felt real rather than practiced. He engaged strongly with the experience and asked for different avatars to interview him in future sessions.
What it made possible: A clearer picture of how he communicated when the situation felt real, and a concrete goal to work toward - job interview readiness.
- Jana Thompson, Speech-Language Pathologist, Flathead High School & Glacier High School, Kalispell, MT
You could try this
Use the Meeting Room situation for a formal interview feel, or the Reception situation for a front-desk scenario. Prepare interview questions in the Sentences tab - start with predictable questions ("Tell me about yourself") and gradually introduce less expected ones. Set avatars to Neutral for early sessions, then try Serious or Bored to increase challenge. Use the Laptop to display key words or prompts the individual can refer to while speaking.
Presentation skills for a teenager - with his father in the room
Who: A 14-year-old working on presentation skills in the classroom. His father, who also stutters, joined the session.
What they did: Used the Classroom situation to practice presenting in front of an audience of avatar students. The session helped him relax in front of a group and experiment with different approaches to presenting effectively and authentically.
What it made possible: Somewhere to try things out - including what it feels like to present while stuttering - with his father present as a fellow person who stutters, not just an observer.
You could try this
Use the Classroom situation with the person standing at the front. Place avatars progressively - start with a small audience and add more across sessions using the shuffle single button. Use the Laptop to display key points from the presentation so the person can glance at it while speaking. Try varying audience emotions between sessions - Neutral, Bored, Anxious - to reflect different kinds of audience energy. Consider using the Auditorium situation as a longer-term goal.
Aphasia advocacy: practicing a pitch in a boardroom
Who: Stroke survivors with aphasia taking part in an Aphasia Advocacy Academy program, working toward speaking publicly about their experience of aphasia.
What they did: Used the Meeting Room situation to practice delivering an advocacy pitch to a panel. The laptop inside VR was used to display a script or key words, giving the person something to refer to when finding words in the moment was challenging.
What it made possible: A realistic boardroom environment to rehearse a demanding communication situation, with built-in support through the laptop display.
- Christine Cook, Visiting Assistant Clinical Professor, Northeastern University, Communication Sciences & Disorders
You could try this
Use the Meeting Room situation with avatars placed on both sides of the table, facing the person. Use the Laptop to display a full script, key words, or sentence starters - click the laptop icon next to any sentence in the session screen to push it to the screen instantly. Set avatars to Neutral for early runs, then introduce Confused or Impatient emotions to practice handling a more challenging audience. The AI Prompts panel can generate follow-up questions on the fly to make the scenario feel more dynamic.
Practicing responses to microaggressions
Who: Adults who stutter, working on responding calmly and assertively to unhelpful comments from others - such as being told to slow down, think before speaking, or try a technique.
What they did: Used avatar conversations to rehearse responses to typical microaggressions. Practiced different approaches: offering information, setting a boundary, or simply sharing a perspective - all in a calm and respectful way.
What it made possible: Repeated, low-stakes practice of a genuinely difficult real-world situation that is hard to rehearse any other way.
- Christine Mathilde Blomkvist, Speech-Language Therapist, specializing in stuttering
You could try this
Use a familiar, low-pressure situation such as the Café or Kitchen Table to keep the focus on the conversation rather than the environment. Prepare the microaggression as a sentence in the Sentences tab so you can deliver it at the right moment. Set the avatar's emotion to something slightly Impatient or Anxious to add a layer of realism. Use the Pause button between exchanges to discuss how the response felt and what the person might want to try differently.
Wide range of communication goals across an NHS caseload
Who: A speech and language therapist at an NHS trust working with individuals who stutter, people with diverse language needs, and autistic people - including group sessions.
What they did: Used Therapy withVR across a wide range of communication goals: building confidence to stammer openly without hiding it, telling people about stammering, ordering food and drink, giving a presentation, exploring reactions to stammering, and responding to teasing. Also used in group sessions and with individuals with DLD and autism.
What it made possible: A single flexible tool that could be adapted across very different individuals and goals without needing to change the software setup significantly.
- Nicola Maddy, Speech and Language Therapist, Stammering; South West Yorkshire Partnership Teaching NHS Foundation Trust
You could try this
For ordering food and drink, use the Café or Bakery situation - the Bakery places a single avatar behind a counter for a focused one-to-one interaction. For presentations, use the Classroom or Auditorium. For teasing or difficult social reactions, prepare specific responses using the Sentences tab and vary avatar emotions to include Bored, Impatient, or Confused. For group sessions, the Speaking Circle situation places the person within a circle of peers - configurable between 2 and 12 seats.
Voice research: studying the effects of room size and speaker-to-listener distance
Who: A research team in the Department of Otolaryngology at Mount Sinai Health System, using Therapy withVR for published academic research.
What they did: Used the Room situation - the only situation with fully customizable dimensions - to manipulate speaker-to-listener distance and room size as controlled variables. This produced two manuscripts, one published in the Journal of Voice and one submitted to the Journal of Speech, Language, and Hearing Research.
What it made possible: Controlled, reproducible experimental conditions that would be difficult or expensive to create in a physical space.
You could try this
Use the Room situation and its Objects tab to set precise dimensions (length, width, height in meters) and Avatar Distance (forward/backward and left/right in meters). These can be saved within a profile and loaded identically for each participant, ensuring consistent conditions across sessions. The Desk Divider can also be used to introduce a physical barrier as an additional variable. For research protocols, create a separate profile for each experimental condition so settings are never accidentally changed between participants.
Gender-affirming voice practice in everyday situations
Who: Transgender individuals working on voice in real-world scenarios - ordering coffee, making phone calls, and navigating reactions from others.
What they did: Used various situations to practice voice in contexts that would be difficult to recreate in a therapy room. The VR environment allowed the individual to experience different social reactions - including negative ones - in a safe space where they could try different approaches without real-world consequences.
What it made possible: Preparation for real-world interactions that carry emotional weight. Some individuals found VR helpful for building confidence before going out into new situations, while others used it alongside live practice.
You could try this
Use the Café or Bakery for everyday interactions. Use the Reception for phone-call-style exchanges. Set avatar emotions to Neutral for early sessions, then introduce Confused or Surprised to practice handling less predictable reactions. Prepare common conversational phrases in the Sentences tab so the individual can focus on voice rather than content.
Selective mutism - practicing speaking with avatars that look like real people
Who: Individuals experiencing selective mutism - able to speak in some settings but not others, often with specific people or in specific places.
What they did: Created custom avatar configurations to resemble real people in the individual's life - a parent, a teacher, a classmate - and placed them in familiar situations like the Café or Classroom. The individual could practice speaking to these representations without the social pressure of the real person being present.
What it made possible: A way to practice the specific situations and specific people that are difficult, not just generic social interaction. Because every detail - the environment, the avatars, the questions asked - is controllable, the professional can match the VR experience as closely as possible to the real-world situation the individual finds challenging.
You could try this
Start with a situation the individual is already comfortable in, using a single avatar. Customize the avatar's appearance, voice, and name to match the real person they find difficult to speak to. Prepare sentences that reflect what that person would actually say. Keep sessions short (3-5 minutes) and build gradually. The Animal situation can also work well as a starting point - speaking to an animal before speaking to a person.
Empathy training - helping listeners understand what communication differences feel like
Who: People who do not stutter, learning what it feels like to communicate when you do.
What they did: Reversed the typical use case. Instead of using VR to train the person who stutters, the professional used it to train listeners - colleagues, family members, or students. The VR environment demonstrated the experience of stuttering from the inside, building empathy and understanding.
What it made possible: A way to shift the focus from changing the individual to changing how the people around them respond. This approach can reduce stigma and improve interactions in workplaces, schools, and families.
You could try this
Use the Meeting Room or Classroom and set avatar emotions to Bored, Impatient, or Confused to simulate unhelpful listener reactions. Use prepared sentences to demonstrate common microaggressions or well-meaning but unhelpful comments. After the VR experience, discuss what the person noticed and felt. This approach works well for training workshops, university courses, and family education sessions.
Sound sensitivity - gradual exposure using controllable background noise
Who: Individuals with hyperacusis (sound sensitivity) or tinnitus who avoid everyday environments because of noise levels.
What they did: Used the VR environments with the Sounds feature to gradually expose the individual to controlled levels of background noise - restaurant chatter, traffic, children playing - in settings that would otherwise be overwhelming. Because the sound levels are controllable, the professional can increase them gradually across sessions.
What it made possible: Practice being in a noisy cafe, a busy classroom, or a social gathering without actually going there. The individual can build tolerance at their own pace, and the professional can adjust immediately if the individual becomes uncomfortable.
You could try this
Start in the Café or Break Room with no background sounds, then introduce sounds from the Sounds panel one at a time. Begin with low ambience and gradually add specific sounds (coffee machine, people talking, traffic). The Pause button lets you stop immediately if needed. Track which sound combinations and volume levels the individual can tolerate across sessions to measure progress.
Supporting IEP, EHCP, and individualized learning plan goals in school settings
Who: School-based speech-language professionals working with students who have individualized plans - IEPs in the United States, EHCPs in the United Kingdom, OPPs in the Netherlands, ILPs in Canada and Australia. Plans are reviewed annually and typically need goals written in measurable terms, data gathered over time, and evidence that what was practiced carries across different environments.
What they did: Reframed each plan goal around access and participation rather than production targets - for example, "The student will have opportunities to introduce themselves to peers in environments that matter to them, self-rating their confidence before and after each session" rather than a goal tied to accuracy or fluency. Each goal became a Profile in Therapy withVR, paired with a situation the student chose, a sentence group with utterances the student wanted to rehearse, and the Goal feature's 1-10 confidence rating as the primary progress measure. Situations were rotated so the student could practice the same kind of interaction in different environments.
What it made possible: A way to write goals in language the legal plan format accepts, without framing the student's natural speech or communication as the problem. The confidence rating over time gave a clear picture of the student's growing ease in situations that previously felt inaccessible. At annual reviews, the conversation could focus on what the student had gained access to - rather than on percentages.
You could try this
Work with the student to identify situations that feel inaccessible or that they want to feel more at ease in. Create a Profile named after the goal (for example, "Introductions with peers"). In Setup, choose the situation the student selects, place the avatars they want, and prepare a sentence group they want to try. Set a short Maximum Duration (5-10 minutes) so sessions fit within service minutes. Use the Goal feature at the start and end of each session - the student's self-rated confidence is the progress data. Duplicate the profile across different situations so the student experiences the same kind of interaction in contexts they care about.
Remote international sessions - therapist and individual in different countries
Who: A specialist working with individuals in other countries where access to specialists in their area is limited.
What they did: Sent a Meta Quest headset to the individual in another country. The professional controlled the session from the Web App while the individual experienced it in VR - real-time interaction across borders.
What it made possible: Access to specialist support regardless of geographic location. Particularly valuable for areas of practice where qualified professionals are rare, allowing individuals to receive expert support without traveling.
You could try this
The Web App and VR headset do not need to be on the same network or even in the same country. Set up the individual's Meta Quest and Therapy withVR account remotely using a video call (see Setup and Onboarding). Once set up, start sessions as normal - the individual puts the headset on, you click Start on the Web App, and the session runs in real time. Use a phone call or messaging app alongside VR for any communication outside the session itself.
Using Art in Your Sessions
How to use the built-in art gallery as a conversation starter, reflection tool, and way for people to feel less alone.
What the Art Is For
Every piece of art in Therapy withVR was created by someone who stutters. The collection includes poems, illustrations, comics, photographs, and paintings - each one reflecting real, lived experience.
The art is not just decoration for the Waiting Room. It is a tool you can use to open conversations, spark reflection, and help individuals feel that their experiences are shared by others. Seeing their own feelings reflected in someone else's creative work can be powerful - especially for young people who may feel they are the only one going through it.
Getting to Know the Art Yourself
Before using art with someone else, take time to explore it yourself. From the Main Menu, open Art and use the Preview Art dropdown to browse each artist's work.
For each piece, try the following:
- Look at the artwork - what does it make you think about? What feelings come through?
- Listen to the Read audio - for poems and text-based works, the artist reads their own piece aloud
- Listen to the Explain audio - the artist shares why they made it and how they felt, in their own voice
- Read the artist's bio - click About to learn who they are and where they are from
This preparation helps you choose pieces that connect to what a particular individual is experiencing, and lets you guide the conversation with confidence.
Using Art as a Conversation Starter
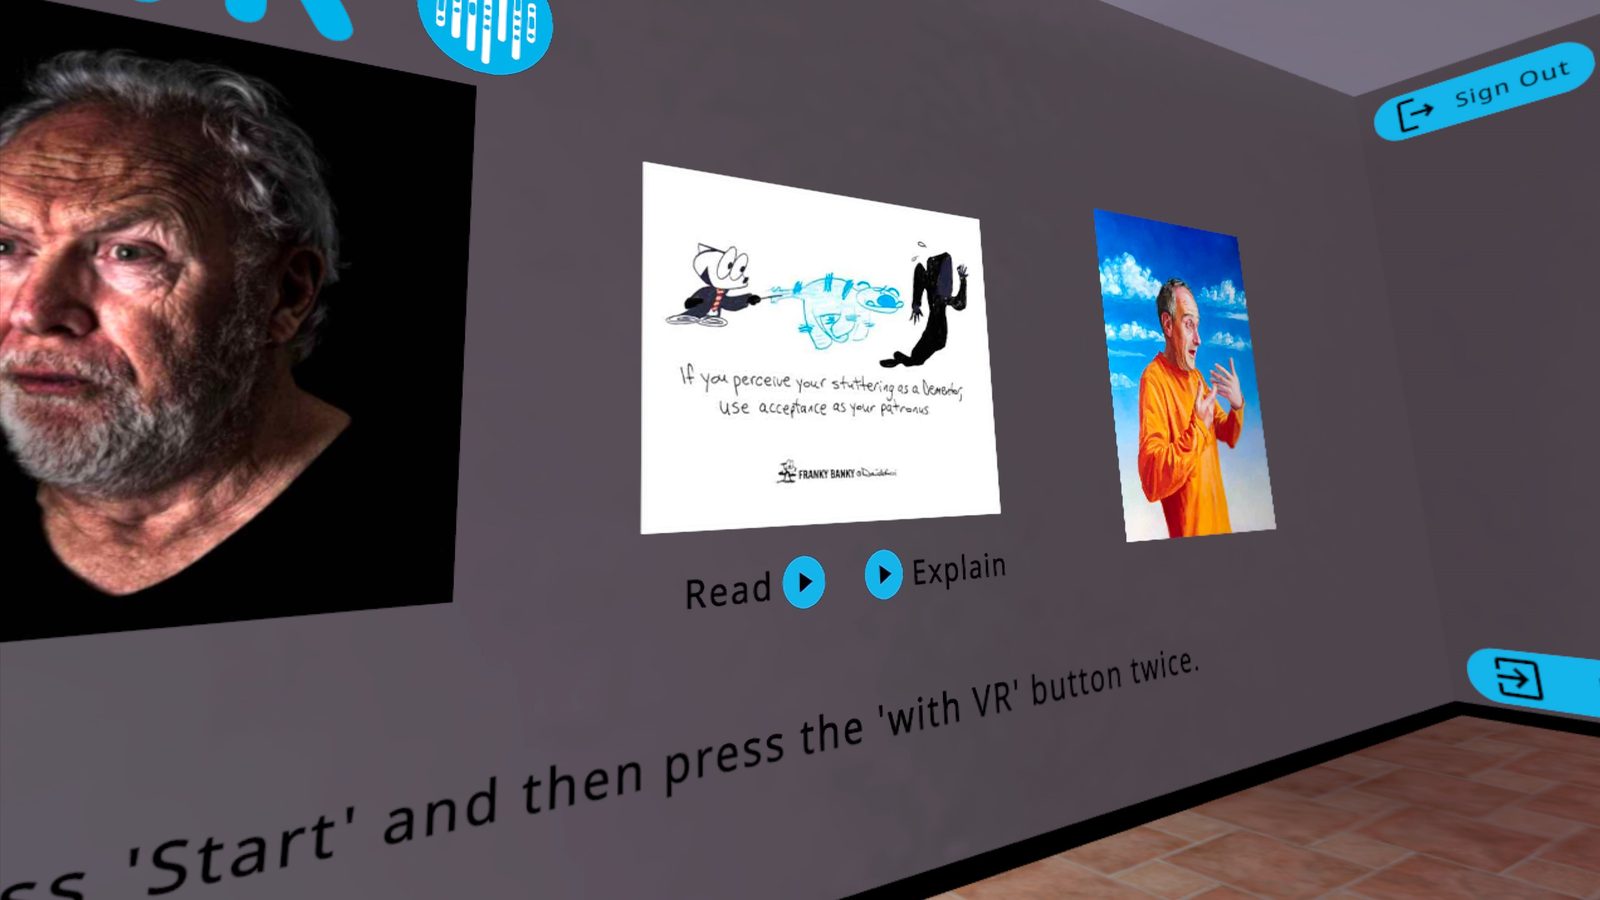
Display one or more artworks in the Waiting Room before the session begins (see Features > Art > Displaying Art Inside VR). When the person inside VR puts the VR headset on, the art is on the wall in front of them.
You can use the art to open a conversation before, during, or after a session. Some approaches that work well:
- Ask what they see - "What do you notice in this picture?" or "What do you think is happening here?" There are no wrong answers.
- Ask what they feel - "Does anything in this remind you of how you feel sometimes?" This works especially well with illustrations and poems where emotions are visible.
- Play the artist's voice - use the Read or Explain buttons (available both in the Web App preview and inside VR in the Waiting Room) so the individual hears the artist talk about their own experience. Hearing someone else speak openly about stuttering can be a meaningful moment.
- Connect it to their experience - if the individual relates to something in the artwork, follow that thread. The art gives people a way to talk about difficult feelings at one step removed - through someone else's work rather than directly about themselves.
Using the Thank Button as a Reflection Tool
After discussing a piece of art, invite the individual to send a message to the artist using the Thank button. This is more than a simple thank-you - it is a chance for the individual to put their own thoughts and feelings into words.
The Thank message is sent directly to the withVR team, who pass it on to the artist. It is a real connection between the individual and the person who made the artwork. You might prompt them with:
- "Would you like to tell the artist what you thought of their work?"
- "Is there anything you would want the artist to know about how their piece made you feel?"
The From field is optional - the individual can include their first name or leave it blank.
Choosing Art for Different Situations
Different pieces suit different conversations. Here are some starting points:
| If you want to explore... | Try |
|---|---|
| Feelings about stuttering | The Stutterverse (poems with Read and Explain audio) |
| Shared experience and not being alone | Juststutter (illustrations reflecting everyday moments) |
| Humor and empowerment | Franky Banky (comics with a lighthearted take) |
| Visual reflection and mood | Paul Aston (paintings) or Eddy Janssens (photographs) |
Use the Random setting in the Select Art dropdown to show a different piece each session. This keeps things fresh and can surprise both you and the individual with unexpected starting points.
Practical Tips
- Preview before every session - make sure you know what will be on the wall before the person puts the VR headset on
- One or two pieces is enough - a focused conversation about one artwork is more valuable than rushing through several
- Clear the art when you do not need it - set all Select Art dropdowns to None if you want the Waiting Room to be plain for a particular session
- Combine with the Explain audio - hearing the artist's own voice adds a personal dimension that the image alone does not have
- Let the individual lead - if they want to spend time with the art, let them. If they are ready to move on, that is fine too
Using AI in Your Sessions
Practical use cases showing how AI features help you create more meaningful and relatable experiences for the individuals you work with.
Making Conversations Feel Natural

Keeping the pace of a real conversation
One of the biggest challenges when running a session is typing fast enough to keep the conversation flowing. If there is a long pause between what the person inside VR says and what the avatar says back, the experience starts to feel artificial.
The AI features reduce the need to type. Use AI Prompts to acknowledge, encourage, or clarify what the person just said with a single click. Use Generate Text to produce follow-up questions from a topic instead of composing them yourself. The less you need to type, the more natural the conversation feels from inside the VR headset.
Features used: AI Prompts, Generate Text
Following an unexpected thread
Sometimes the person inside VR mentions something you did not prepare for - a hobby, a memory, a strong opinion. These moments are often the most valuable parts of a session. Instead of steering the conversation back to your plan, you can follow their lead.
Type their topic into the input bar and use Generate Text to produce questions about it instantly. If the individual mentions they cook, type "cooking" and generate three follow-up questions. If they bring up a game you have never heard of, type the name and let the AI create questions - even if you know nothing about the topic yourself.
Features used: Generate Text
Expanding on what the avatar already asked
After the avatar asks a question and the person responds, use the Elaborate AI Prompt to have the avatar ask for more detail about what they just said. This keeps the conversation going deeper on the same topic without you needing to think of a follow-up question yourself. Other prompts like Clarify, Reflect, and Hypothesize work similarly - each one takes the conversation in a slightly different direction based on what was just said.
Features used: AI Prompts (Elaborate, Clarify, Reflect, Hypothesize)
Helping someone open up
Some individuals use very few words, especially at the start. AI features help you keep the conversation going long enough for the person to relax and say more than they typically would. Quick responses through AI Prompts keep the rhythm going so there are no awkward silences. Generate Text can introduce new angles on a topic, giving the person more to respond to. Over time, a steady stream of natural-feeling questions and responses can lower the pressure enough for someone to open up in ways they might not in a face-to-face setting.
Features used: AI Prompts, Generate Text
Matching the Individual's World
Generating questions on topics you do not know
The person inside VR may want to talk about something you are unfamiliar with - a video game, a TV show, a niche hobby. You do not need to know the topic yourself. Type it into the input bar and use Generate Text to create relevant questions. The AI draws on its own knowledge of the topic, so the avatar can ask informed questions even when you cannot.
Features used: Generate Text
Using language the individual relates to
You can shape what the AI produces by adding instructions to your topic. If you are working with a younger person, try typing "weekend plans using Gen Alpha slang" or "Roblox but keep it casual." The AI adjusts its vocabulary and tone to match. Combined with the Formality dropdown set to Informal, this makes the avatar sound more like someone the individual would actually talk to.
Features used: Generate Text, Formality
Adjusting sentence complexity
The same topic can be explored at different language levels. Add instructions to your Generate Text input to control complexity - for example, "animals but use simple words for 2nd grade" for simpler vocabulary, or "climate change using academic language" for more complex sentences. This lets you match the output to the individual's current abilities without preparing everything in advance.
Features used: Generate Text
Changing formality to match the situation
A job interview requires different language than a chat with a friend. Use the Formality dropdown to switch between Formal, Neutral, and Informal for all AI-generated text. This affects both Generate Text output and AI Prompt responses. You can change it at any point during the session - start Formal for an interview scenario, then switch to Informal for a casual debrief.
Features used: Formality
Speaking the individual's language
If the person inside VR speaks a different language than you do, use Translate to have the avatar speak in their language. Type a sentence in your own language, select the target language from the dropdown, and click the globe icon. The avatar says the translated version. This means you can run a meaningful session in a language you do not speak - the AI handles the translation.
Features used: Translate
Getting gendered grammar right automatically
In many languages, the correct word form depends on the gender of the person speaking. If you prepare a sentence and one avatar says it correctly, a different avatar with a different voice gender might need different grammar. Speaker Grammar handles this automatically - the AI adjusts the grammar of each sentence to match the voice gender of the avatar before they speak. You write one sentence and it works for any avatar.
Features used: Speaker Grammar
Making Avatars Feel Real
Matching avatar voice to emotion
When you set an avatar's emotion to something other than Neutral and their voice type is WAVENET or STANDARD, the Emotional Speech feature automatically adjusts how the avatar sounds. A Happy avatar speaks with a higher pitch and faster pace. A Sad avatar sounds slower and quieter. This happens behind the scenes - you just set the emotion and the voice follows. Combined with the avatar's facial expression, this creates a more convincing character.
Features used: Emotional Speech
Customizing avatar voices
You can change individual avatar voices from the Setup screen to make them sound like someone the individual might actually encounter. Choose a voice that matches the age, gender, and accent appropriate for the scenario. Natural-sounding voices help the person inside VR engage more deeply with the experience.
Features used: Avatar voice selection (Setup screen)
Changing facial expressions in real time
During a session, change an avatar's emotion to match what the person inside VR is saying. If they tell a funny story, switch the avatar to Happy or Surprised. If they share something difficult, switch to Sad or Concerned. The person inside VR sees the avatar reacting to them in real time, which makes the interaction feel more like a genuine conversation and less like talking to a screen. Some individuals may not notice the changes at first - but once they do, it can shift their awareness of how others respond to them.
Features used: Real-time emotion controls (Session screen)
Building Someone Up
Using the avatar to encourage and validate
The Encourage, Compliment, Validate, and Acknowledge AI Prompts let you have the avatar respond positively and supportively with a single click. The avatar can tell the person they are doing well, that what they said was interesting, or that their effort is noticed. Hearing this from a virtual character in a realistic scenario can be a powerful experience - especially for someone who rarely hears it elsewhere.
Features used: AI Prompts (Encourage, Compliment, Validate, Acknowledge)
Preparation and Teamwork
Using Whisper to prepare sentences quickly
Instead of typing every sentence during Setup, use Whisper to speak them in. Click Start Recording next to a sentence field, say the sentence, and the text appears after up to 5 seconds. This is faster than typing, especially when you are preparing a large number of sentences across multiple groups.
Features used: Whisper
Standardizing sessions across a team
If you work with colleagues on a shared research project or want to keep sessions consistent across a team, you can coordinate your sentence preparation outside the software and then enter the agreed sentences into each person's own Setup screen.
A practical approach:
- Create a shared document (Word, Excel, or similar) with the questions, topics, and sentence groups your team has agreed on
- Organize sentences by group name so they match across everyone's Setup screens
- Each team member enters the sentences into their own account
- During sessions, everyone uses the same prepared material, reducing variability
This does not replace professional judgment during the session. Each person running a session can still adapt, skip, or add to the prepared material based on what happens in the moment. The shared document simply gives everyone a common starting point.
Putting It All Together
The most effective sessions often combine multiple AI features. Individually, each tool does something simple. Together, they create an experience that feels natural and responsive from the perspective of the person inside VR.
Here is what a typical flow might look like:
Start with prepared sentences. Use your pre-loaded sentence group to open the conversation with a clear topic or question.
React with AI Prompts. When the person responds, click Acknowledge, Encourage, or Clarify to keep the conversation moving without pausing to type.
Follow unexpected threads with Generate Text. If the person mentions something you did not prepare for, type that topic into the input bar and generate follow-up questions on the spot.
Adjust as you go. Change formality if the tone needs to shift. Switch the avatar's emotion to match the mood. Use Translate if you need a sentence in another language.
Transition naturally. When you are ready to move on, click New Topic or Transition to shift the conversation without an abrupt change.
Practical Tips
- Start without AI - if you are new to the software, run your first few sessions using only prepared sentences and manual typing. Add AI features once you are comfortable with the basics.
- Preview before speed - use the robot icon (preview mode) until you are confident in what the AI tends to produce. Switch to clicking the word directly only when you trust the output for that specific prompt type.
- Prepare the predictable, generate the unexpected - use sentence groups for the parts of the conversation you can plan in advance. Use Generate Text and AI Prompts for the parts you cannot predict.
- Keep reviewing - even after many sessions, continue reading AI-generated text before sending it. Automation bias grows with familiarity.
- Remember the privacy rule - never type personal or identifying information into any AI text field. Use general topics instead of specific personal details.
Tips for Faster Sessions
Practical strategies for keeping conversations flowing naturally, so the experience feels real from inside the VR headset.
The Key Principle: Prepare While They Speak
The most important habit for running fast sessions is this: while the person inside VR is speaking, you are already preparing the next thing the avatar will say. You are not waiting for them to finish before you start thinking about what comes next. You are listening to them and - at the same time - opening a sentence group, hovering over an AI Prompt, or typing a topic into the input bar.
This means the gap between the person finishing their sentence and the avatar responding can be almost nothing. From inside the VR headset, it feels like a real conversation. From your laptop, it looks like you are always one step ahead.
Every strategy in this guide works best when you keep this parallel workflow in mind. The faster you can get your next move ready while the person is still talking, the more natural the experience feels.
Using AI Prompts During a Session
AI Prompts are your fastest option for keeping a conversation going. They are the 14 buttons on the right side of the session screen - each one generates a response based on what the person inside VR just said. One click, and the avatar reacts.
Each AI Prompt button works in two ways:
- Click the robot icon next to the word - three options appear for you to choose from. This gives you control over what the avatar says before it speaks.
- Click the word itself - the avatar speaks immediately with no preview. This is faster, but you do not see the response in advance.
When you are starting out, use the robot icon so you can review what the AI produces. As you get comfortable with how each prompt type tends to respond, you can start clicking the word directly for speed.
Which prompts to use when
Not all 14 prompts are equally useful for speed. Here are the ones that help most in keeping a conversation flowing:
| Prompt | What it does | When to use it |
|---|---|---|
| Acknowledge | The avatar responds to show it heard and understood | After the person finishes speaking - buys you time to decide what comes next |
| Elaborate | The avatar asks for more detail about what was just said | When the person gives a short answer and you want them to say more |
| Clarify | The avatar asks what the person meant | When the response was unclear or you want to keep them talking on the same topic |
| New Topic | The avatar introduces a completely new subject | When the current topic has run its course and you need to move on quickly |
| Transition | The avatar smoothly shifts to a related topic | When you want to steer the conversation without an abrupt change |
| Encourage | The avatar says something positive and supportive | When the person seems hesitant or has just done something challenging |
The remaining prompts - Compliment, Thank, Apologize, Validate, Reflect, Hypothesize, Contrast, and Summarize - are useful in specific moments but come up less often during a fast-paced conversation.
A typical fast exchange using AI Prompts
Here is what a quick back-and-forth might look like during a session. Notice what you are doing while the person inside VR is still speaking:
You click a prepared sentence from the Default group: "What did you do last weekend?" The avatar asks the question.
The person inside VR starts answering. While they are still talking, you move your cursor toward the AI Prompts panel on the right and decide which one fits best.
They finish. You immediately click Acknowledge - the avatar responds to show it was listening. While the avatar is speaking, you are already deciding what comes next.
The person responds again - a short answer. While they speak, you hover over Elaborate. The moment they finish, you click it. The avatar asks for more detail.
This time they give a longer answer. While they talk, you decide the topic has run its course and hover over Transition. When they stop, you click - the avatar smoothly shifts the conversation forward.
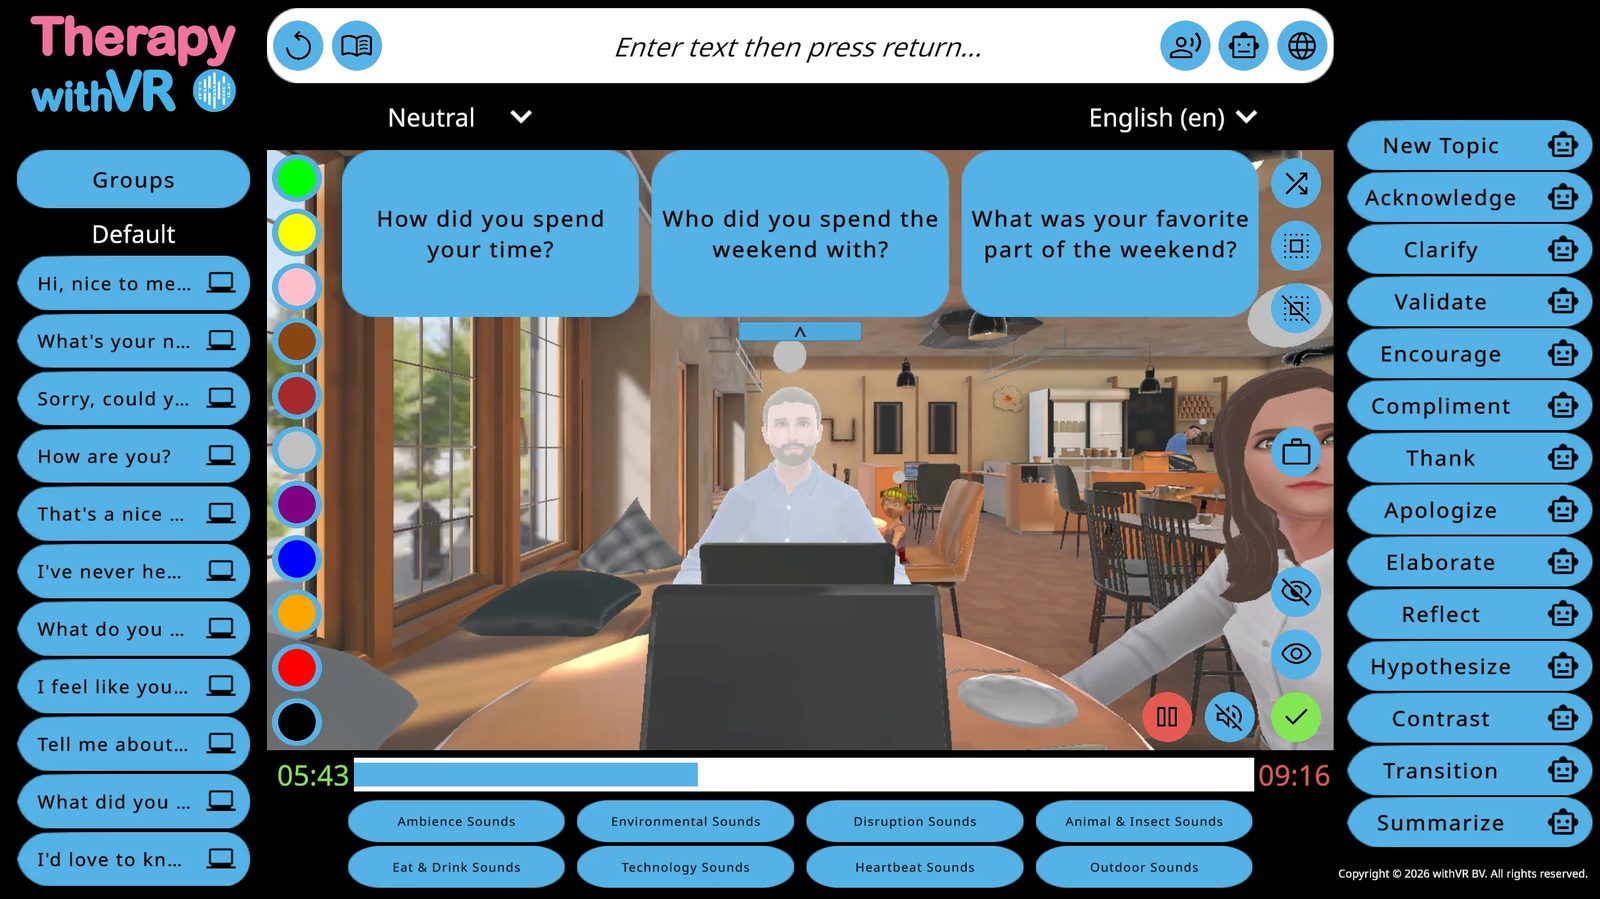
Five exchanges, zero typing. The conversation feels natural from inside the VR headset because there is almost no gap between the person finishing a sentence and the avatar responding. You are always one step ahead.
Using Generate Text During a Session
When the person inside VR mentions a topic you did not prepare for, you do not need to think of questions yourself. While they are still talking about it, type the topic into the input bar at the top of the session screen - even just one or two words. When they finish, click the Generate Text robot icon. Three questions appear as bubbles. Click one, and the avatar asks it.
For example, if the person mentions they like cooking, start typing "cooking" while they are still speaking. By the time they finish their sentence, you are ready to click the robot icon. Three questions about cooking appear instantly. You do not need to know anything about the topic yourself - the AI handles it.
You can shape what the AI produces by being more specific in the input bar. Instead of just "cooking," try "cooking for beginners" or "baking with kids." The Formality dropdown (Neutral, Informal, Formal) also affects the tone of the generated questions.
Preparing Sentences Before a Session
Clicking a prepared sentence is always faster than typing one. The time you invest before a session directly reduces the pressure you feel during it.
Where sentences live
The Sentences tab in Setup gives you 10 groups: Default, plus Groups 1 through 9. Each group holds up to 11 sentences. During a session, these groups appear on the left panel of the session screen - click a group name to expand it, then click any sentence to make the selected avatar say it immediately. While the person inside VR is speaking, you can open the group you need next so the right sentence is ready to click the moment they finish.
How to organize your groups
Think of each group as a stage of the conversation or a category of things the avatar might need to say. Here is one way to organize them for a session about ordering food in a cafe:
| Group | Purpose | Example sentences |
|---|---|---|
| Default | Opening and greetings | "Hi, welcome! What can I get for you today?" / "Take your time, no rush." |
| Group 1 | Follow-up questions | "Would you like anything else?" / "What size would you like?" |
| Group 2 | Unexpected responses | "Sorry, we are out of that today." / "I did not quite catch that, could you say it again?" |
| Group 3 | Closing the interaction | "That will be ready in a few minutes." / "Have a great day!" |
This is just one example. There is no required structure - organize groups in whatever way makes sense for your session.
Walkthrough: preparing sentences step by step
Decide what the conversation will be about. Think about the situation you have chosen, who the avatars will be, and what the individual wants to practice. Write down the key questions and responses the avatars will need.
Go to Setup and open the Sentences tab. Click the Default group. You will see 11 sentence slots. Click any sentence to edit it - type your text into the field and click Edit to save.
Fill the Default group with your opening lines. These are the sentences you will need at the start of the session - greetings, opening questions, or the first thing the avatar should say.
Use additional groups for the rest. Click Back, then click Group 1. Fill it with your follow-up questions or the next stage of the conversation. Continue with Groups 2, 3, and beyond as needed.
Rename groups to find them quickly. Click Change Name at the top of any group and give it a short, descriptive label. During the session, you will see these names on the left panel - clear labels help you find the right group fast.
Preparing together with the individual
Preparation does not have to happen alone. Some users prepare sentences together with the individual before going into VR - discussing what situations they find challenging, choosing what the avatars should say, and writing the questions together. This makes the setup itself a useful activity and means the session content is already personalized before it begins. It also gives the individual a sense of control over what they are about to experience.
Preparing outside the software for teams
If you work with colleagues on a shared research project or caseload, consider creating a shared document (Word, Excel, or similar) with your planned questions and sentences organized by group name. Each team member can then enter the same sentences into their own Setup screen. This saves time, keeps sessions consistent, and gives everyone a common starting point while still allowing each person to adapt during the session itself.
Combine Both: Click What You Prepared, Generate What You Did Not
The fastest sessions come from combining prepared sentences with AI features. Use sentence groups for the predictable parts of the conversation - opening questions, key topics, expected responses. Use Generate Text and AI Prompts for everything else - follow-up questions, reactions, new directions the conversation takes.
This way, you are never stuck typing under time pressure. You either click a prepared sentence or click an AI-generated response. The keyboard becomes a backup rather than your main tool.
The Startup Phase Takes Longer - That Is Normal
Getting the VR headset on, signing in, checking the connection, and starting the session takes more time than the session itself. Users consistently mention that most of the time pressure they feel happens during this startup phase, not during the actual conversation. This is normal and gets faster as you build a routine.
To keep the startup smooth:
- Charge the VR headset the night before - a dead or low battery during a session is the most common avoidable delay
- Check for VR app updates beforehand - the Welcome screen shows your VR app status (green, red, or blue). Update before the individual arrives, not during the session
- Keep the VR app signed in - unless your organization requires sign-out after each use, leaving the app signed in saves time at the start of the next session
- Prepare your profile and situation in advance - all settings save automatically, so you can set everything up hours or days ahead
- Have a short, familiar activity ready - while you get the connection working, the individual can browse artwork in the Waiting Room or look around the space
It Gets Easier with Practice
Users consistently report that the software feels much smoother after just a few sessions. The interface, the workflow, and the timing all become more natural with repetition. If your first few sessions feel slow or clunky, that is typical and temporary.
If possible, run a practice session on your own before your first session with an individual. Use the without VR start method to try the session screen, click through sentence groups, test the AI Prompts and Generate Text, and get familiar with where everything is. Even 10 minutes of practice makes a noticeable difference.
Spontaneous Sessions Are Possible
Once you are comfortable with the software, not every session needs extensive preparation. Some users run sessions on short notice - responding to what the individual wants to practice in the moment rather than planning everything ahead of time. With AI features handling most of the conversation, a session can come together quickly.
To make spontaneous sessions easier, keep a profile with a simple, versatile situation already set up - a Café or Classroom with a few avatars placed and neutral emotions. When the moment comes, open that profile, adjust the sentence groups if needed, and start. The AI features handle the rest.
Quick Reference
| Strategy | When to use it | Where to learn more |
|---|---|---|
| AI Prompts (single-click responses) | During a session - to react quickly without typing | Features > The Session Screen |
| Generate Text (topic-based questions) | During a session - when a new topic comes up | Features > The Session Screen |
| Prepared sentence groups | Before a session - fill in expected questions and prompts | Features > Setup: Preparing a Situation |
| Shared preparation documents | Before sessions - to coordinate with colleagues | Guides > Using AI in Your Sessions |
| Whisper (voice-to-text for sentences) | During setup - to speak sentences in rather than type | Features > AI |
| Without VR practice sessions | Before your first real session - to learn the interface | Features > Starting a Session |
| Keeping a ready-to-go profile | For spontaneous sessions on short notice | Features > Profiles |
Sessions Without a VR Headset
The web app is not just a controller for VR - it is a fully functional tool on its own. Many professionals run sessions entirely on their computer screen.
How It Works
When you click without VR on the Start screen, the session runs entirely in your browser. Everything works the same as a full VR session - avatars speak, emotions change, sounds play, AI features respond - except the experience is on your laptop screen instead of inside a VR headset. Sound comes from your computer speakers or headphones.
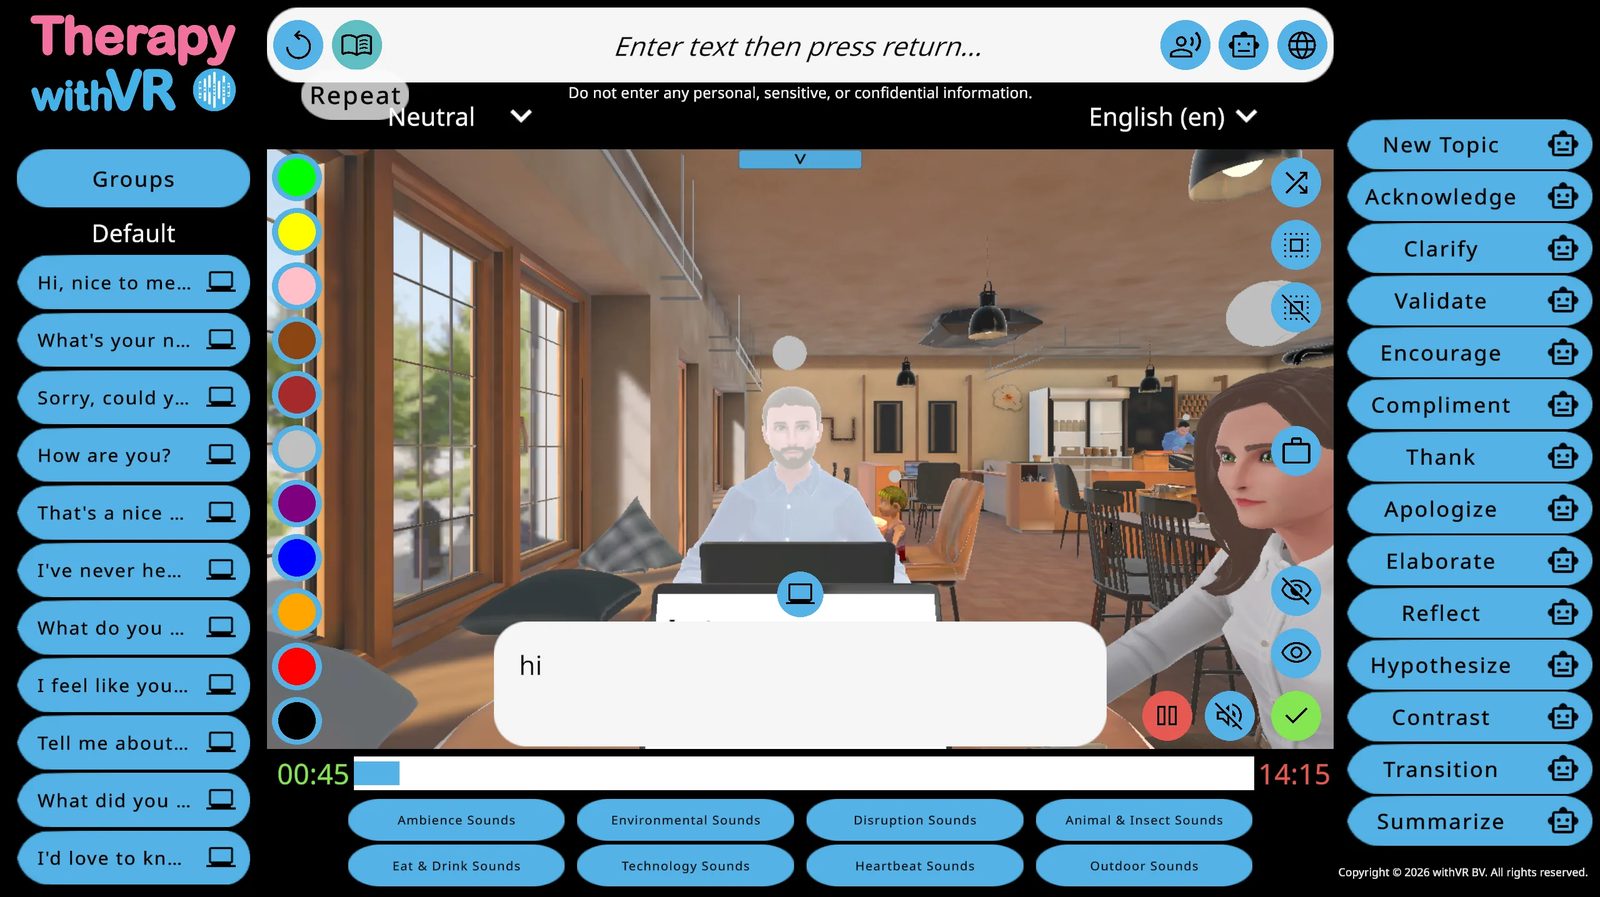
From the individual's perspective, they are looking at an animated scene on a screen. It is less immersive than VR, but the interactions, conversations, and session structure are identical.
When to Use It
Familiarization before VR
For individuals who have never been inside VR, the experience can feel unknown and unpredictable. Showing them the environment on your laptop screen first - the cafe, the classroom, the avatars - removes some of that uncertainty. They can see what the avatars look like, hear what they sound like, and understand what will happen before the VR headset goes on.
This is especially useful for younger individuals and anyone who is hesitant about trying VR for the first time. A few minutes looking at the environment on a laptop can make the transition into the VR headset much smoother.
Sessions on video calls
If you and the individual are not in the same room, you can share your screen during a video call and run the session on the web app. The individual sees the avatars and hears them speak through the call. You control everything from your laptop as usual.
This makes it possible to continue working with individuals who cannot travel to your location, or to run sessions with individuals in different regions or countries.
Tips for video call sessions
- Position matters - before starting, click on different avatar positions in Setup to find a camera angle that feels natural for the individual as a viewer rather than a controller
- Let them direct you - rather than choosing everything yourself, ask the individual what the avatars should say or how they should react. It turns the session into a collaborative exercise where they are actively thinking about the social situation
- Use emotions as a discussion tool - change an avatar's emotion mid-conversation and ask the individual how they would respond differently now that the avatar looks anxious, bored, or confused
- Pause strategically - you can pause the session to discuss what just happened or plan what should happen next. On a video call this feels more natural than in VR because the individual is not wearing a headset
- The laptop display works well on screen - since the individual is already reading a screen, text on the in-situation laptop is easy for them to follow. Display a goal, talking points, or a passage for them to read aloud while the avatars watch
- Try it as preparation for VR - walk through the situation on screen together first so the individual knows what to expect, then use VR the following week for the full experience
When the VR headset is not available
If you are visiting a school, a home, or a clinic and did not bring the VR headset, you can still run a session on your laptop. The session is less immersive, but the conversation, the avatars, and the interaction are all still there.
When the individual cannot wear the VR headset
Some individuals do not want things on their head, are too young for the VR headset to fit comfortably, or have other reasons to prefer working without it. The web app means they can still participate fully in the session without needing to wear anything.
- Jana Thompson, Speech-Language Pathologist, Flathead High School & Glacier High School, Kalispell, MT
Demos, presentations, and pitches
If you are showing the software to colleagues, managers, or an audience at a conference, you can run a live session on the web app and project it onto a large screen. This lets everyone see the environment, hear the avatars, and understand what the software does - without needing a VR headset for the audience.
You can prepare a profile in advance with avatars, sentences, and emotions ready to go, so the demo runs smoothly and shows the software at its best.
Tips for Web-App-Only Sessions
- Turn up your laptop volume - avatar voices play from your computer speakers, so make sure the volume is high enough for the individual to hear clearly. External speakers can help in louder environments.
- Position the screen so the individual can see it - if you are in the same room, angle your laptop toward them or connect to a larger screen. Remember that you also need to see the screen to control the session.
- Involve the individual in what happens - because they can see the same screen you see, web-app-only sessions naturally become more collaborative. The individual can point at avatars, ask for specific emotions, or choose which sentences to use.
- Use it as a stepping stone - a few web-app-only sessions can build familiarity and confidence before introducing the VR headset. The individual already knows the environment, the avatars, and how the conversation works - VR just adds immersion.
- Prepare sentences as usual - all features work identically, including sentence groups, AI Prompts, Generate Text, sounds, and emotions. Preparation is just as valuable for web-app-only sessions as for VR sessions.
What the VR Headset Adds
Sessions on the web app are valuable, but they are not the same as sessions in VR. Research shows that VR speaking experiences closely match real-life equivalents. The VR headset creates a sense of being physically present in the room with the avatars - and that presence is what produces the same feelings, emotions, and responses that the individual would experience in a real-world situation.
On a screen, the individual is watching a scene. In VR, they are inside it. That difference matters when the goal is to practice something that feels real - like speaking in front of a classroom, ordering at a counter, or introducing yourself to a stranger. The emotional and physical responses that come from presence - the slight nervousness, the feeling of being looked at, the sense of a real space around you - do not happen to the same degree on a flat screen.
A web-app-only session is always better than no session at all. But whenever VR is an option, it will create a more realistic and impactful experience.
What Is Different
Almost everything works the same. The key differences are:
| Feature | With VR headset | Without VR headset |
|---|---|---|
| Where the individual sees the environment | Inside the VR headset (immersive, 360-degree) | On the computer screen (the same VR preview you see on the web app) |
| Where sound plays | From the VR headset speakers | From your computer speakers or headphones |
| Sense of presence | High - the individual feels like they are physically in the room with the avatars | Lower - they are watching a screen, not inside the space |
| Feelings and responses | Closely match real-world situations - the individual experiences similar emotions, nervousness, and reactions as they would in person | Reduced - watching a screen does not produce the same level of emotional and physical response |
| Eye contact | When the eye contact button is pressed, avatars look directly at the person inside VR and follow them as they move around | When the eye contact button is pressed, avatars look toward the camera view on the web app - they still respond to the button, but do not track a person |
| All other features | Identical - avatars, emotions, sentences, sounds, AI features, timer, pause, goal rating | |
Casting and Recording
How to share the live VR view with others and how to record sessions from inside the VR headset.
Casting
Casting lets you share what the person inside VR is seeing on another screen - a phone, a computer, or a TV. This is useful when a parent, colleague, supervisor, or student wants to follow along during a session without putting on a VR headset themselves.
- Sarah Thoné, Speech-Language Therapist
Why cast instead of using the web app preview?
The VR preview on the web app shows a static camera angle of the situation - useful for controlling the session, but it does not show what the person inside VR is actually seeing in real time. Casting shows their live, first-person view: where they are looking, the avatars in front of them, and the full 360-degree environment from their perspective. If you want to see exactly what the individual is experiencing, casting is the way to do it.
What you need
- The Meta Horizon mobile app installed on your phone (available on iOS and Android)
- Your phone and the VR headset must be on the same WiFi network
- Your phone must be signed into the same Meta account as the VR headset
Method 1: Start casting from your phone (recommended)
This is the easiest method because the person inside VR does not need to do anything.
Open the Meta Horizon app on your phone.
Tap Menu and select the VR headset you want to cast from. If you do not see it listed, tap Other Devices and the app will search for it on your network.
Tap Start and choose your phone as the casting destination.
The live VR view will appear on your phone screen. The person inside VR will see a brief notification that casting has started, but they do not need to press anything.
To stop casting, tap the casting notification on your phone and select Stop Casting.
Method 2: Start casting from inside the VR headset
Press the Meta button on the right controller to open the universal menu.
Select the clock on the left side of the menu to open Quick Settings.
Select Cast.
Choose a destination: Mobile (your phone), Web (a browser), or a nearby compatible device.
Method 3: Cast to a web browser
If you prefer to view the cast on a computer screen instead of your phone, go to oculus.com/casting in Google Chrome or Microsoft Edge (other browsers are not supported). Sign in with the same Meta account as the VR headset. The live view will appear in the browser window.
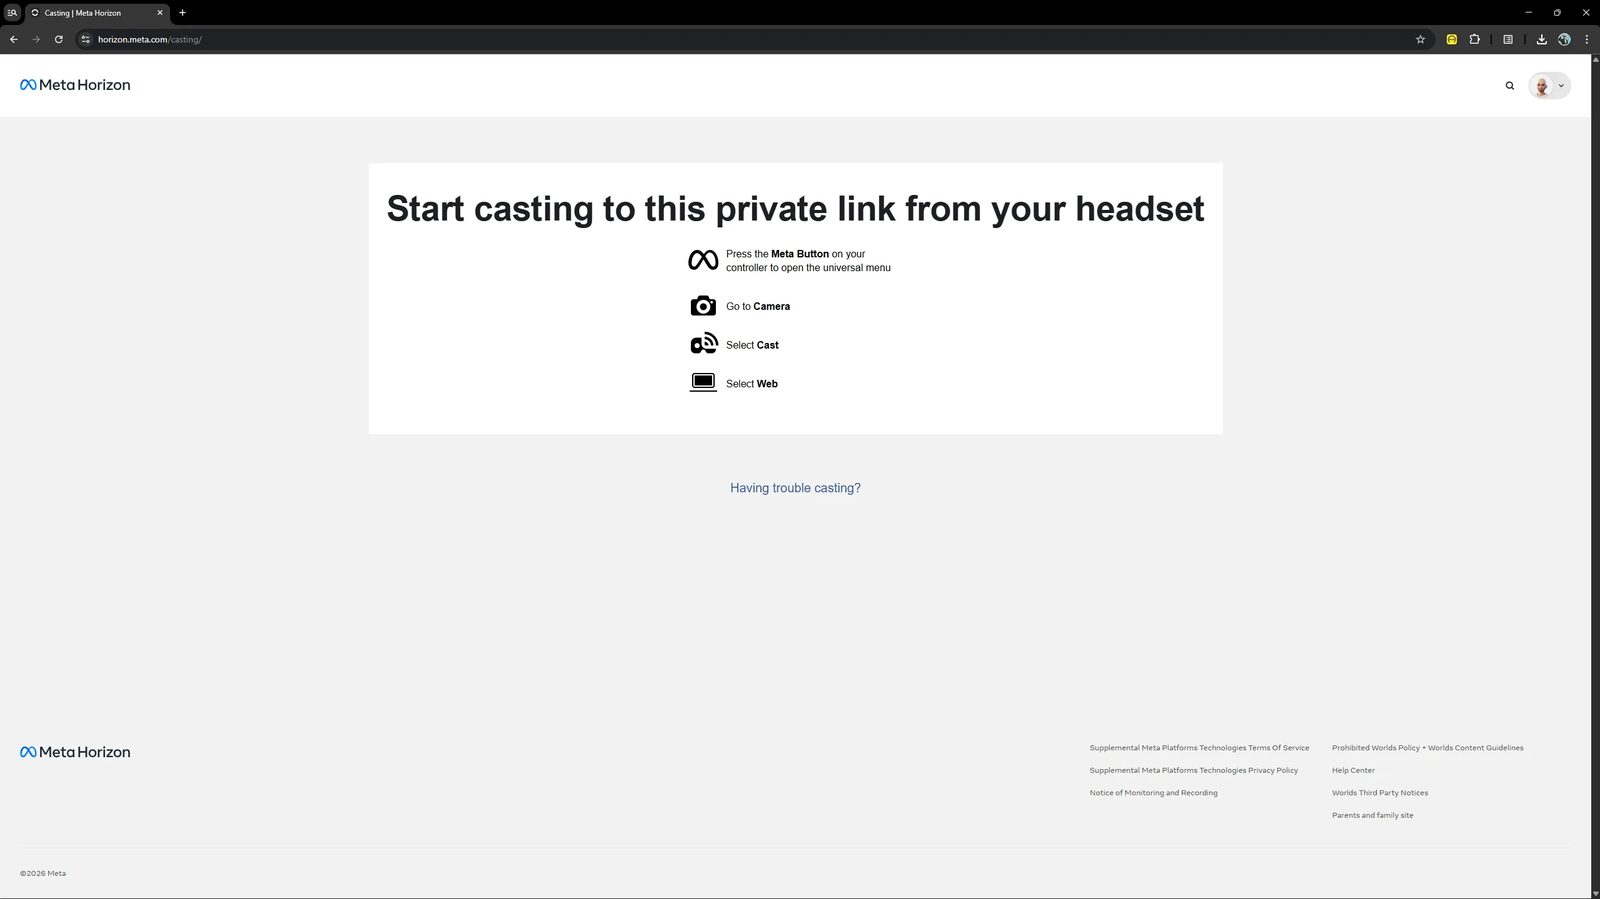
If casting does not work
- Confirm the phone (or computer) and VR headset are on the same WiFi network
- Confirm both devices are signed into the same Meta account
- Restart the VR headset, your phone, and try again
- Some corporate or institutional WiFi networks block casting for security reasons - try a personal mobile hotspot as an alternative
For more troubleshooting steps, see Meta's casting troubleshooting guide.
Recording Sessions
Therapy withVR does not include a built-in recording feature. However, the Meta Quest VR headset has a built-in video recording function that captures what the person inside VR sees. This works with any app, including Therapy withVR.
How to record
Press the Meta button on the right controller to open the universal menu.
Select the Camera icon.
Select Record Video. A red dot will appear indicating recording has started.
To stop recording, open the menu again and select Stop Recording.
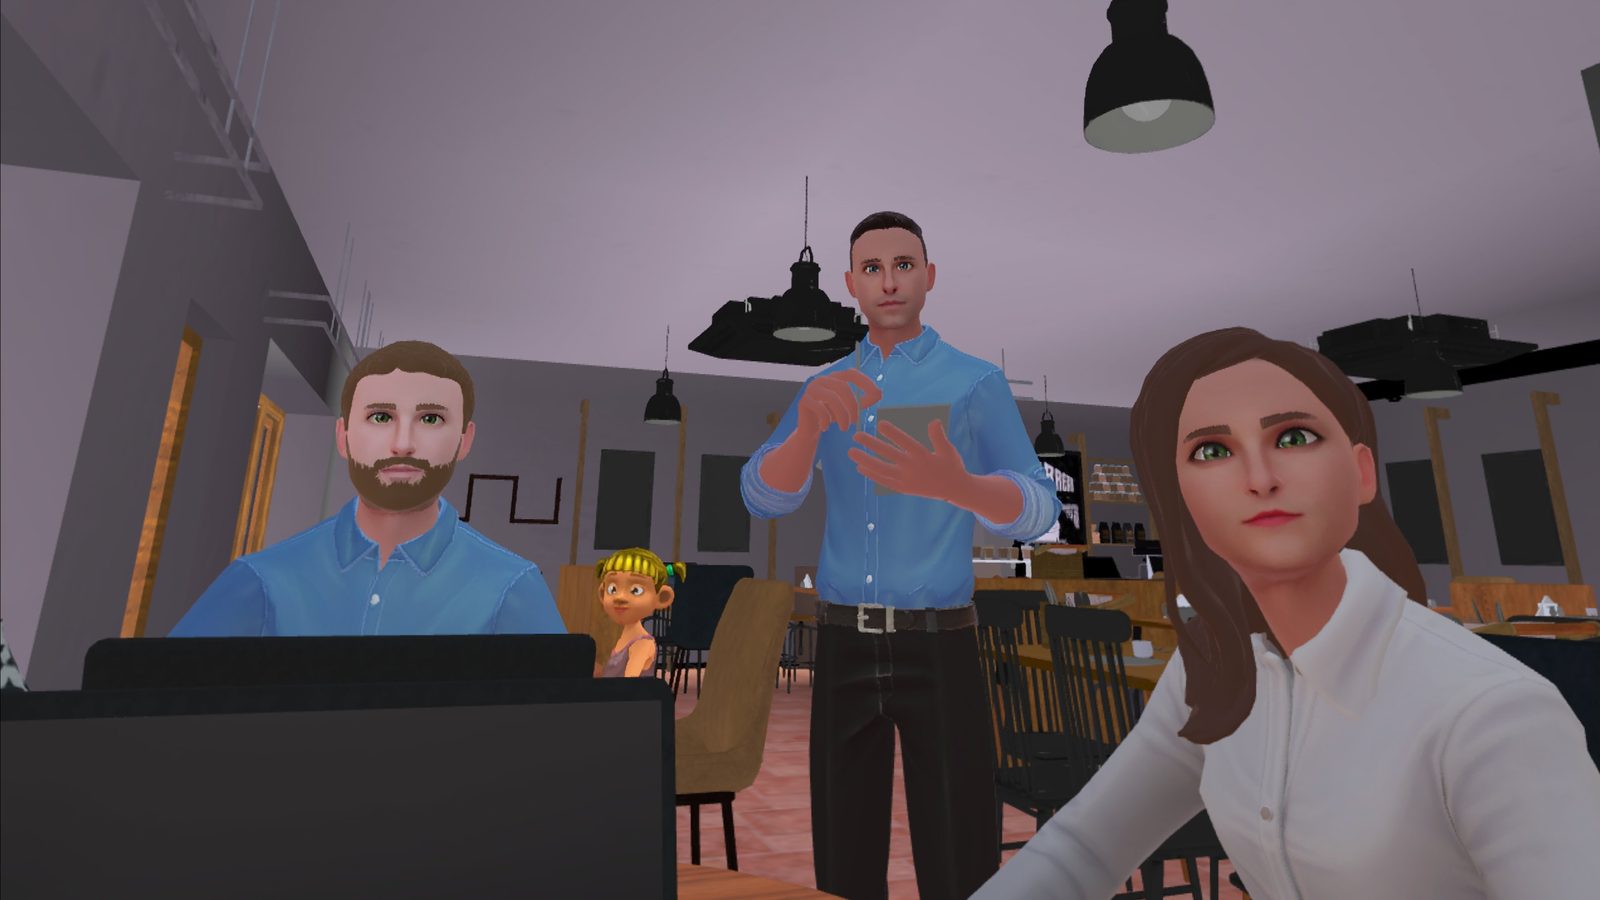
Including microphone audio
By default, recordings capture the sounds from inside VR (avatar voices, ambient sounds) but not the microphone. To include the voice of the person wearing the VR headset:
Press the Meta button and select Camera.
Select Camera Settings (top right).
Toggle Include mic audio to on.
With this enabled, the recording will capture both the avatar voices and the person's own voice, which can be useful for reviewing sessions afterward or creating demonstration videos.
Recording settings
You can customize recording quality from the VR headset settings. Go to Quick Settings > Settings > System > Camera. The available options include:
| Setting | Options | Notes |
|---|---|---|
| Video aspect ratio | Square, Landscape, Portrait | Landscape is best for sharing on social media or presentations. Square works well for social media posts. |
| Image stabilization | On / Off | Reduces shakiness from head movement. Recommended for smoother recordings. |
| Frame rate | Varies by VR headset model | Higher frame rates produce smoother video but larger files. |
| Video compression quality (bitrate) | 5 Mbps to 20 Mbps | Higher values produce better quality but larger files. 10-15 Mbps is a good balance for most uses. |
| Include mic audio | On / Off | Captures the voice of the person wearing the VR headset alongside in-app sounds. |
Accessing and sharing recordings
Recorded videos are saved to the VR headset. To access them:
- On the VR headset: Open the Camera app, then select Gallery to view your recordings
- On your phone: Open the Meta Horizon app to view and download recordings from the VR headset
- On your computer: Connect the VR headset to your computer with a USB-C cable. The VR headset will appear as a storage device. Recordings are in the video folder.
From there, you can share recordings on social media, include them in presentations, or use them for training and supervision purposes.
Session Checklist
A quick reference for every session - from preparation to debrief. Print this page and keep it next to your workstation.
Before the Individual Arrives
These steps can be done hours or days in advance. The more you prepare here, the less setup time you need during the session itself.
VR Headset
- Charge the VR headset overnight - check the small charging light on the side
- Confirm the play area is clear and a chair is in position if the individual will be seated
Web App
- Sign in at the withVR web app
- Check the VR app status on the Welcome screen: green = ready, red = update needed, blue = install needed
- Click Start to enter the Main Menu
Profile and Situation
- Create or select a profile for this individual
- Choose a situation and open the Setup screen
Setup
- Place avatars and set their emotions (Tab 1: Select Avatar)
- Prepare sentences the avatars will say (Tab 3: Sentences) - clicking a prepared sentence during a session is always faster than typing
- Set the maximum duration
- Optionally configure objects, voice settings, or art for the Waiting Room
Starting the Session
VR Headset
- Help the individual put the VR headset on and adjust the straps until the image is clear
- Use the volume buttons on the underside of the VR headset to set volume to maximum
- The individual signs in with their email and password (same credentials as the web app)
- Wait until the instruction text appears on the wall inside VR - this confirms avatars have loaded and the VR app is ready
Web App
- Click the Start arrow (right side of the Setup screen)
- Set a goal and rate confidence, or click Skip
- Click with VR
- If the VR headset is detected, the text changes to "Press the button again to start" - click again to launch
- If not detected: close and reopen the VR app, sign back in, wait for the instruction text, then try again
- If still not detected: refresh the web app and navigate back to the Start popup
During the Session
Talking to the Individual
- Click a sentence from the left panel to make the selected avatar say it
- Type anything in the top input bar and press Return
- Click the repeat icon (circular arrow, far left of the top bar) to repeat the last thing said
- Use AI Prompts (right panel) to respond quickly to what the individual just said
Controlling Avatars
- Click an avatar in the VR preview to select them (white highlight appears on the web app only)
- Click a colored circle on the left edge of the preview to change their emotion
- Click the eye icon (bottom right of the preview) to make avatars look at the individual
Sounds
- Click a sound category at the bottom to expand it, then click a sound to play it
- Click the mute icon to stop all sounds immediately
Other Controls
- Click the laptop in the VR preview to display text on the laptop screen inside VR
- Click the red pause button (bottom right) to pause everything - use this to check in with the individual
- Click the green play button to resume
Ending the Session
Web App
- Click the green tick button (bottom right of the preview)
- Confirm with Yes
- Rate the goal if you are using one, or click Skip
- You return to the Main Menu - all settings are saved automatically
VR Headset
- Let the individual know the session is over - they will return to the Waiting Room
- Give them a moment before removing the VR headset, especially if it was their first time in VR
After
- Debrief - ask how the individual felt, what they noticed, and what they would like to do differently next time
- Record notes in your own system - not in the software
- Adjust the Setup for the next session based on what you learned
Preparing Your First Session
A practical walkthrough for new users - from setup to debrief.
Before the Session
Charge the VR headset overnight. Confirm the small charging light on the side is on.
Check your VR app status on the Welcome screen of the web app. Green = ready. Red = update needed. Blue = install needed.
Create a profile and select a situation. The Café or Animal situation works well for a first session - familiar, low-pressure environments.
Set up the situation. Choose avatars with Neutral emotion, set duration to 5 minutes or less, and prepare a few simple sentences in the Default group.
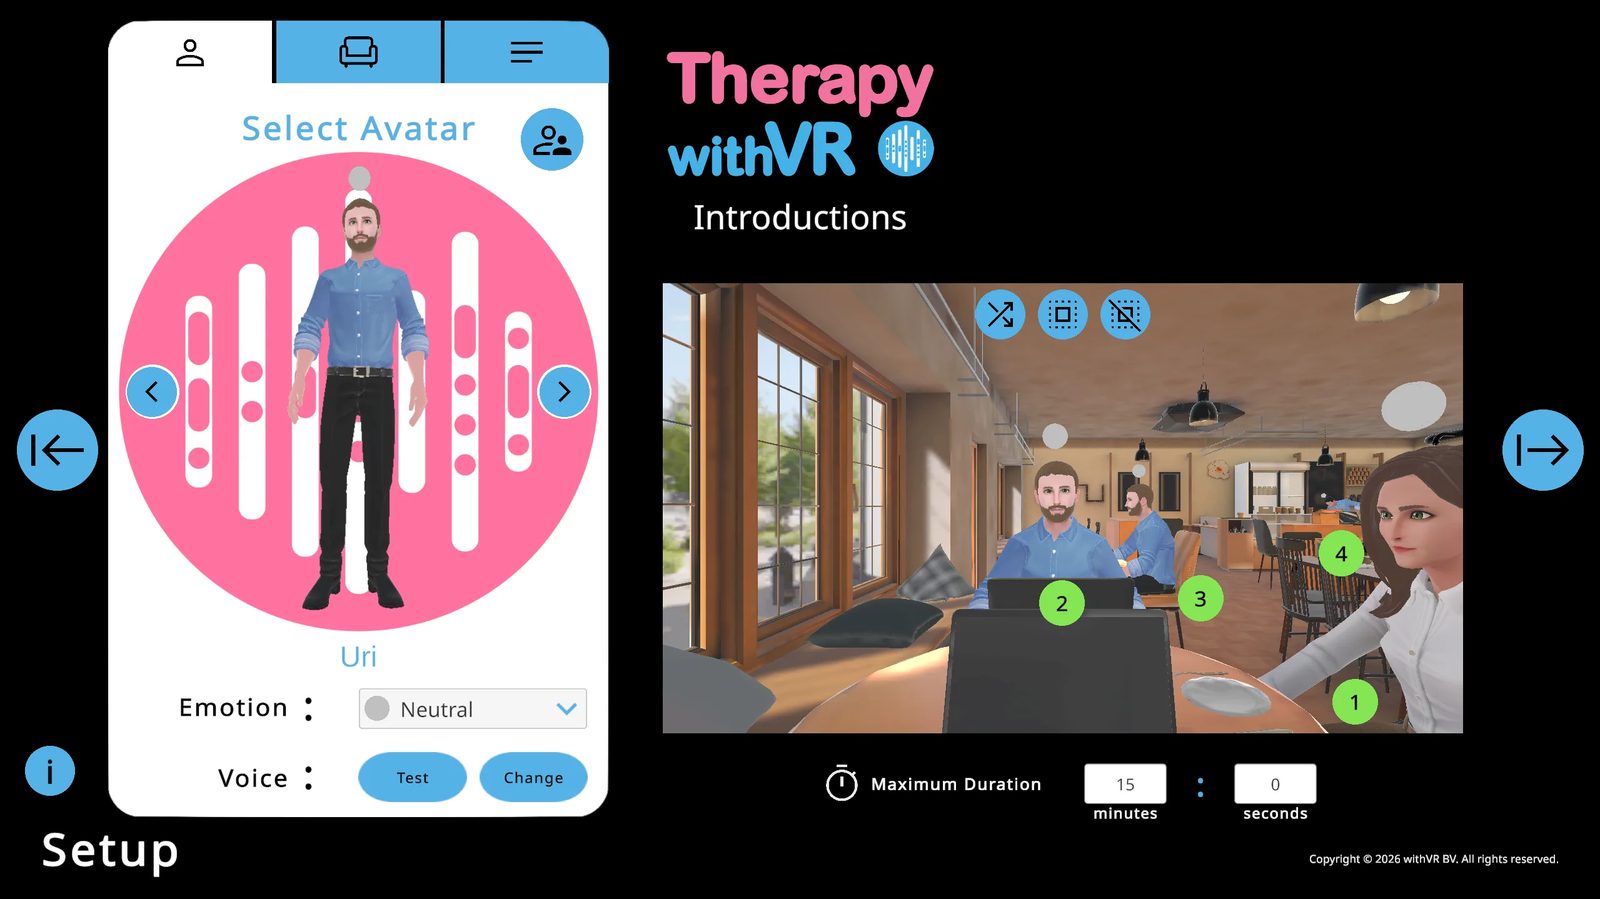
Consider involving the individual in setup. Asking them which avatars they want, where they should sit, and what they want the avatars to say is itself a valuable activity.
At the Start of the Session
Help the individual put the VR headset on. Use the volume buttons on the underside of the headset to set volume to maximum.
Let them look around the Waiting Room and get comfortable before starting.
Click the → Start arrow, complete the Goal screen, and choose with VR to begin.
During the Session
- Keep it simple - a few sentences and one or two avatars is enough for a first session
- Use the pause button freely to check in with the individual
- Follow the individual's lead - if the conversation goes off-script, that is fine and natural
- Watch for signs of discomfort, especially in the first few minutes
After the Session
- Rate the goal if you are using one, or skip it
- Let the individual take a moment before standing up
- Debrief - ask how they felt, what they noticed, and what they would like next time
- Note what worked and adjust Setup for the next session
Less is more. Prepare together with the individual. There is no wrong way to use this tool. Stay close so you can observe and respond. It is completely fine if the conversation goes off-script.
Supported Languages
Two independent language settings - one for the interface, one for your avatars.
Avatar Language loads culturally appropriate default avatars and Google Text-To-Speech voices from that region.
These settings are independent and can be different from each other.
Interface Languages
Avatar Languages
Voice Types
| Type | Quality | Pitch/Rate Adjustment |
|---|---|---|
| CHIRP3-HD | Most natural, fastest to start. Preferred where available. | Not available |
| WAVENET | Good quality, slightly more robotic. | Available |
| STANDARD | Basic quality. | Available |
Situations Overview
12 virtual speaking environments - each fully customizable and saved within your profile.
Quick Reference
| Situation | Positions | Postures |
|---|---|---|
| Café | 4 | 3 seated, 1 standing |
| Classroom | 31 | All seated |
| Bakery | 1 | Standing |
| Kitchen Table | 6 | All seated |
| Break Room | 6 | 3 seated, 3 standing |
| Meeting Room | 9 | All seated |
| Speaking Circle | 2-12 (configurable) | All seated |
| Animal | 0 human, 1 animal | - |
| Room | 2 | All seated |
| Auditorium | 6 active (197 total) | All seated |
| Reception | 2 | All seated |
| Supermarket | 1 | Standing |
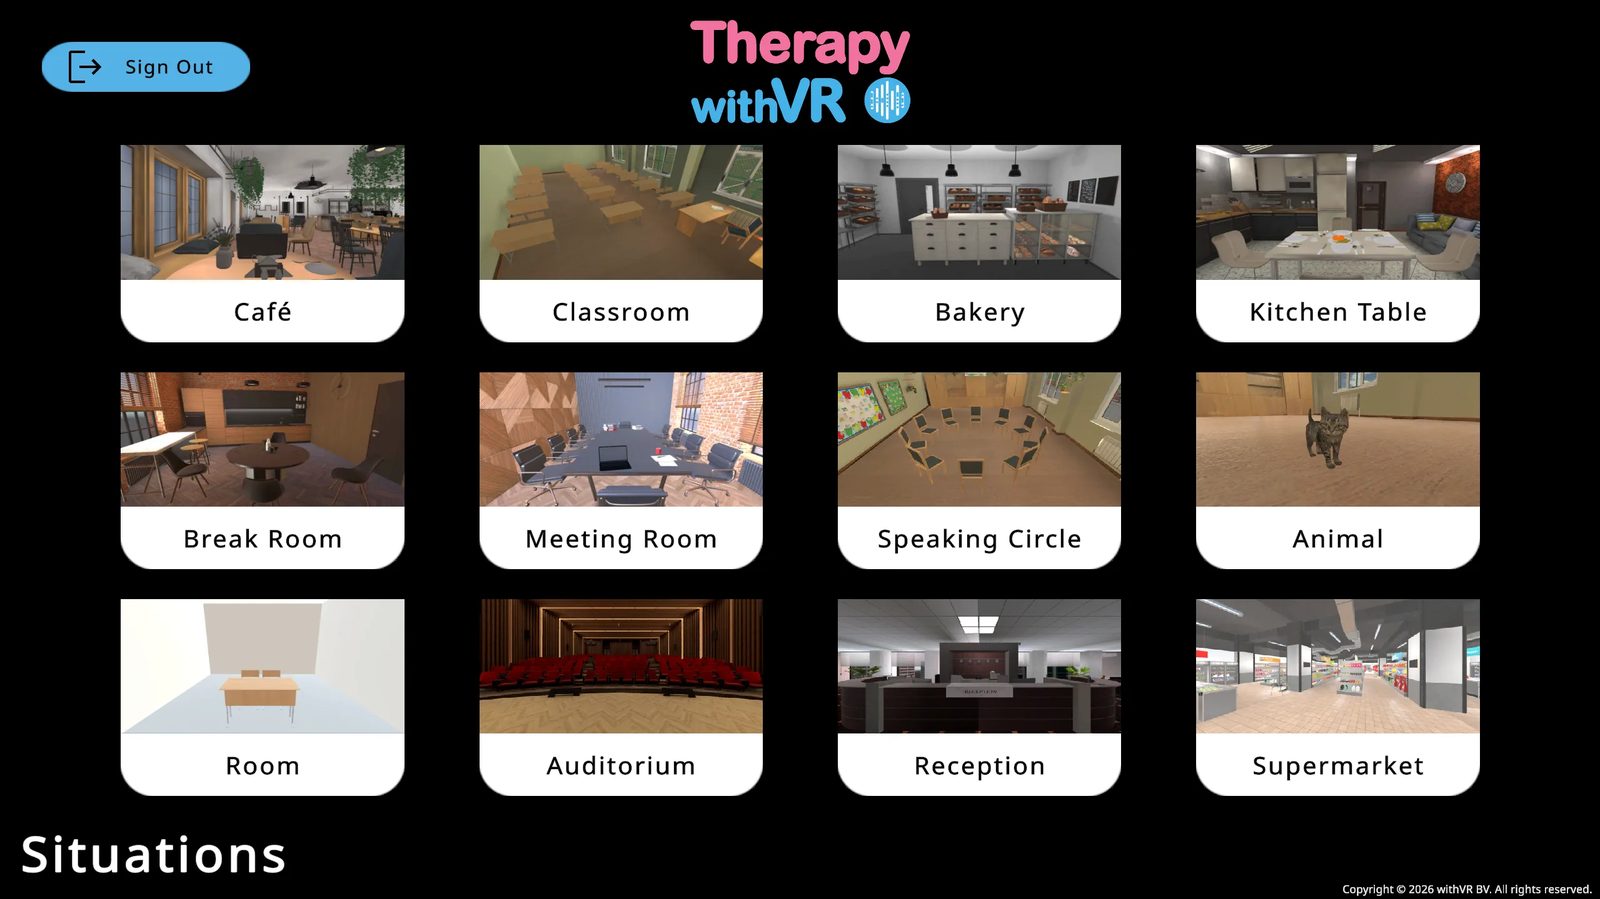
Café
A bright, modern open-plan space with large windows, natural light, and multiple seating zones. A round table in the foreground, additional seating further back. Also used as the Waiting Room before sessions begin.
Special feature: A waiter avatar behind the bar can walk to the table during a session, arriving with a notepad and pencil.
Classroom
A traditional classroom with rows of student desks, classroom decorations, and a teacher's desk at the front right. The person inside VR stands at the front, facing the class. The web app preview shows a top-corner view for setup purposes.
Bakery
A bakery interior with bread and baked goods on wooden shelves and a white service counter in the foreground. The person inside VR stands on the customer side of the counter.
Kitchen Table
A warm, domestic home dining area with a set table, plates, and cutlery. The most familiar and domestic setting of the 12 situations.
Break Room
A modern space with a round table and a contemporary kitchen in the background. One of two situations with a clear mix of seated and standing avatars in the same scene.
Meeting Room
A formal boardroom with a long conference table, warm accent wall, and laptops on the table. The person inside VR is at one end, facing the group.
Speaking Circle
A configurable circle of chairs (2-12 seats, including the person's own). The web app shows a bird's-eye view for setup. The person inside VR experiences the circle from their seat within it.
Animal
A warm room with wooden storage units and a wooden floor. An animal is present - it blinks occasionally and shifts slightly, as if present and alive. Choose Kitten or Bunny. No human avatars are visible, but a voice is still available through an invisible avatar.
Room
A minimalist room - the most customizable situation. Full control over dimensions, colors, lighting, avatar distance, and desk divider. Places full focus on the interaction.
Auditorium
A large theater-style auditorium with red upholstered seats and a stage. The person inside VR stands on the stage as the speaker, looking out at the audience. The auditorium has 197 seats, but only 6 front-center positions are currently active.
Reception
A formal reception area with a desk labeled RECEPTION, a laptop on the counter, and three wall clocks. Both avatars face outward toward the person inside VR.
Supermarket
A supermarket aisle with product-filled shelves on both sides and a warehouse-style ceiling. The person inside VR faces the avatar across the aisle.
There is no prescribed order or recommended starting point. Use situations in whatever order and combination makes the most sense for the individual you are working with.
Citing This Software
How to reference Therapy withVR in academic publications, reports, and presentations.
Citation Formats
Replace the version number with the version you used. The current version is shown in the top right corner of this documentation. If your citation style supports access dates, use the last date you accessed the software.
APA (7th edition)
MLA (9th edition)
IEEE
BibTeX
author = {withVR},
title = {Therapy withVR},
year = {2021},
note = {Version 4.0.0, Computer software},
url = {https://withvr.app}
}
Mentioning the Software in Text
On first mention in a paper or report, use the full name: Therapy withVR (withVR, 2021). After that, Therapy withVR on its own is fine. If you need to describe it briefly:
“Therapy withVR is a customizable virtual reality tool that provides real-time control over virtual speaking situations, running on Meta Quest headsets and controlled from a standard laptop (withVR, 2021).”
Version Numbers
The software is updated frequently. Including the version number in your citation helps readers understand exactly which version of the tool was used in your study. The current version is always shown in the top right corner of this documentation page. If you are unsure which version you used, contact support@withvr.app.
Access Dates
Some citation styles (MLA, IEEE) support an access date. If you include one, use the last date you used the software for your study - not the date you wrote the paper. Because the software is updated regularly, the access date helps readers understand when in the software's development your work took place.
Software Details for Reference
| Detail | Value |
|---|---|
| Software name | Therapy withVR |
| Developer | withVR |
| Location | Merelbeke-Melle, Belgium |
| First released | 2021 |
| Current version | 4.0.0 |
| Platform | Web app (the withVR web app) + Meta Quest VR headset |
| Website | withvr.app |
Glossary
Definitions of key terms used throughout this documentation.
| Term | Definition |
|---|---|
| AES (Advanced Encryption Standard) | A widely used encryption method for protecting data. Therapy withVR uses AES-256 to encrypt profile names stored in the database. |
| AI Prompt | One of 14 buttons on the right panel of the session screen (such as Acknowledge, Encourage, Clarify, New Topic). Each one generates a response based on what the person inside VR just said. See Features > The Session Screen. |
| Art | A built-in collection of artwork created by people who stutter - including poems, illustrations, comics, photographs, and paintings. Art can be displayed on the walls of the Waiting Room. See Features > Art. |
| Avatar | A virtual character inside VR. Avatars can speak, show emotions, and respond to actions you control from the web app. There are 3 default adult avatars (based on your Avatar Language) and 31 children avatars. |
| Avatar Language | The language and region setting that determines which default avatars and Google Text-to-Speech voices are loaded. Set during account creation and cannot be changed by the user afterward. See Getting Started > Web App Account Setup. |
| Boundary | The physical play area boundary set up on the Meta Quest VR headset. See Stationary Boundary and Roomscale Boundary. For setup instructions, see Meta's boundary guide. |
| Casting | Sharing the live VR view from the VR headset to another screen (phone, computer, or TV) so others can see what the person inside VR is seeing. This is a Meta Quest feature, not a Therapy withVR feature. See Guides > Casting and Recording. |
| CHIRP3-HD | The highest quality Google Text-to-Speech voice type. Sounds the most natural and is the fastest to start speaking. Preferred where available, but pitch and rate cannot be adjusted. See Reference > Supported Languages. |
| DPA (Data Processing Agreement) | A legal document required by many organizations under GDPR. Defines how personal data is processed on your behalf. Available on request from legal@withvr.app. |
| Emotion | The facial expression and mood displayed by an avatar. There are 11 emotions: Neutral, Happy, Sad, Angry, Bored, Fearful, Confused, Anxious, Excited, Calm, and Surprised. Each has an associated color. Emotions can be set during setup or changed in real time during a session. |
| EULA (End User License Agreement) | The license agreement covering your use of the VR app installed on the Meta Quest VR headset. See Legal & Privacy. |
| Eye Contact | A session control that makes selected avatars turn to look at the person inside VR and follow them as they move. Activated by clicking the eye icon on the session screen. What you see on the web app (avatars look toward the camera) is different from what the person inside VR sees (avatars look directly at them). |
| FERPA (Family Educational Rights and Privacy Act) | A US law protecting student education records. Therapy withVR does not collect or store student education records, so the platform falls outside FERPA's scope by design. |
| Firebase | A Google Cloud platform used by Therapy withVR for user authentication, database storage, and file hosting. All Firebase data is stored on servers in Frankfurt, Germany. |
| Firestore | The specific Google Cloud database service (part of Firebase) used by Therapy withVR to store account data, session data, and profile data. |
| Formality | A dropdown on the session screen that controls the tone of AI-generated text. Options are Neutral, Informal, and Formal. Affects the output of Generate Text. See Features > The Session Screen. |
| GDPR (General Data Protection Regulation) | The EU/EEA regulation governing the collection, processing, and storage of personal data. Therapy withVR is GDPR compliant. See Legal & Privacy. |
| Generate Text | An AI feature that produces three conversation questions based on a topic you type into the input bar. Click the robot icon next to the input bar to generate them. See Features > The Session Screen. |
| Goal | An optional text and confidence rating (1-10) that can be set at the start of a session and rated again at the end. Goal data is saved but not currently processed into reports. See Features > Starting a Session and Features > Ending a Session. |
| Google Text-to-Speech | The Google service used to generate avatar voices. When an avatar "speaks," the text is sent to Google's servers and returned as audio. See CHIRP3-HD, WAVENET, and STANDARD for voice quality types. |
| HIPAA (Health Insurance Portability and Accountability Act) | A US law governing protected health information (PHI). Therapy withVR is designed so that PHI does not enter the system. See Legal & Privacy. |
| Interface Language | The language used for the web app's menus, buttons, and labels. Can be changed at any time from Settings. Independent of the Avatar Language. |
| Maximum Duration | The time limit for a session, set during setup. When the countdown timer reaches zero, the session ends automatically. See Features > Setup: Preparing a Situation. |
| Meta Horizon app | The mobile app (iOS and Android) used to manage your Meta Quest VR headset. Also used for casting and accessing recordings. Previously called the Oculus app and the Meta Quest app. See Meta's guide. |
| Meta Quest | The VR headset brand made by Meta. Therapy withVR is compatible with the Meta Quest 2, Quest Pro, Quest 3, and Quest 3S. See Getting Started > Choosing Your VR Headset. |
| PHI (Protected Health Information) | Any individually identifiable health information under US law (HIPAA). Therapy withVR is designed so that PHI does not enter the system. |
| Position | A numbered location inside a situation where an avatar can be placed. Each situation has a fixed number of positions (for example, the Café has 4, the Classroom has 31). Positions appear as blue circles in the VR preview during setup. |
| Profile | A saved set of session settings for a specific use case or individual. Each profile stores avatar placements, emotions, sentences, voice settings, duration, and goals for every situation. See Features > Profiles. |
| Roomscale Boundary | A VR headset boundary type that allows the person to move around within a defined area. The VR headset displays a warning when they approach the edge. Useful if the person wants to walk or move during a session. |
| Sentence Group | A collection of pre-written sentences that avatars can say during a session. There are 10 groups (Default plus Groups 1-9), each holding up to 11 sentences. Prepared in the Sentences tab during setup. See Features > Setup: Preparing a Situation. |
| Session | A live VR experience controlled from the web app. During a session, you make avatars speak, change emotions, play sounds, and interact with the person inside VR in real time. Sessions have a maximum duration set during setup. |
| Situation | One of 12 virtual environments where sessions take place - Café, Classroom, Bakery, Kitchen Table, Break Room, Meeting Room, Speaking Circle, Animal, Room, Auditorium, Reception, and Supermarket. See Reference > Situations Overview. |
| STANDARD | A basic quality Google Text-to-Speech voice type. Pitch and rate can be adjusted. Used where higher quality voice types are not available for a particular language. See Reference > Supported Languages. |
| Stationary Boundary | A VR headset boundary type for staying in one place, either sitting or standing. Sufficient for most Therapy withVR sessions. |
| TLS (Transport Layer Security) | A security protocol that encrypts data as it travels between your devices and the server. Therapy withVR uses TLS 1.2 or higher for all connections. |
| VR App | The Therapy withVR application installed on the Meta Quest VR headset. The person inside VR uses this app. It receives real-time updates from the web app during a session. |
| Waiting Room | The empty cafe-style room the person sees inside VR after signing in and before a session starts. The Waiting Room may display artwork on its walls. The person returns to the Waiting Room when a session ends. See Guides > The Waiting Room (VR). |
| WAVENET | A good quality Google Text-to-Speech voice type. Slightly more robotic than CHIRP3-HD, but pitch and rate can be adjusted. Children's avatars always use WAVENET voices. See Reference > Supported Languages. |
| Web App | The main control interface at the withVR web app, accessed in any web browser. Used for setup, running sessions, managing profiles, and all real-time control of what happens inside VR. |
| Whisper | An OpenAI speech recognition feature that converts spoken words into text. Used in Therapy withVR to speak sentences into the microphone instead of typing them. Requires OpenAI features to be enabled in Settings. |
Troubleshooting & Common Issues
Most issues can be resolved quickly. Try these fixes before contacting support.
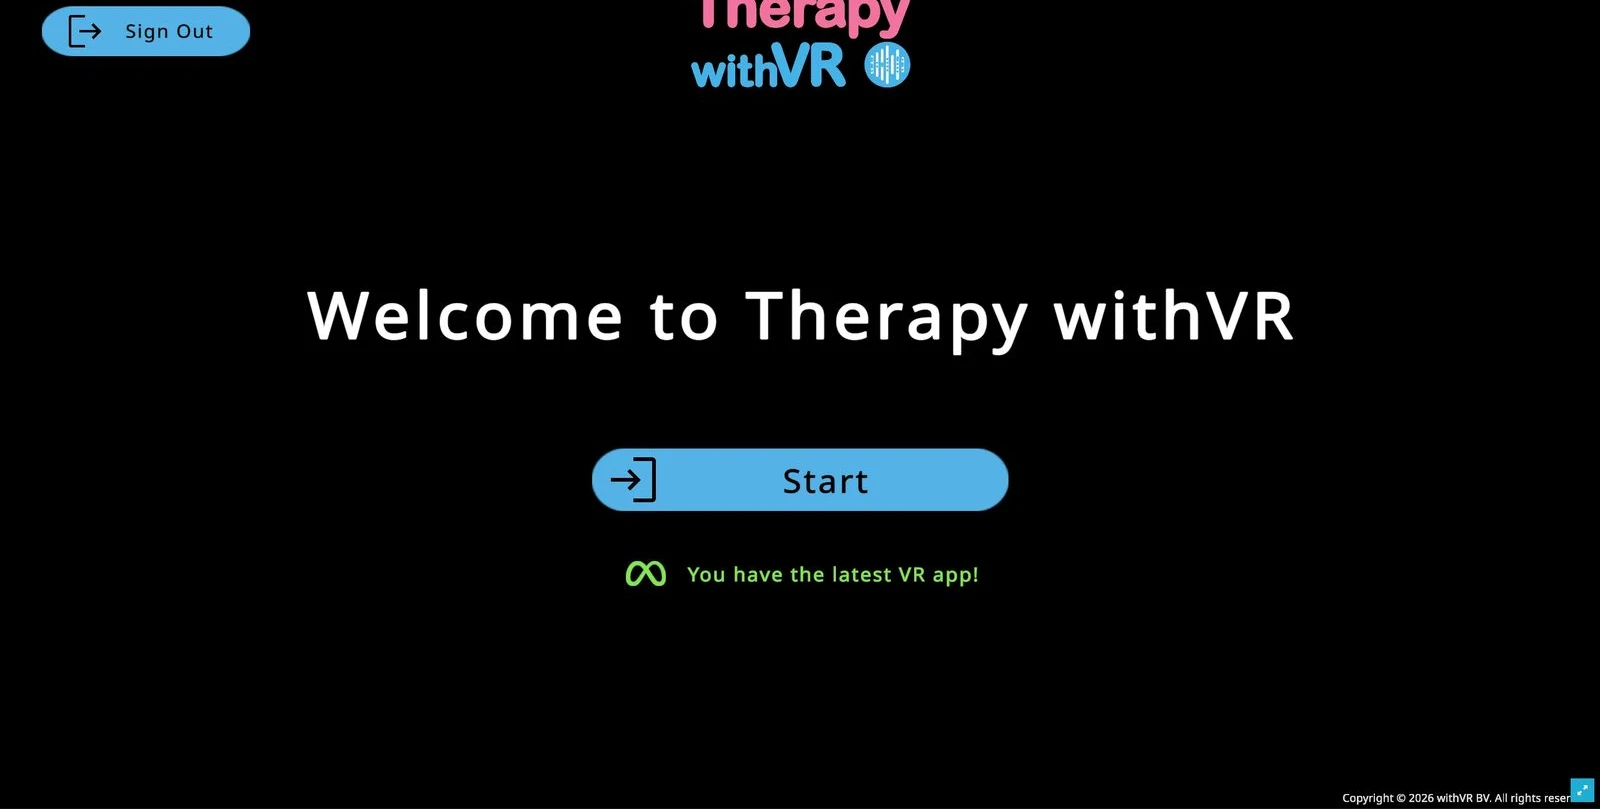
Quick Reference
| Problem | Try first | If that does not work |
|---|---|---|
| Cannot connect to the software | Try a personal mobile hotspot instead of your current WiFi | Check if IT is blocking the required domains (see Organization and IT below) |
| Loading is slow | Close other applications (especially video calls) and unused browser tabs | Try a different browser (Chrome recommended) or a different network |
| VR app is crashing or restarting | Charge the VR headset fully - low battery causes crashes | Hold the power button for 30 seconds to hard reset, then charge and try again |
| Avatars are not loading | Close and reopen the VR app | Check WiFi connection. Restart the VR headset. Try a mobile hotspot. |
| No sound | Use the volume buttons on the underside of the VR headset | Check your computer volume for web-app-only sessions. Restart the VR app. |
| Cannot sign in | Confirm you are using your Therapy withVR credentials, not your Meta account | Sign out and back into the web app first to confirm your password, then try VR |
Setup & Installation
I did not receive the Meta invitation email
Check your spam and junk folders. Make sure you emailed hello@withvr.app with the correct Meta account email address. Contact us if you still have not received it.
The Accept link in the invitation email is hard to find
The link is embedded in the body text of the email - it is not a large button. Read the full email carefully.
Therapy withVR does not appear in my App Library
Restart your VR headset after accepting the invitation (hold the power button until the screen goes black, wait 5 seconds, then hold again to turn back on). Open the menu, go to Library (Navigator) or Apps (older UI), and make sure the filter is set to All rather than "Installed". Use the search field in the left-hand menu to type "therapy" if scrolling is slow.
My Quest looks different from the screenshots - there is no bar at the bottom
Meta rolled out a new interface called Navigator in 2026. It replaces the old bar across the bottom. Press the Meta button (right controller) or pinch your thumb and index finger together in front of you (hands) to open it. Your apps are in the Library tab. Everything in these docs works for both the old and new UIs.
I cannot get the menu to open with my hands - pinching my wrist does nothing
Meta removed the wrist-pinch shortcut in late 2025. Pinch your thumb and index finger together in front of you - not on your wrist - or pick up a controller and press the Meta button. If your hands are unresponsive, the room may be too dim: hand tracking needs decent light. Turn on a light or use the controllers.
The Open or Update button is missing from the Therapy withVR card
Known bug in recent Meta Quest updates. Restart the headset (hold power until black, wait 5 seconds, hold again to turn on). The buttons should return.
A or B buttons do not seem to select anything
They are not supposed to - the trigger (back of the controller, under your index finger) is the select button. A, B, X, Y and the grip buttons do not click in the Meta Quest menu system.
Do I need to install MetaLink, Meta Quest Link, or Oculus Link?
No. None of those are needed. Those tools are for playing PC-VR games by tethering a Quest to a gaming computer - a completely different use case. Therapy withVR runs natively on the headset, not tethered to your laptop. Your laptop runs the Web App in a browser; the two communicate over the internet. If your IT team asks what they need to install on a managed laptop, the answer is nothing - just browser access to the domains listed in Organization and IT below.
I cannot connect to WiFi during VR headset setup
If you are in a large organization, contact your IT department to allow the Meta Quest headset and Therapy withVR on the network. A personal mobile hotspot is a reliable alternative. The VR headset and laptop do not need to be on the same network.
Signing In
I forgot my password
Sign out of the web app, click Manage on the Sign In page, enter your email, and click Reset Password. Refresh the web app after resetting before signing in again.
I selected the wrong Avatar Language when signing up
Your three default avatars are assigned based on the Avatar Language you chose at sign-up. You cannot change this yourself after your account is created. Contact hello@withvr.app to have your avatars updated manually. You can change individual avatar voices yourself at any time from the Setup screen.
I cannot sign into the VR app
Make sure you are using your Therapy withVR web app credentials - not your Meta account credentials. If unsure of your password, sign out and back into the web app first to confirm it works, then use the same credentials in VR.
Languages & Voices
My avatar sounds accented when I type in another language
Each avatar has its own voice, and every voice is trained on one specific language. A French voice pronounces French naturally but reads German text with a strong French accent - because the voice model does not know German phonology. This is not a bug; it is how text-to-speech voices work.
To fix this: change the avatar's voice to one in the target language.
Open the Setup screen in the Web App.
Select the avatar you want to speak in a different language.
Click Change next to the voice name, then select the new language and pick a voice in that language (CHIRP3-HD voices sound the most natural).
Click Test to confirm it sounds right.
Repeat for every avatar you want to switch. Each avatar is independent - you can have one French avatar and one German avatar in the same scene.
I changed the software language but the avatars still use the old language
The software interface language (Settings > Language) is separate from avatar voices. Avatar voices are set individually per avatar in the Setup screen. See the question above for steps.
Using the Translate feature vs. changing avatar voices
Two different approaches:
- Translate (AI feature): you type in your language, and the AI translates the text to the avatar's current language before it is spoken. The avatar keeps its existing voice. Useful when you do not speak the target language yourself.
- Change avatar voice: the avatar speaks directly in the new language. Useful when you do speak the target language and want to type in it directly, or when practicing with a client whose language matches one of your avatars.
Controller Issues
I cannot select anything inside VR
| What people press | Result |
|---|---|
| A or B buttons (top of right controller) | Does not select |
| Grip (side of controller) | Does not select |
| Trigger (back of controller, under index finger) | Correct - use this |
Position & Orientation Inside VR
Facing the wrong direction or in the wrong position
Point the controller straight ahead and press and hold the Meta button on the right controller until the view resets. For more detail, see Meta's guide to resetting your view.
VR App Issues
App stuck on loading / avatars not loading
Close and reopen the VR app. If that does not help, restart the VR headset (hold power button until black, wait a few seconds, then hold again to turn on).
Update available
Go to App Library on the VR headset, find Therapy withVR, press it, and select Update Now. After updating, open the app and wait for the instruction text to appear before returning to the web app.
Web App Issues
Buttons are cut off or not fully visible
Click the blue maximize button in the bottom right corner to expand to full screen.
VR headset not detected when starting a session
Close and reopen the VR app, sign back in, wait for the instruction text, then try the with VR button again. If still not detected, refresh the web app and navigate back to the Start popup.
Sound Issues
Cannot hear avatar speech or sounds
With VR method: Use the volume buttons on the underside of the VR headset to turn the volume up. The exact position varies by headset model, but they are always on the bottom edge. Set to maximum for sessions so anyone nearby can also hear clearly.
Without VR method: Check your computer volume and audio output settings.
Sound is still playing when I want it stopped
Click the speaker with a line through it icon in the bottom right area of the session screen.
Organization & IT
IT department is blocking the software or VR headset
This is the most common barrier in hospitals, schools, and universities. Your IT department needs to allow access to specific domains for the software to work. Copy the section below and send it directly to your IT team.
Web App (used by the professional on a laptop or desktop)
withvr.app- Web App and platform assetsfirestore.googleapis.com- databasefirebasestorage.googleapis.com- file storagetexttospeech.googleapis.com- avatar voice synthesisapi.openai.com- optional AI features, only if enabled by the user
VR App (used by the person in the headset)
firestore.googleapis.com- real-time session datafirebasestorage.googleapis.com- avatar models and platform assetstexttospeech.googleapis.com- avatar voice synthesiswithvr.app- scenes, objects, and localization data
The VR App does not connect to OpenAI.
Meta Quest headset (operating system)
The Meta Quest headset also requires access to Meta platform domains for its own operating system. These are managed by Meta and are outside the control of withVR BV. Required domains: meta.com, facebook.com, fbcdn.net, akamaihd.net, oculus.com, graph.oculus.com, graph.facebook.com. Required ports: TCP 443 and 3478, UDP 50000-59999.
Enterprise Wi-Fi (eduroam) does not work with VR headsets
University and hospital Wi-Fi networks that use enterprise authentication (such as eduroam or EduRAM) are not compatible with Meta Quest headsets. The headset cannot handle the authentication step. Use a personal mobile hotspot or a guest Wi-Fi network instead. This applies only to the VR headset - the Web App works on any network.
VPN or antivirus software blocking the Web App
If the Web App will not load or features are missing, check whether a VPN or antivirus program is blocking access to the domains listed above. Try temporarily disabling the VPN, or ask IT to add exceptions for withvr.app and the Google domains.
Performance
Loading is slow or the Web App feels sluggish
- Close other applications - especially video calls. Running Zoom with video alongside the Web App can cause significant slowdowns and battery drain.
- Close unused browser tabs - the Web App needs system resources to render the VR preview.
- Try a different browser - Chrome generally performs best.
- MacBook users - if loading takes longer than 30 seconds, try refreshing the page. A personal hotspot may be faster than institutional Wi-Fi.
Low battery causes unexpected problems
When the VR headset battery is low, it can cause a chain of problems that look like software bugs: the app may restart repeatedly, hand tracking may stop working, and controllers may disconnect. If you experience any of these, charge the headset fully before troubleshooting further. If the headset is stuck in a restart loop, hold the power button for 30 seconds to force a hard reset, then charge it.
Contact
| Contact | |
|---|---|
| General enquiries and access requests | hello@withvr.app |
| Technical support | support@withvr.app |
| Legal and data protection | legal@withvr.app |
Reporting an Issue
If something is not working as expected, let us know. Your reports help us improve the software for everyone.
What to Include
The more detail you can provide, the faster your issue can be resolved. When you email us, try to include the following:
| Information | Why it helps |
|---|---|
| What you were doing | Which screen were you on? Were you in the middle of a session, setting up, or signing in? |
| What happened | Describe what you saw - an error message, unexpected behavior, a crash, or something that did not respond. |
| What you expected to happen | This helps us understand the gap between what should have happened and what actually did. |
| Which VR headset | Meta Quest 2, Quest 3, Quest 3S, or Quest Pro. |
| Which web browser | Chrome, Firefox, Safari, Edge, or another browser. |
| A screenshot | If possible, take a screenshot of what you see on the web app. This is often the single most helpful thing you can send. |
You do not need to include all of this for every report. A short description of what went wrong is always a good starting point - follow-up questions may be asked if more detail is needed.
How to Report
Send an email to support@withvr.app with as much of the above information as you can. You will receive a response as quickly as possible.
Legal and Privacy
Policies, agreements, and information about how your data is handled.
Published Documents
The following documents are available on the withVR website:
| Document | Description |
|---|---|
| Privacy Policy | How personal data is collected, used, stored, and protected. Covers both the Web App and the VR App. |
| Terms of Service | The terms under which you use Therapy withVR, including permitted use, account responsibilities, and limitations. |
| End User License Agreement (EULA) | The license agreement covering your use of the VR App installed on the Meta Quest headset. |
| Cookie Policy | Every cookie used by the platform, its purpose, retention period, and how to manage preferences. |
| Refund and Return Policy | Subscription cancellation, the EU 14-day withdrawal right, and the subscription pause option. |
| Acceptable Use Policy | Rules for appropriate platform use. |
| Accessibility Statement | Current accessibility features and known limitations for both the Web App and the VR App. |
| EU AI Act Compliance Statement | AI risk classification, Article 5 review, and Article 50 transparency obligations. |
| Educational Use Policy | Guidance for universities and training programs using Therapy withVR in educational settings, including student data handling. |
| Sub-Processor List | All third-party services that process data on behalf of withVR BV, including Google Cloud, Google Text-to-Speech, OpenAI, Stripe, MailerLite, and Google Analytics. |
| VPAT v2.5 | Voluntary Product Accessibility Template documenting the platform's conformance with accessibility standards (completed March 2026 for v4.0.0). |
Available on Request
The following documents are available on request for institutional procurement or compliance purposes. Contact legal@withvr.app to receive a copy.
| Document | Description |
|---|---|
| Data Processing Agreement (DPA) | Standard GDPR Article 28 DPA template for institutional use. Covers security measures, sub-processor details, and breach notification. |
| Business Continuity and Disaster Recovery Summary | Infrastructure resilience, data backup and recovery procedures, incident response priorities, and network requirements for IT teams. |
| Patch Management Policy | How software updates are managed, tested, and deployed for both the Web App and VR App. |
| Research Agreement | For research teams using Therapy withVR in academic studies. Covers data handling, publication guidelines, and approved use in experimental protocols. |
Data and Privacy Summary
A summary of how Therapy withVR handles data. For full details, refer to the Privacy Policy above.
Where data is stored
All data is stored on Google Cloud servers in Frankfurt, Germany (EU). This applies to account data, session data, and profile data.
What data is collected
- Account data - name and email address, used for sign-in and account management
- Session data - timing, avatar positions, emotions triggered, sentences sent, sounds played, and goal ratings. No audio or video is ever recorded. Nothing the person inside VR says is captured by the software.
- Profile data - profile names (encrypted with AES encryption in the database), labels, and goals (stored as plain text)
What is not collected
- No audio or video recordings from sessions
- No recording of what the person inside VR says or does
- No health data, diagnostic information, or protected health information (PHI)
AI features and third-party services
AI features are off by default. When enabled, some text input is sent to OpenAI for processing (Generate Text, AI Prompts, Translate, Autocorrect, Whisper). Avatar voices are synthesized using Google Text-to-Speech. No personally identifiable information about the person inside VR is sent to any AI provider as part of normal use.
Data retention
Different types of data are retained for different periods after a subscription ends:
- Account and subscription data - 5 years after subscription ends
- Session and profile data - 3 years after subscription ends
- Billing and transaction records - 7 years (Belgian accounting law)
You can request earlier deletion at any time.
Data export and deletion
- Data export - available on request within 30 days. Contact hello@withvr.app.
- Data deletion - requests handled in accordance with applicable data protection law (within one month under GDPR). Contact legal@withvr.app.
Compliance
GDPR (EU/EEA)
Therapy withVR is GDPR compliant. All data is stored within the European Economic Area. A Data Processing Agreement (DPA) is available on request.
HIPAA (US)
Therapy withVR is designed so that Protected Health Information (PHI) does not enter the system. No client names, diagnoses, health records, or other identifiable health data is collected or stored. Because PHI does not enter the system, a Business Associate Agreement (BAA) is not required. This is an architectural choice - the platform is built to avoid PHI entirely.
EU AI Act
Avatar voices are synthesized using Google Text-to-Speech. When AI features are enabled, some session content - such as suggested sentences, translations, and autocorrected text - is AI-generated. Under the EU AI Act (Article 50, applicable from August 2026), users must ensure the individuals they work with are informed that avatar voices and some session content may be AI-generated.
Contact
| Contact | |
|---|---|
| General inquiries and access requests | hello@withvr.app |
| Technical support | support@withvr.app |
| Legal and data protection | legal@withvr.app |
Suggest a Feature
Every situation and feature in this software started as a suggestion from someone like you.
If there is something you wish the software could do - a new situation, avatar option, control, or workflow improvement - your suggestion is welcome. Suggestions from the people who use Therapy withVR every day are what shape its development.
No idea is too small. Whether it is a new environment, a different age range for avatars, a shortcut that would save you time during sessions, or something you noticed while working with an individual - it all helps.
Send Your Suggestion
Fill in the form below and click Send suggestion. Your email app will open with the details pre-filled - just press Send.
Prefer Email?
Send your suggestion directly to hello@withvr.app with "Feature suggestion" in the subject line.